1. Overview
This portfolio documents my contributions to modsUni, a software engineering module project. This module was taken in my second year during the first semester.
modsUni was developed by a team of five over a period of seven weeks. It is a desktop application made for local undergraduates to quickly generate a schedule. The schedule will contain a list of modules to take in each semester, throughout their entire university candidature. modsUni is also designed for users who prefer typing commands instead of using a mouse to interact with the application.
2. Summary of Contributions
This section documents the various contributions that I have made to modsUni.
-
Major enhancement: Implemented generate command
-
Minor enhancement: Implemented loading of modules database
-
Code contributed: Functional Code
-
Other contributions:
-
Project management:
-
Set up labels and milestones in Github
-
Closed milestone v1.3
-
-
Enhancements to existing features:
-
Modified browser panel to load in web pages from different addresses
-
Created a loading screen before a user logs in or registers
-
-
Documentation:
-
Community:
-
Tools:
-
Updated configuration file for a third party framework, Reposense: (Pull request #219)
-
Setup Slack notifications on Travis build status
-
-
3. Contributions to User Guide
Given below are sections I contributed to the User Guide. They showcase my ability to write documentation targeting end-users. |
Generate schedule: generate
Generates a schedule based on the modules that has been added using addModuleS command.
Format: generate
| This command can only be executed when logged in using a student account. |
Example:
-
To generate a schedule successfully, follow the following steps:
-
addModuleS CS1010 CS2030 CS2040 CS2103T -
generate
The schedule will be displayed as shown in figure 1 below.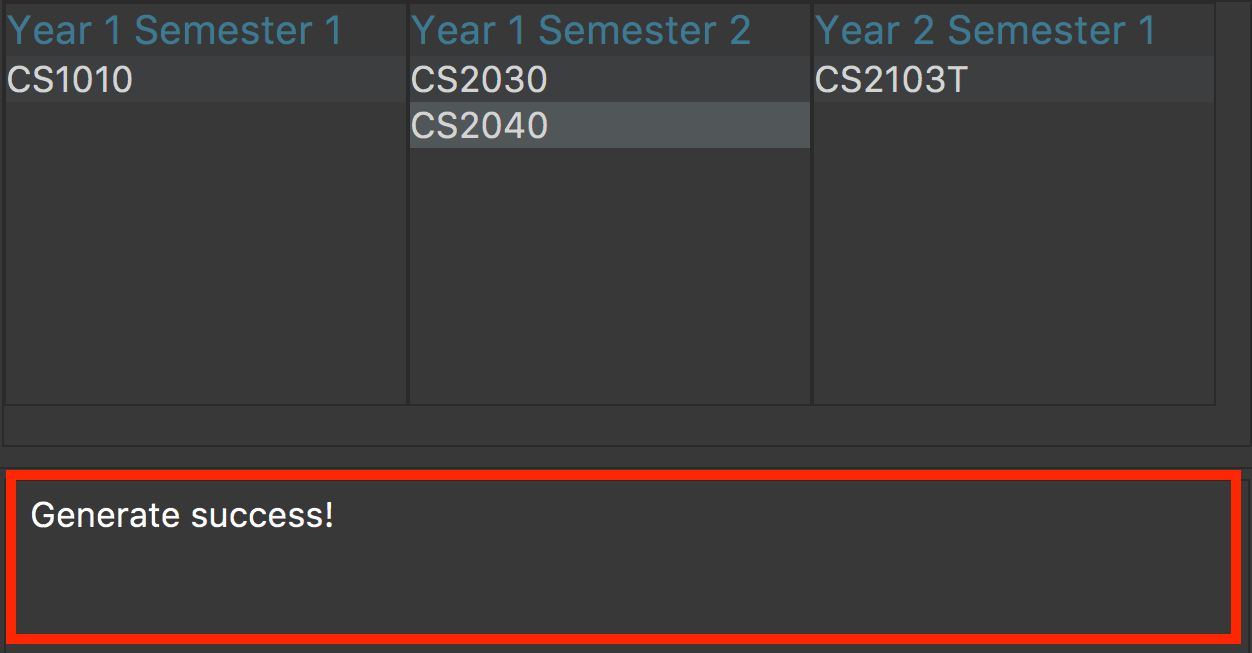
Figure 1. An example of a schedule
If the command has executed successfully, the message in the red box will say "Generate success!". -
There are instances where the command will fail to generate a schedule. The following is a list of possible reasons why a failure might occur and the steps required to resolve it.
Examples of possible failures:
-
Missing prerequisites
The following message in figure 2 will be shown for this failure.

Figure 2. Error message shown when there are prerequisites are missing.
Steps to rectify:
-
Execute
showModule CS2030to identify the missing prerequisite module as shown in figure 3.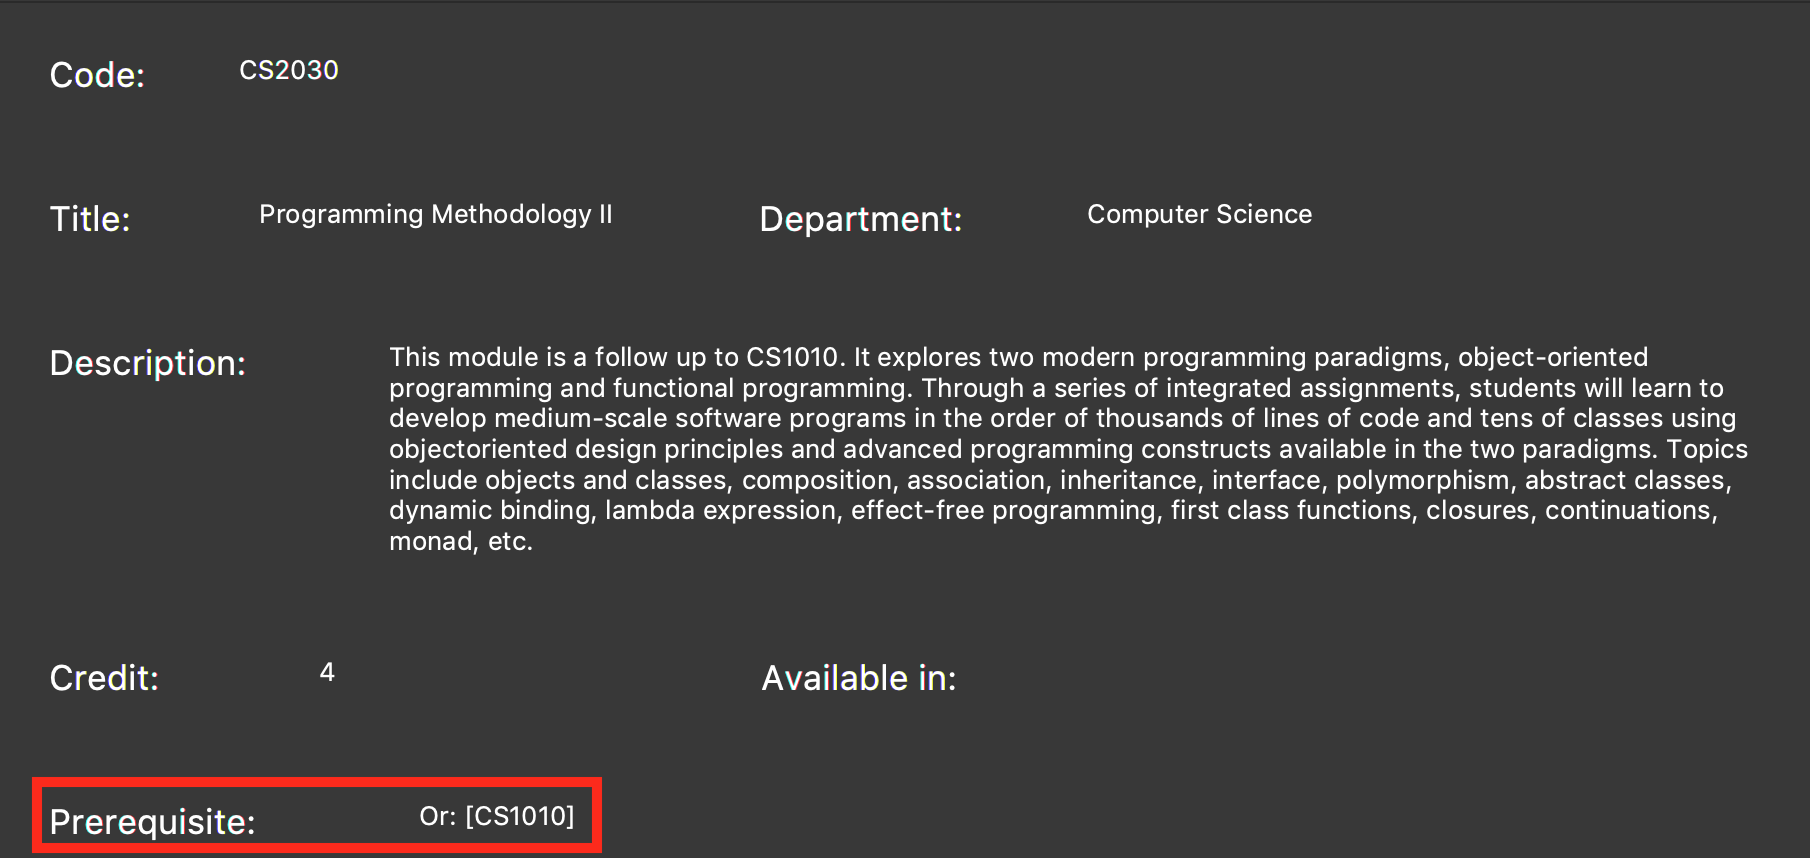
Figure 3. Output of the
showModule CS2030command.The prerequisites are shown in the red box. -
Add the missing prerequisite module using
addModuleS CS1010. -
Run the
generatecommand again. -
Verify the application’s output with the figure 4 as shown below. The green box should show the schedule and message in the red box should say "Generate success!".
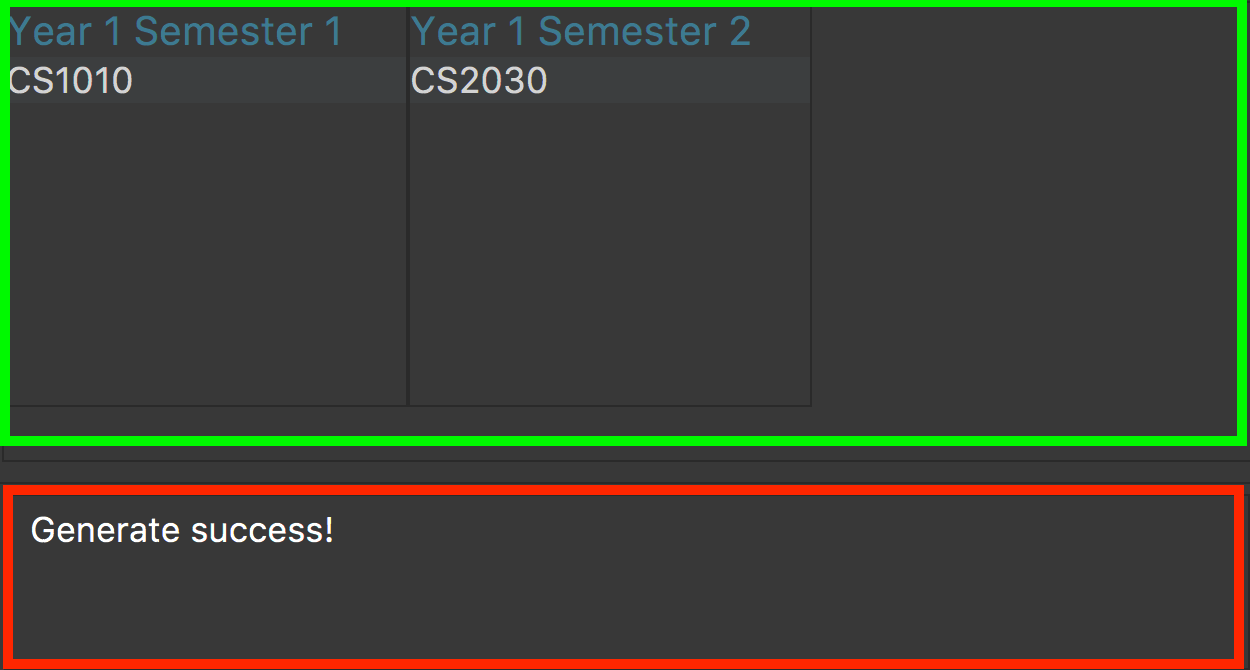
Figure 4. Output when the schedule has been successfully generated.
-
-
No modules added to staged list
The following message in figure 5 will be shown for this failure.

Figure 5. Error message shown when there are no modules in the staged list.
Steps to rectify:
-
Add a module to your staged list using
addModuleS CS1010. -
Execute
switch tab/stagedto ensure that the module has been successfully added to your staged list.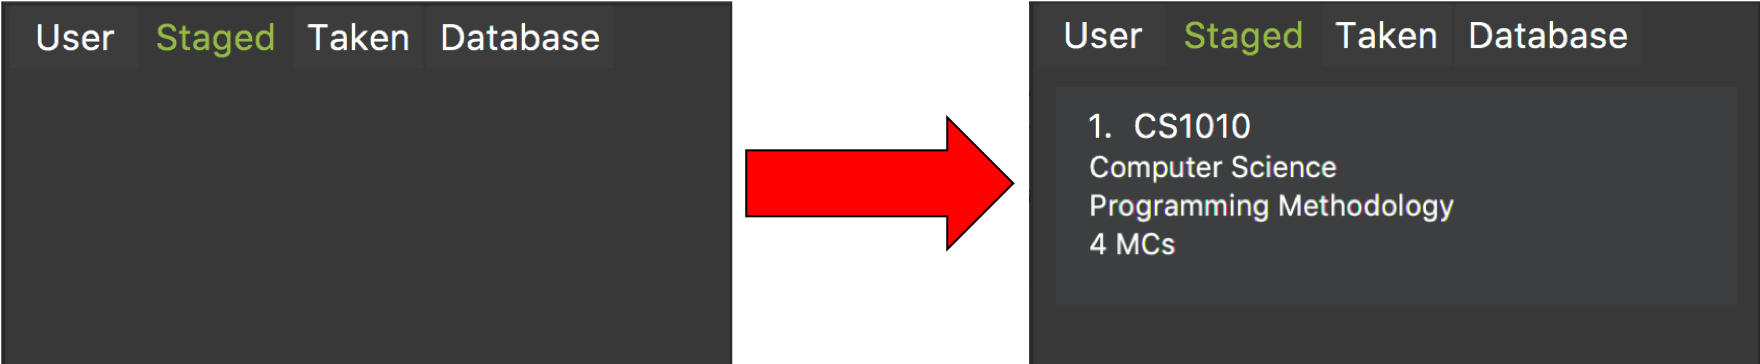
Figure 6. Before and after ouput after adding a module to the staged list.
-
Run the
generatecommand again. -
Verify the application’s output with the image below. The green box should show the schedule and message in the red box should say "Generate success!".
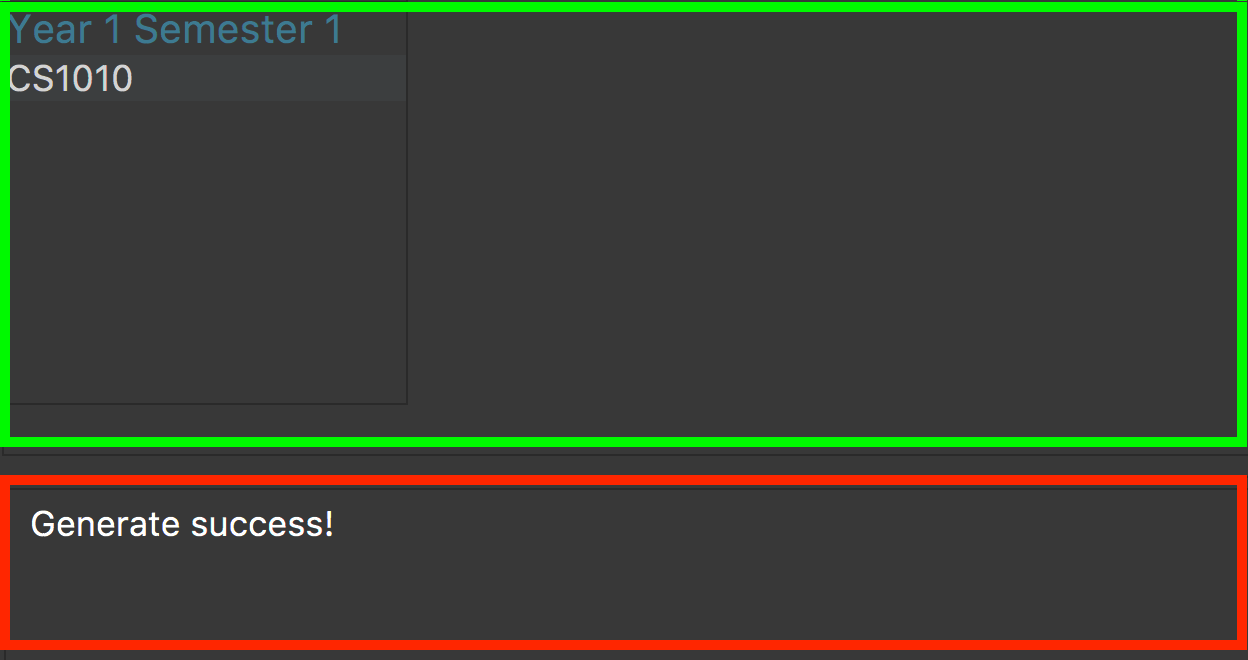
Figure 7. Output when the schedule has been successfully generated.
-
4. Contributions to Developer Guide
Given below are sections I contributed to the Developer Guide. They showcase my ability to write technical documentation and the technical depth of my contributions to the project. |
Generate Schedule Feature
This feature is for student users to generate a schedule containing the modules to take in each semester
during their entire university candidature. It is executed using the generate command.
The generate command can only be executed by users of type Student.
|
The section below will describe in detail the current implementation and design considerations of the
generate command.
Current Implementation
The sequence diagram shown below in Figure 8 illustrates the interactions between some of these components when the command is executed.
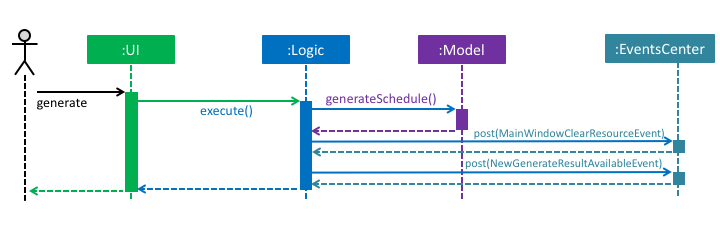
Figure 8. High Level Sequence Diagram for generate command
The command is facilitated by the following classes:
-
Generatecommand class
TheGeneratecommand class extends from theCommandclass. Figure 9 below depicts the UML diagram for theGeneratecommand class.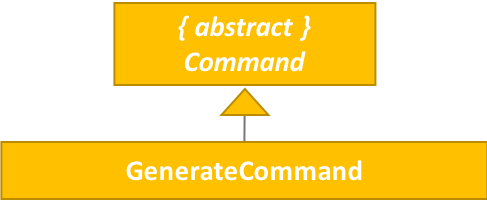
Figure 9. Generate command UML Diagram
-
Modelclass
The following methods in theModelclass are used in this command:-
isStudent()
This method checks if the current user is a student. -
canGenerate()
This method checks if it is possible to generate a schedule. -
generateSchedule()
This method generates a schedule.
-
-
Generatefrom theLogicpackage.
This class is used to encapsulate the processes for generating a schedule. The following methods are used in this command:-
canGenerate(Student)
This methods checks if all the module prerequisites from the student’s staged list is met. It does this by merging the staged and taken module list together.
Using the merged list, it extracts out the list of module codes. Each module in the staged list is checked to see if the prerequisite condition can be met. The following code snippet shows this process:public static Optional<List<Code>> canGenerate(Student student) { List<Code> cannotTakeCode = new ArrayList<>(); List<Code> codeChecklist = student.getTakenAndStageCode(); UniqueModuleList modulesStaged = student.getModulesStaged(); for (Module module : modulesStaged) { if (!module.checkPrereq(codeChecklist)) { cannotTakeCode.add(module.getCode()); } } // return list of codes that failed to met prerequisite condition or an empty value if the list is empty. } -
generateSchedule()
This method will create a schedule using modules that are in the student’s staged list.
It does this by going though the list of modules and removing those that satisfies the prerequisite condition. As it removes, the module code is added to a temporary list. This list is used during the checking of prerequisite conditions for the remaining modules.
The following code snippet will provide a clearer explanation of how the method works:public SemesterList generateSchedule() { SemesterList semesterList = new SemesterList(); Semester newSemester = new Semester(); List<Code> taken = new ArrayList<>(); while (modulesStaged.size() > 0) { for (Module element : modulesStaged) { if (element.checkPrereq(taken)) { // Remove module from staged list // Add module to semester and temporary list } } semesterList.addSemester(newSemester); newSemester = new Semester(); } return semesterList; }
-
This class is different from the Generate command class. The command class is for the execution of the
command, while the current one is for creating the schedule.
|
Execution phase of the generate command
Figure 10 below shows an overview of the steps performed during the execution phase of the command.
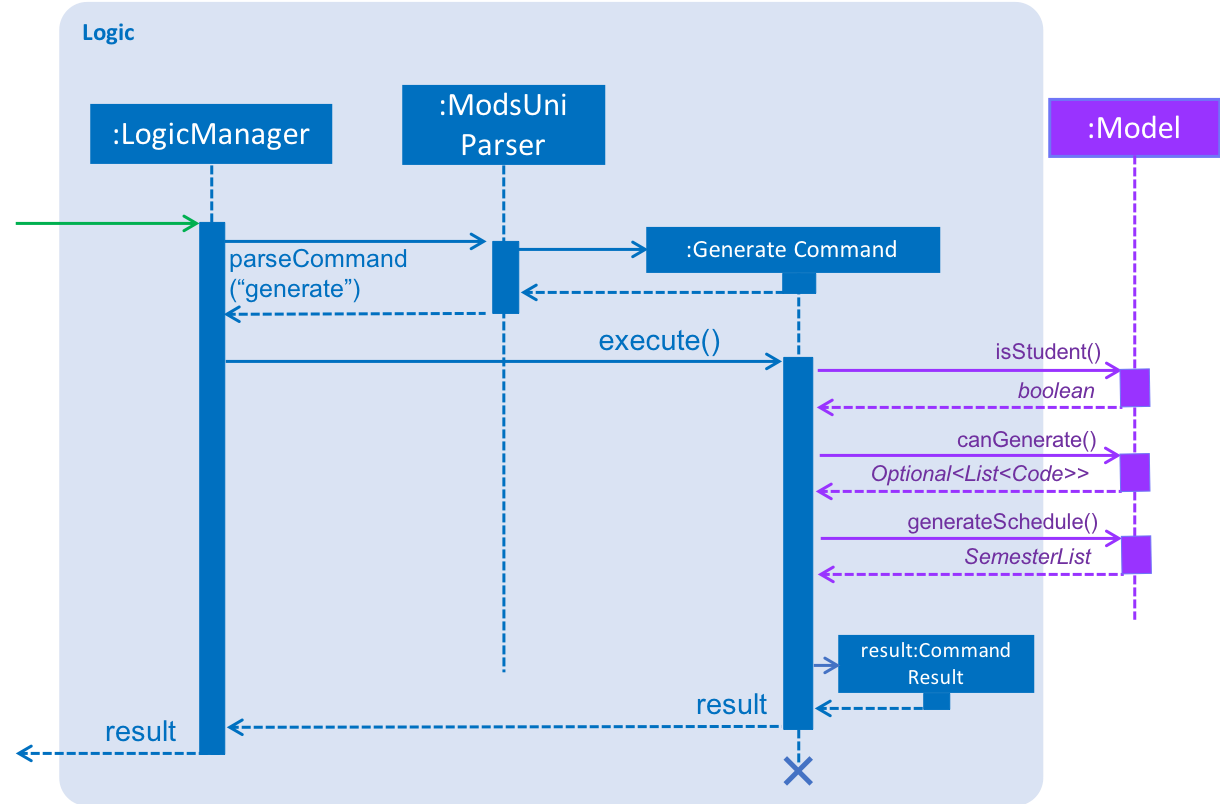
Figure 10. Sequence diagram for the interaction between Logic and Model Components when executing
generate.
In the execute method of the command, the following checks are performed:
-
Type of user account
This step checks if a user has logged in and the current user is a student. It is performed as only student accounts are able to generate a schedule. -
Modules in staged list
This step ensures that there modules are available to add into the schedule. -
Staged modules prerequisites
This step verifies that the prerequisites for all modules in the staged list are met. It is done to ensure that it is possible to generate a schedule.
If any of the checks fails, an error will be thrown. The following code snippet illustrates the
checking process:
if (model.getCurrentUser() == null) {
    throw new CommandException(MESSAGE_ERROR);
}

if (!model.isStudent()) {
    throw new CommandException(MESSAGE_INVALID_ROLE);
}

if (!currentStudent.hasModuleToTake()) {
    throw new CommandException(MESSAGE_NO_MODULES);
}

if (cannotTakeCodes.isPresent()) {
    return new CommandResult(MESSAGE_FAILURE + cannotTakeCodes.toString());
}
After passing all the checks, the command will proceed on and generate a schedule. To display the schedule in the user interface, two events will be created.
-
MainWindowClearResourceEvent
It is created to inform the current panel in the main window to clear it’s resources. -
NewGenerateResultAvailableEvent
This event will show the generated schedule in the main window.
These events will be sent to EventsCenter to process and execute it.
Example scenario of the generate command
Given below is an example usage scenario of how the generate command behaves:
The user launches the application for the first time and the currentUser will at this point be null.
Issuing the generate command at this point will throw an error message indicating to the user that they have
not registered an account or they are currently not logged in.
In order to utilise the generate command, the user must perform one of the following options:
-
The user executes
register user/demo …to register a newStudentaccount, followed byaddModuleS cs1010. -
The user executes
login user/demo pass/P@ssw0rdto log into account, followed byaddModuleS cs1010.
A new Student would be initialized and automatically set as the currentUser. The module cs1010 would
also be added to the student’s staged module list, enabling the student to perform generate command. |
Design Considerations
Aspect: Placement of methods for generating a schedule
-
Alternative 1 (current choice): Use a separate
Generateclass in theLogicpackage to encapsulate the processes for generating a schedule.-
Pros: Modification made to the generating of schedule does not affect the
Studentmodel. -
Cons: This approach adds complexity to the design of the application.
-
-
Alternative 2: Adding the logic for generating the schedule to the
Studentmodel.-
Pros: This alternative is easier to implement.
-
Cons: It breaks the single responsibility principle of the
Studentmodel.
-
Aspect: Checking of prerequisites before generating a schedule
-
Alternative 1 (current choice): Perform checks to ensure that all prerequisites for modules in staged list are fulfilled.
-
Pros: Ensures that the command will not cause an infinite loop.
-
Cons: The command will not always be able to generate a schedule as students may forget to add in the prerequisite modules.
-
-
Alterative 2: Assume that prerequisites for all modules are met.
-
Pros: Reduces the time complexity of the command.
-
Cons: The command might end up with an infinite loop as it keeps on trying to arrange the modules.
-