By: Team W17-2 Since: Sep 2018 Licence: MIT
1. Setting up
1.1. Prerequisites
-
JDK
9or laterJDK 10on Windows will fail to run tests in headless mode due to a JavaFX bug. Windows developers are highly recommended to use JDK9. -
IntelliJ IDE
IntelliJ by default has Gradle and JavaFx plugins installed.
Do not disable them. If you have disabled them, go toFile>Settings>Pluginsto re-enable them.
1.2. Setting up the project in your computer
-
Fork this repo, and clone the fork to your computer
-
Open IntelliJ (if you are not in the welcome screen, click
File>Close Projectto close the existing project dialog first) -
Set up the correct JDK version for Gradle
-
Click
Configure>Project Defaults>Project Structure -
Click
New…and find the directory of the JDK
-
-
Click
Import Project -
Locate the
build.gradlefile and select it. ClickOK -
Click
Open as Project -
Click
OKto accept the default settings -
Open a console and run the command
gradlew processResources(Mac/Linux:./gradlew processResources). It should finish with theBUILD SUCCESSFULmessage.
This will generate all resources required by the application and tests. -
Open
XmlAdaptedCredential.javaandMainWindow.javaand check for any code errors-
Due to an ongoing issue with some of the newer versions of IntelliJ, code errors may be detected even if the project can be built and run successfully
-
To resolve this, place your cursor over any of the code section highlighted in red. Press ALT+ENTER, and select
Add '--add-modules=…' to module compiler optionsfor each error
-
-
Repeat this for the test folder as well (e.g. check
XmlUtilTest.javaandHelpWindowTest.javafor code errors, and if so, resolve it the same way)
1.3. Verifying the setup
-
Run the
seedu.modsuni.MainAppand try a few commands -
Run the tests to ensure they all pass.
1.4. Configurations to do before writing code
1.4.1. Configuring the Coding Style
This project follows oss-generic coding standards. IntelliJ’s default style is mostly compliant with ours but it uses a different import order from ours. To rectify,
-
Go to
File>Settings…(Windows/Linux), orIntelliJ IDEA>Preferences…(macOS) -
Select
Editor>Code Style>Java -
Click on the
Importstab to set the order-
For
Class count to use import with '*'andNames count to use static import with '*': Set to999to prevent IntelliJ from contracting the import statements -
For
Import Layout: The order isimport static all other imports,import java.*,import javax.*,import org.*,import com.*,import all other imports. Add a<blank line>between eachimport
-
Optionally, you can follow the UsingCheckstyle.adoc document to configure Intellij to check style-compliance as you write code.
1.4.2. Updating Documentation to match your fork
After forking the repo, the documentation will still have the modsUni branding and refer to the CS2103-AY1819S1-W17-2/main repo.
If you plan to develop this fork as a separate product (i.e. instead of contributing to CS2103-AY1819S1-W17-2/main), you should do the following:
-
Configure the site-wide documentation settings in
build.gradle, such as thesite-name, to suit your own project. -
Replace the URL in the attribute
repoURLinDeveloperGuide.adocandUserGuide.adocwith the URL of your fork.
1.4.3. Setting Up CI
Set up Travis to perform Continuous Integration (CI) for your fork. See UsingTravis.adoc to learn how to set it up.
After setting up Travis, you can optionally set up coverage reporting for your team fork (see UsingCoveralls.adoc).
| Coverage reporting could be useful for a team repository that hosts the final version but it is not that useful for your personal fork. |
Optionally, you can set up AppVeyor as a second CI (see UsingAppVeyor.adoc).
| Having both Travis and AppVeyor ensures your App works on both Unix-based platforms and Windows-based platforms (Travis is Unix-based and AppVeyor is Windows-based) |
1.4.4. Getting Started with Coding
When you are ready to start coding,
-
Get some sense of the overall design by reading Section 2.1, “Architecture”.
-
Take a look at [GetStartedProgramming].
2. Design
2.1. Architecture
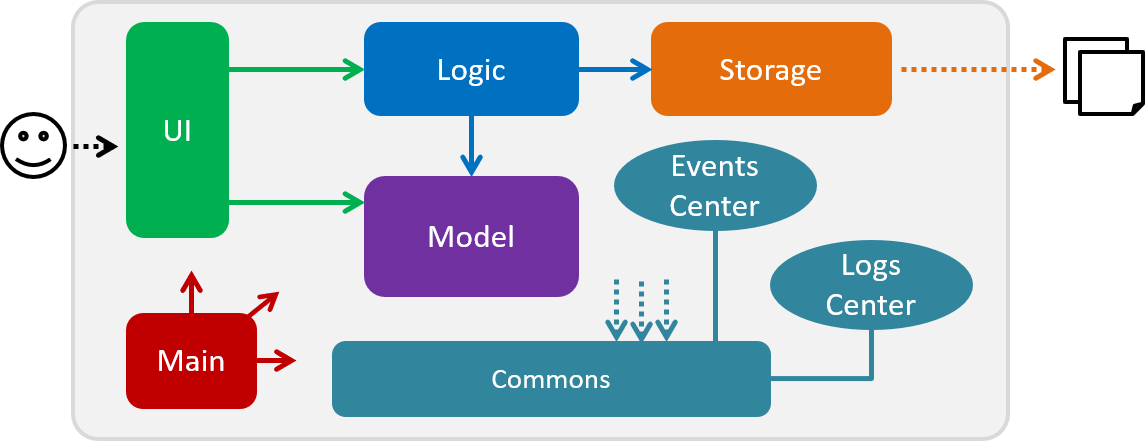
The Architecture Diagram given above explains the high-level design of the App. Given below is a quick overview of each component.
The .pptx files used to create diagrams in this document can be found in the diagrams folder. To update a diagram, modify the diagram in the pptx file, select the objects of the diagram, and choose Save as picture.
|
Main has only one class called MainApp. It is responsible for,
-
At app launch: Initializes the components in the correct sequence, and connects them up with each other.
-
At shut down: Shuts down the components and invokes cleanup method where necessary.
Commons represents a collection of classes used by multiple other components. Two of those classes play important roles at the architecture level.
-
EventsCenter: This class (written using Google’s Event Bus library) is used by components to communicate with other components using events (i.e. a form of Event Driven design) -
LogsCenter: Used by many classes to write log messages to the App’s log file.
The rest of the App consists of four components.
Each of the four components
-
Defines its API in an
interfacewith the same name as the Component. -
Exposes its functionality using a
{Component Name}Managerclass.
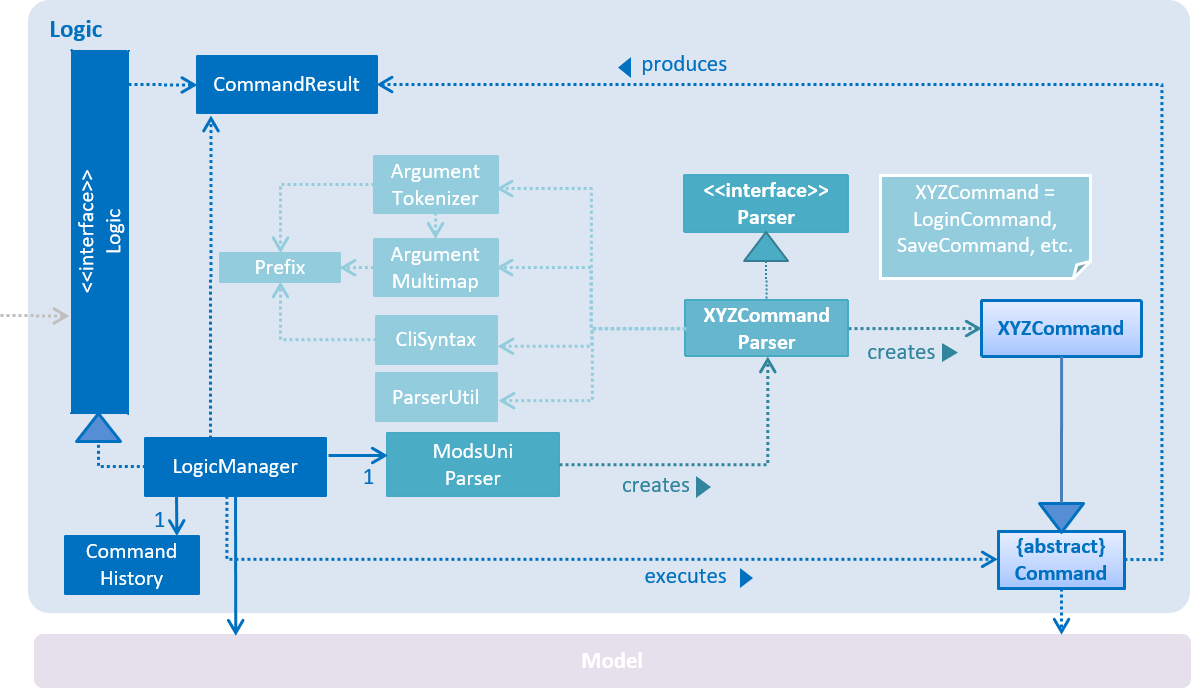
For example, the Logic component (see the class diagram given below) defines it’s API in the Logic.java interface and exposes its functionality using the LogicManager.java class.
Events-Driven Nature of the Design
The Sequence Diagram below shows how the components interact for the scenario where the user issues the register command.
register command (part 1)
Note how the Model simply raises a AddressBookChangedEvent when the Address Book data are changed, instead of asking the Storage to save the updates to the hard disk.
|
The diagram below shows how the EventsCenter reacts to that event, which eventually results in the updates being saved to the hard disk and the status bar of the UI being updated to reflect the 'Last Updated' time.
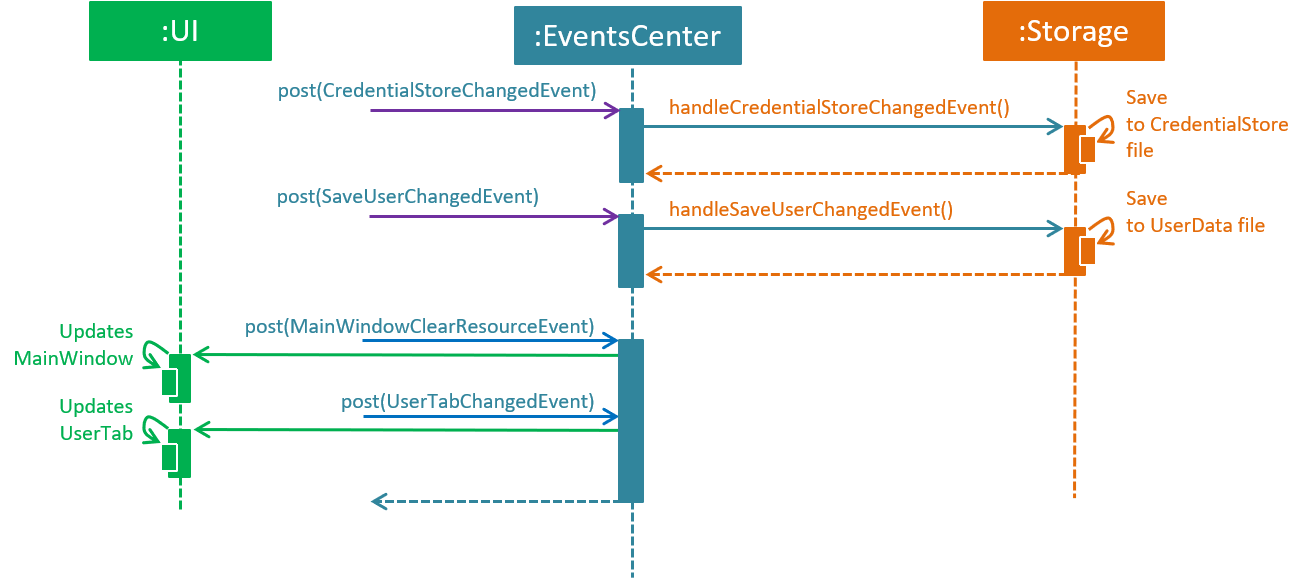
register command (part 2)
Note how the event is propagated through the EventsCenter to the Storage and UI without Model having to be coupled to either of them. This is an example of how this Event Driven approach helps us reduce direct coupling between components.
|
The sections below give more details of each component.
2.2. UI Component
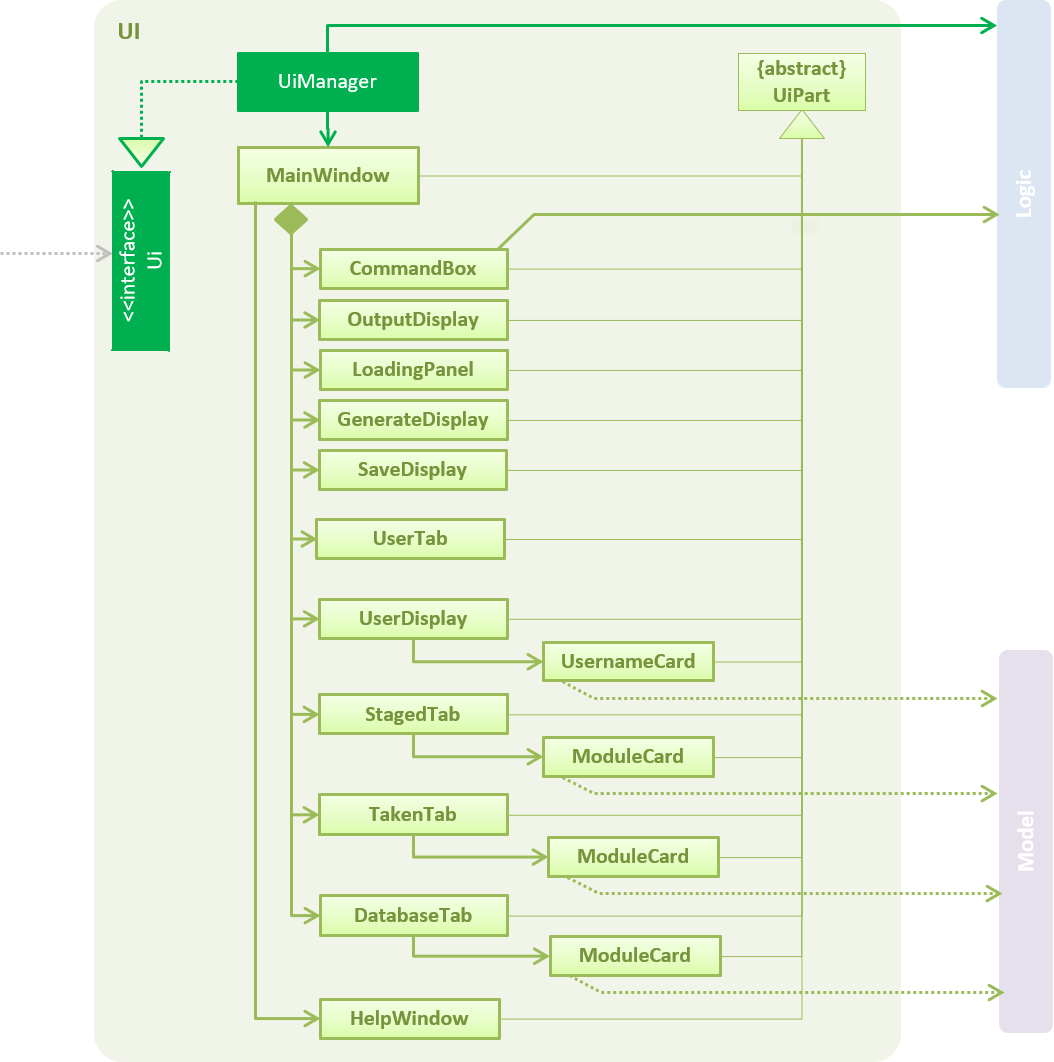
API : Ui.java
The UI consists of a MainWindow that is made up of parts e.g.CommandBox, ResultDisplay, PersonListPanel, StatusBarFooter, BrowserPanel etc. All these, including the MainWindow, inherit from the abstract UiPart class.
The UI component uses JavaFx UI framework. The layout of these UI parts are defined in matching .fxml files that are in the src/main/resources/view folder. For example, the layout of the MainWindow is specified in MainWindow.fxml
The UI component,
-
Executes user commands using the
Logiccomponent. -
Binds itself to some data in the
Modelso that the UI can auto-update when data in theModelchange. -
Responds to events raised from various parts of the App and updates the UI accordingly.
2.3. Logic Component
API :
Logic.java
-
Logicuses theModsUniParserclass to parse the user command. -
This results in a
Commandobject which is executed by theLogicManager. -
The command execution can affect the
Model(e.g. adding a person) and/or raise events. -
The result of the command execution is encapsulated as a
CommandResultobject which is passed back to theUi.
Given below is the Sequence Diagram for interactions within the Logic component for the execute("delete 1") API call.
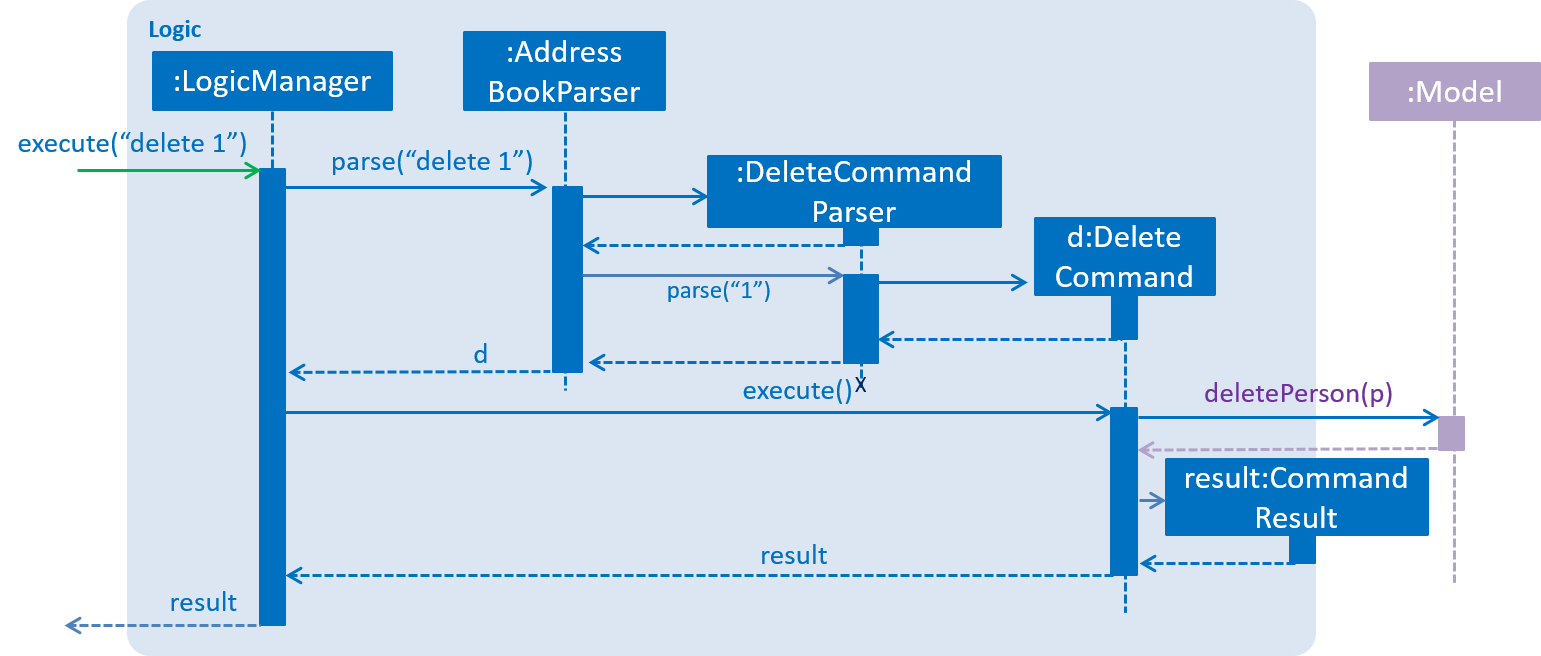
delete 1 Command2.4. Model Component
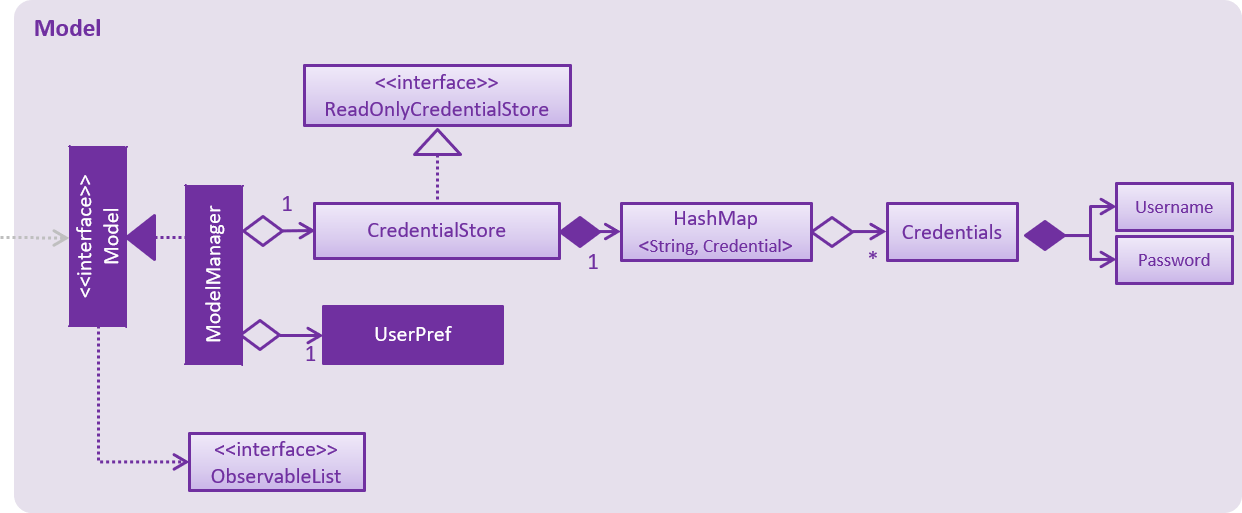
API : Model.java
The Model,
-
stores a
UserPrefobject that represents the user’s preferences. -
stores the Address Book data.
-
exposes an unmodifiable
ObservableList<Person>that can be 'observed' e.g. the UI can be bound to this list so that the UI automatically updates when the data in the list change. -
does not depend on any of the other three components.
2.5. Storage Component
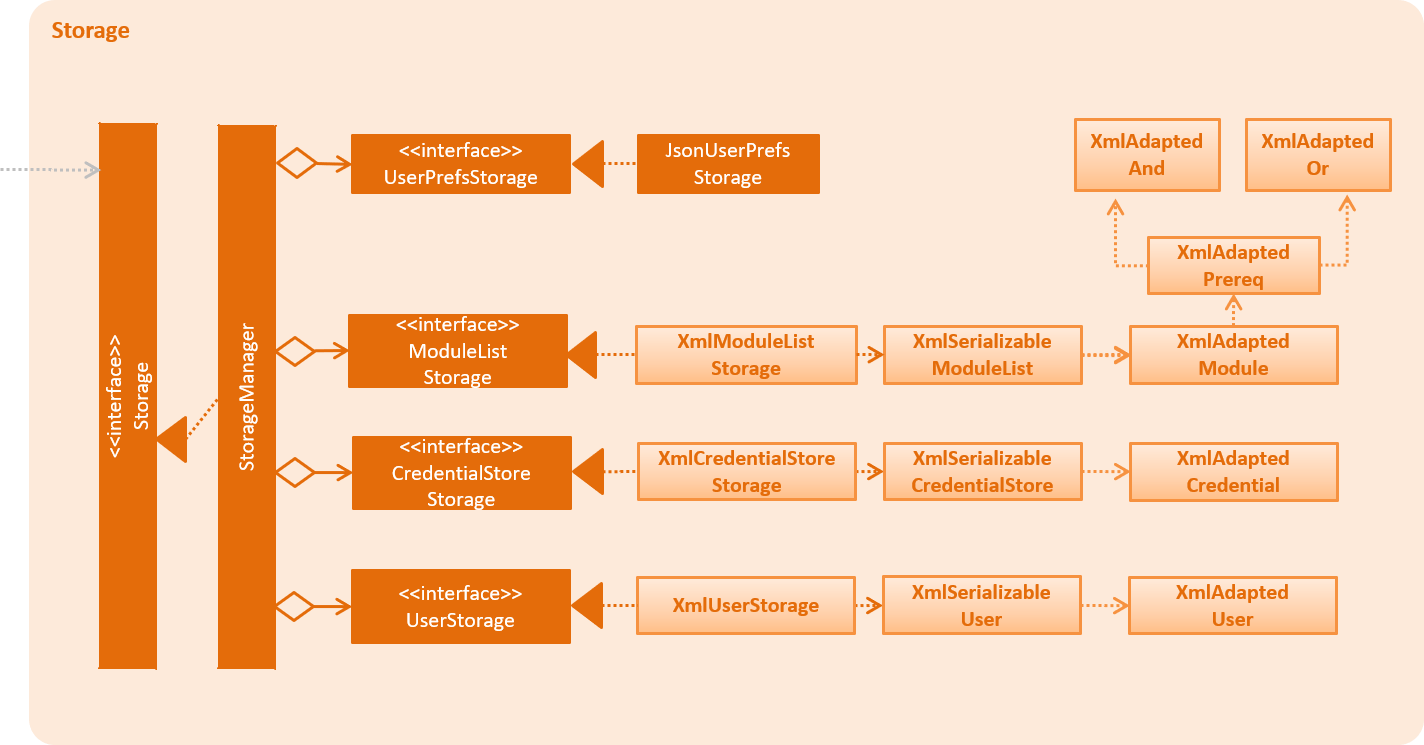
API : Storage.java
The Storage component,
-
can save
UserPrefobjects in json format and read it back. -
can save the Address Book data in xml format and read it back.
2.6. Common Classes
Classes used by multiple components are in the seedu.modsuni.commons package.
3. Implementation
This section describes some noteworthy details on how certain features are implemented.
3.1. User Account Management
User Account Management involves mainly the authentication process of the users. Only once they are authenticated, will their respective user data be loaded into the application.
+
Additionally, it is only by registering/logging in will users be able to access and manipulate their account details.
This section will describe in detail the Current Implementation and the Design Considerations of the User Account Management feature.
Figure 1(shown below) describes the general flow of the user account management in an activity diagram.
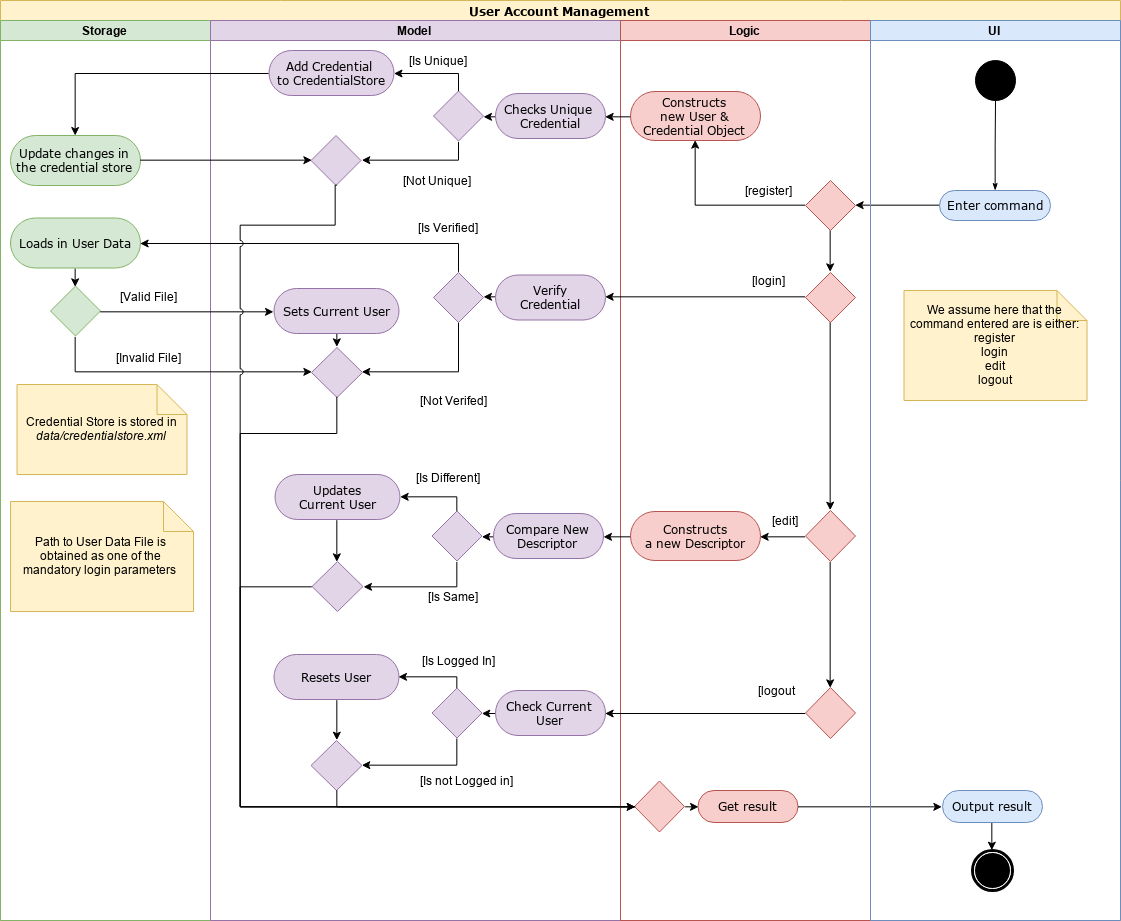
Figure 1. Activity Diagram for User Account Management.
3.1.1. Current Implementation
The User Account Management mechanism is facilitated by the following classes:
-
Credential
It storesUsernameandPasswordof theUserclass.
Additionally, it implements the following operation(s):-
Credential#isSameCredential(…)— Determines if there already exists aCredentialwith the same username in theCredentialStore
-
-
CredentialStore
It stores the credentials and the corresponding username in aHashMapobject.
Additionally, it implements the following operations(s):-
CredentialStore#addCredential(…)— Adds the input credential into the credential store -
CredentialStore#removeCredential(…)— Removes the input credential from the credential store. -
CredentialStore#isVerifiedCredential(…)— Checks if there exists the same credential with the matching username and passwords. Returnstrueif the input credential is verified.
-
The above operations are exposed in the Model interface as Model#addCredential(), Model#removeCredential() and Model#isVerifiedCredential() respectively.
|
-
User
Contains all the necessary data contained within a single user.
Currently, there are two Users, each defined by theirRoles; namelyStudentandAdminas defined in the enum classRole.java-
Student
Refers to the majority of the users. It stores variables pertaining to a student user. -
Admin
Refers to the application managers. It stores variables pertaining to an administrator.
-
Figure 2(shown below) is the Class Diagrams illustrating the inheritance between User, Student and Admin
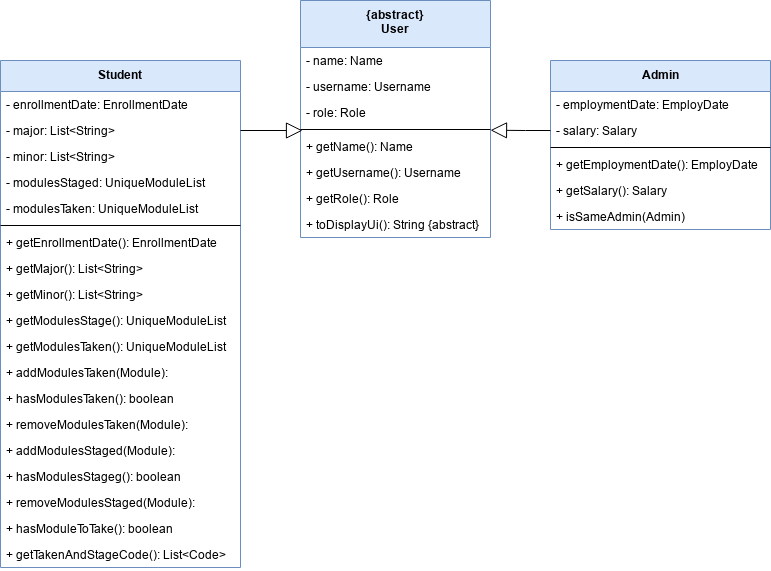
Figure 2. User, Student and Admin Class Diagrams
Each User types contain different class-variables. Additionally, the sets of commands available for either User types are limited to their respective Role
|
Implementation of the register feature
The register feature is facilitated by the RegisterCommand class.
It allows for students to sign up for a modsUni account, which is required to use the application.
Registering only applies to students. For the creation of Admin Accounts, only existing administrators can create another Admin account
|
The RegisterCommand extends the Command class. Figure 3(shown below) depicts the UML representation of the RegisterCommand.

Figure 3. UML Diagram of RegisterCommand.
Parsing of command is performed by RegisterCommandParser,
which returns a RegisterCommand object after parsing Username, Password, Name, Path to Profile Picture, Enrollment Date, Major(s) and Minor(s).
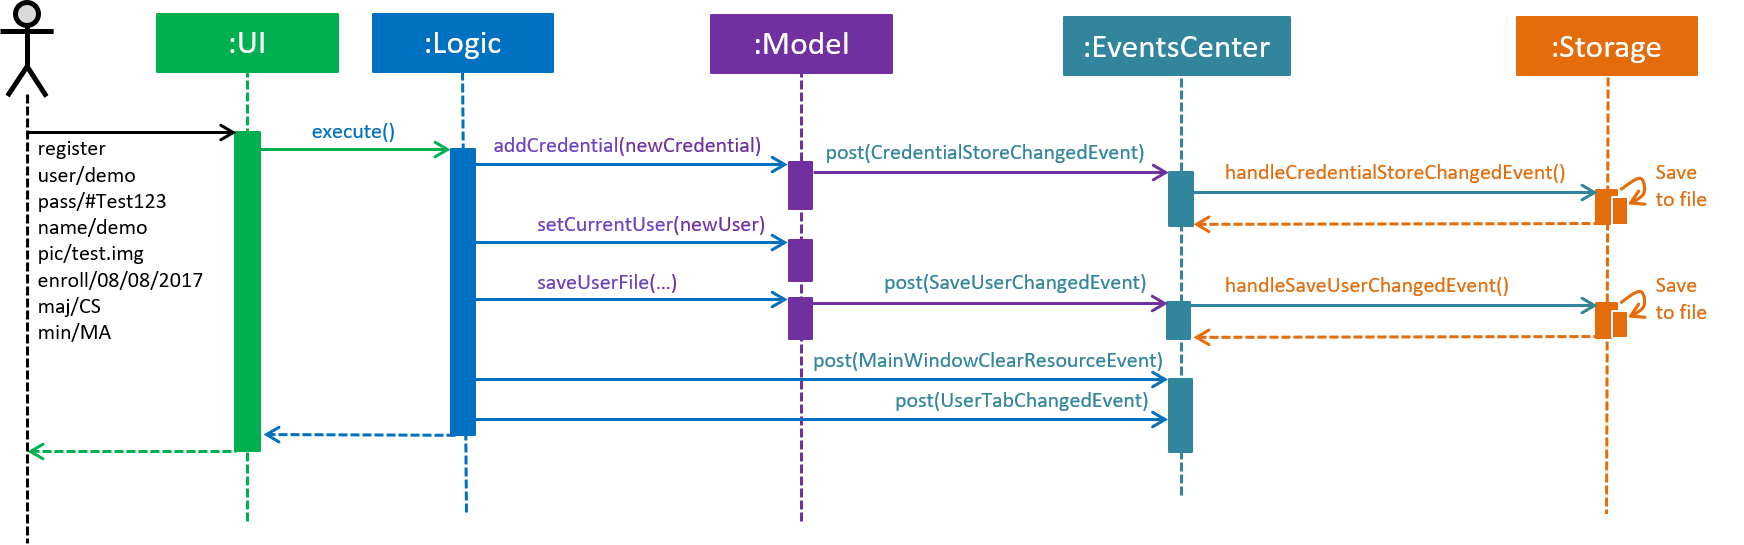
The Sequence Diagram shown below in Figure 4 illustrates the interactions between the Logic & Model components when the RegisterCommand is being executed.
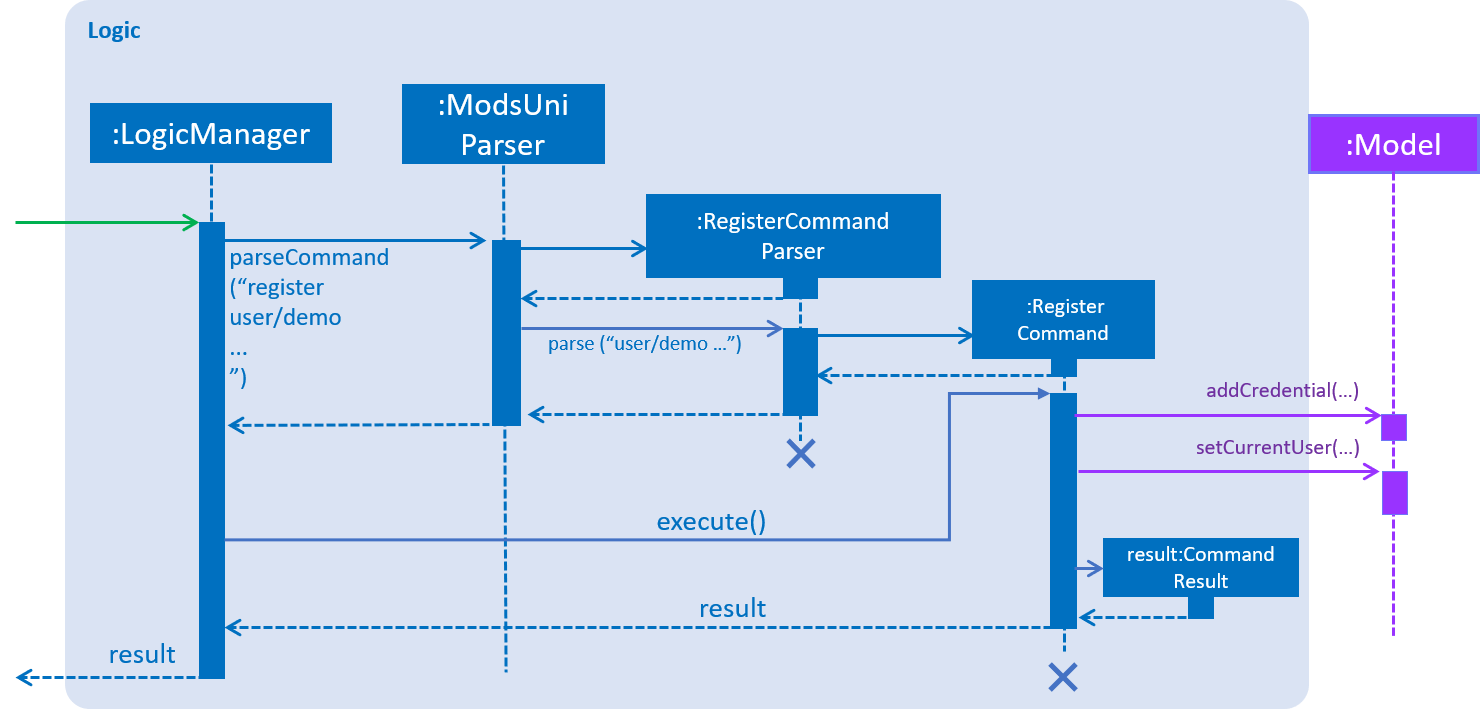
Figure 4. Sequence Diagram for the interaction between Logic and Model Components when executing RegisterCommand.
Figure 5 below shows the high-level sequence diagram of the command execution.
Figure 5. High-Level Sequence diagram of registering a new student account.
Given below is an example usage scenario and how the register mechanism behaves at each step:
Step 1. The user launches the application for the first time. Only register and login command is available this is because currentUser in Model is not yet instantiated.
currentUser refers to the user account currently loaded in the modsUni Application.
|
Step 2. The user executes register user/demo … to register a new Student account.
Step 3. RegisterCommandParser would process the user inputs and create a Student, Credential and Path object, which will be used to construct a register command.
Below is a small code snippet of the aforementioned procedure:
public RegisterCommand parse(String userInput) throws ParseException {
        // initial prefix checks, omitted for brevity

        Username username = ParserUtil.parseUsername(argMultimap.getValue(PREFIX_USERNAME).get());
        Password password = ParserUtil.parsePassword(argMultimap.getValue(PREFIX_PASSWORD).get());
        Name name = ParserUtil.parseName(argMultimap.getValue(PREFIX_NAME).get());
        EnrollmentDate enrollmentDate = ParserUtil.parseEnrollmentDate(
            argMultimap.getValue(PREFIX_STUDENT_ENROLLMENT_DATE).get());
        List<String> majors = argMultimap.getAllValues(PREFIX_STUDENT_MAJOR);
        List<String> minors = argMultimap.getAllValues(PREFIX_STUDENT_MINOR);

        User user = new Student(username, name, Role.STUDENT,
            enrollmentDate, majors, minors);
        Credential credential = new Credential(username, password);

        // constructs and returns RegisterCommand, omitted for brevity
    }
Step 4. The register command will next call Model#addCredential(…) and Model#setCurrentUser(…).
Step 5. At this point, Model will insert a new entry in CredentialStore and indicate to Storage to commit the changes to file. Additionally, the event raised by the register command will be handled by UI, making the necessary changes to all UI elements.
A new Student would be initialized and automatically set as the currentUser, enabling the user to perform additional commands automatically. |
Implementation of the login feature
The login feature is facilitated by the LoginCommand class.
It allows for students to log into their existing modsUni account, granting them access to their respective user data.
The LoginCommand extends the Command class. Figure 1(shown below) depicts the UML representation of the LoginCommand.
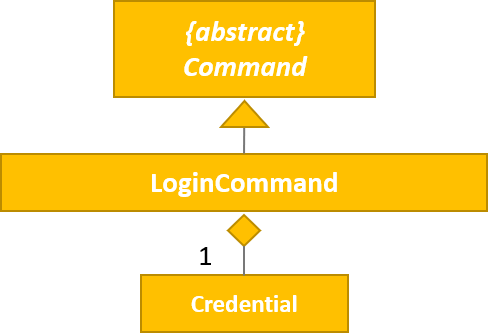
Figure 1. UML Diagram of LoginCommand.
Parsing of command is performed by LoginCommandParser, which returns a LoginCommand after parsing the username and password inputs.
The Sequence Diagram shown below in Figure 2 illustrates the interactions between the Logic & Model components when the LoginCommand is being executed.
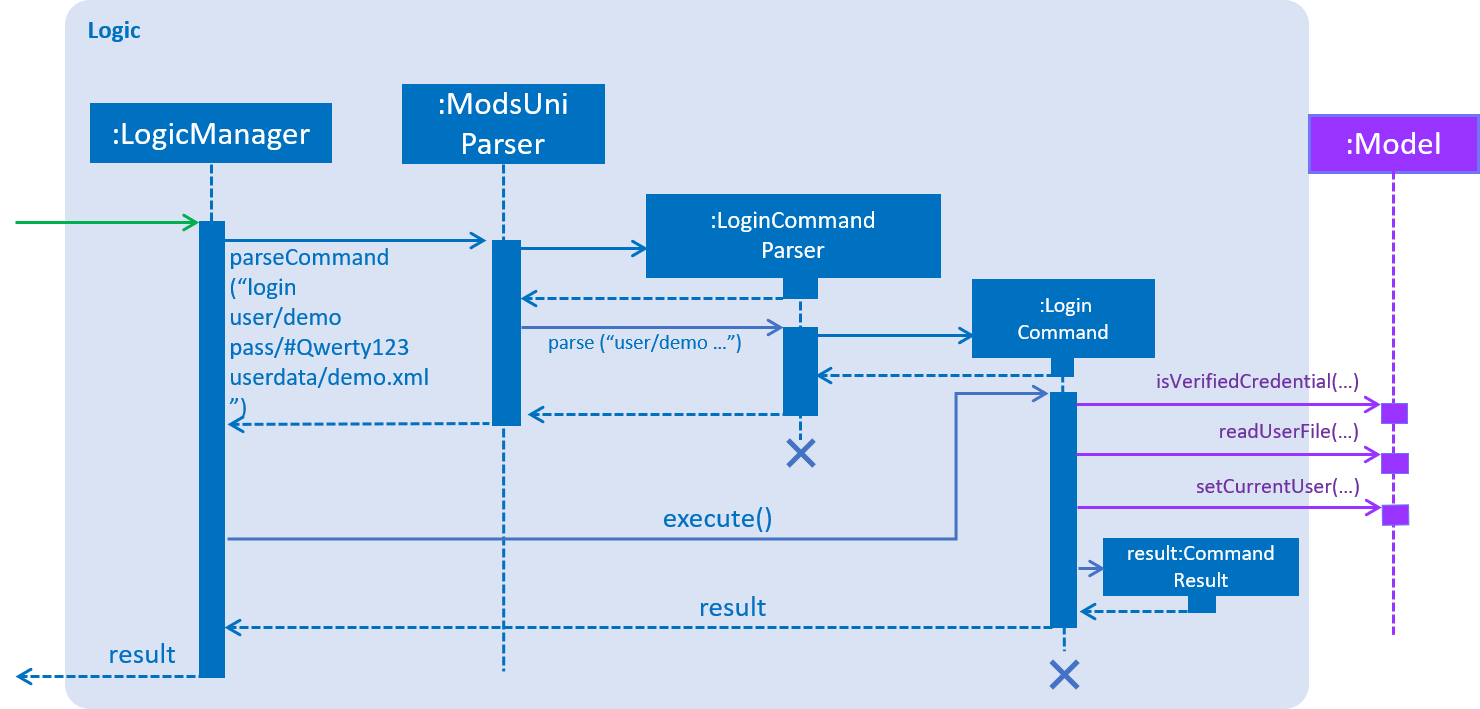
Figure 2. Sequence Diagram for the interaction between Logic and Model Components when executing LoginCommand.
Figure 3 below shows the high-level sequence diagram of the command execution.
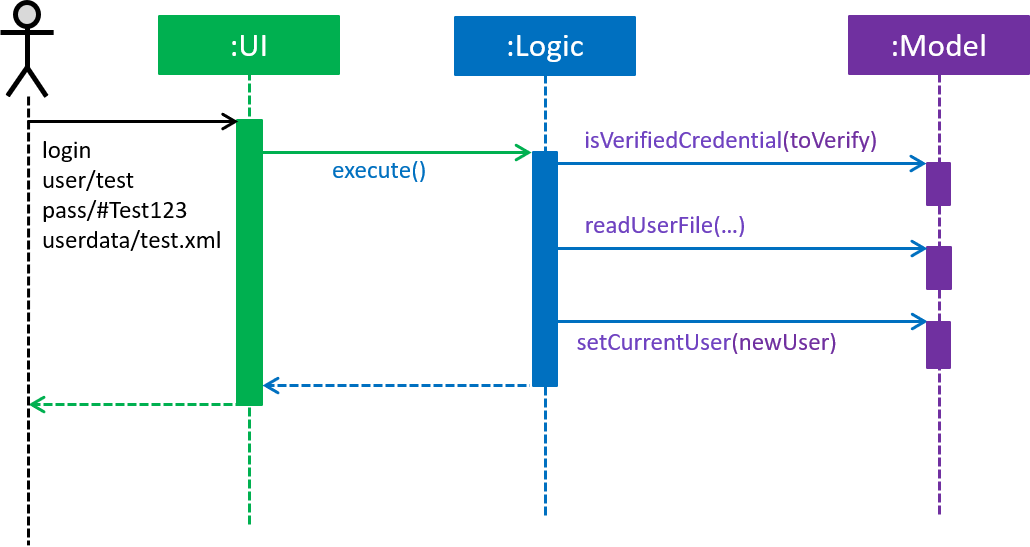
Figure 3. High-Level Sequence Diagram of the login process.
Given below is an example usage scenario and how the login mechanism behaves at each step:
-
The user launches the application. As explained earlier, since the
currentUserinModelis not yet instantiated, the user will only be able to execute either theregisterorlogincommand. -
Having already registered an account, the user can proceed to execute
login user/demo pass/#Qwerty123to log in to their account. Thelogincommand will callModel#isVerifiedCredential(…)to determine if the user input matches a credential inCredentialStore. -
Should the credential be valid and verified, a
Userwill be loaded from a the defaultuserData.xmlfile. Subsequently, theModel#setCurrentUser(…)will be called to set the loaded user data as thecurrentUser. -
Should the credential not be valid or does not match an existing credential in the
CredentialStore, the user will simply be shown a failure message.
Implementation of the edit feature
The edit feature is facilitated by the EditStudentCommand class.
It allows for students to edit their existing modsUni account, granting them the ability
to modify personal details.
The EditStudentCommand extends the Command class. Figure 1(shown below) depicts the UML representation of the EditStudentCommand.
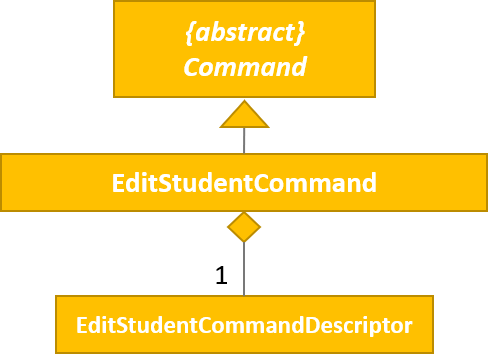
Figure 1. UML Diagram of EditStudentCommand.
Parsing the command is performed by EditStudentCommandParser, which returns a EditCommand after parsing the user input.
The Sequence Diagram shown below in Figure 2 illustrates the interactions between the Logic & Model components when the EditStudentCommand is being executed.
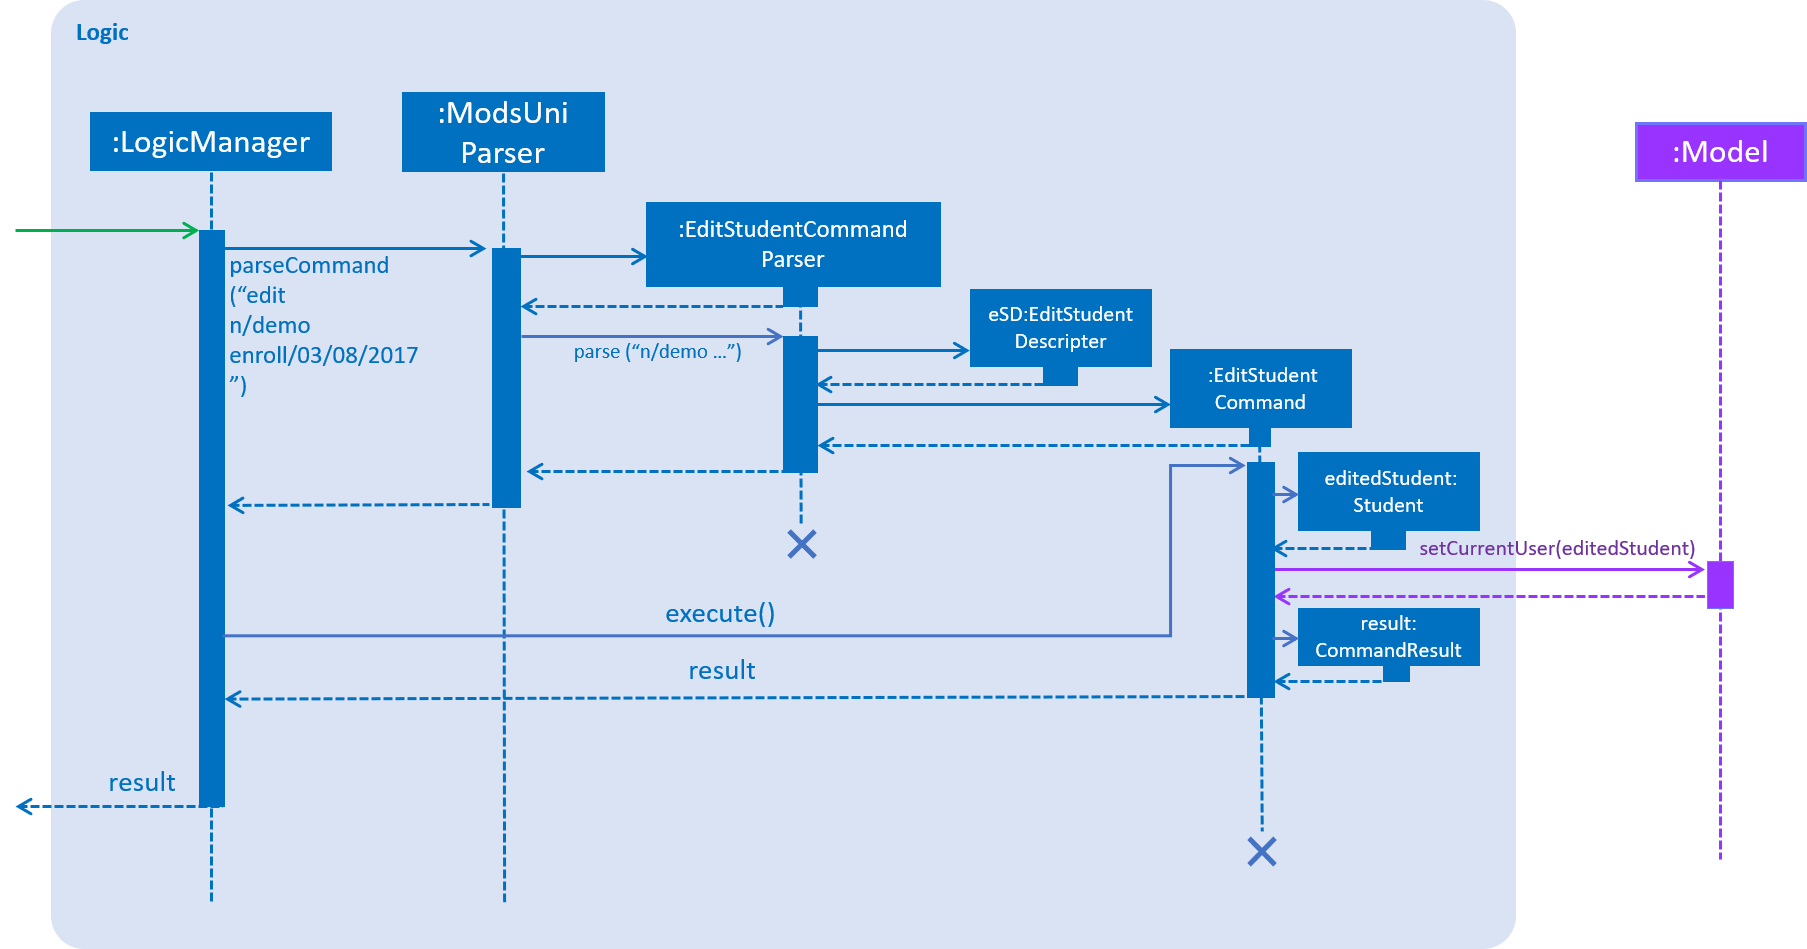
Figure 2. Sequence Diagram for the interaction between Logic and Model Components when executing EditStudentCommand.
Figure 3 below shows the high-level sequence diagram of the command execution:
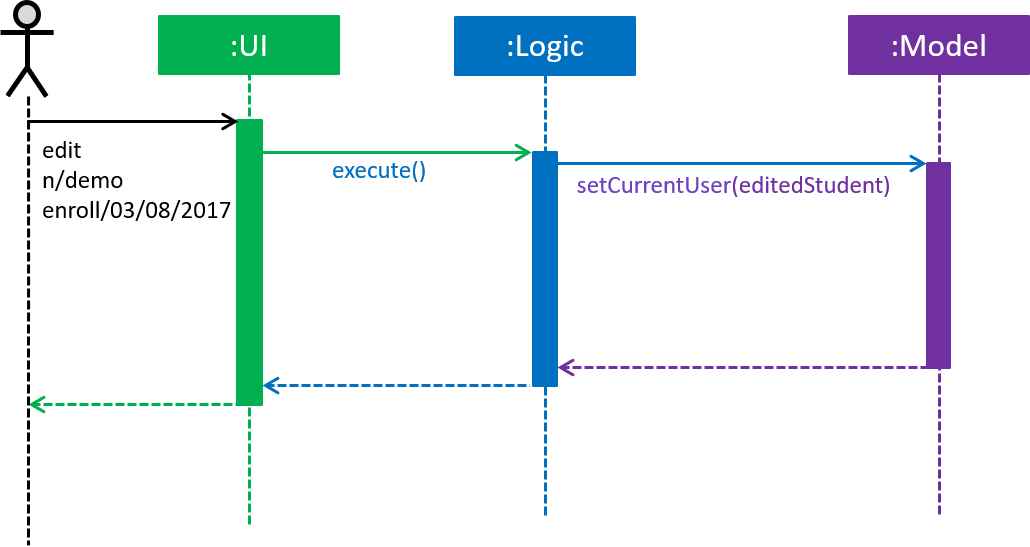
Figure 3. High-Level Sequence Diagram of the edit process.
Given below is an example usage scenario and how the edit mechanism behaves at each step:
-
The user launches the application. Depending on whether the user already has an account registered, he would proceed to login.
-
Now that the
currentUseris being loaded. The student can proceed to execute an edit commandedit n/demo enroll/03/08/2017
At this point,ModsUniParserwould instantiateEditStudentCommandParserwhich would parse theeditcommand. -
EditStudentCommandParserwould instantiateEditStudentDescriptor.EditStudentDescriptorcontains the respective user details that is provided in the user input.EditStudentDescriptorcontains only the details as provided in the user input and will be used inEditCommand#execute()to updatecurrentUser -
EditStudentCommandParserwould return aEditCommandwith the descriptor class. Subsequently,EditCommand#execute()would be called. -
At this point,
EditCommand#createEditedStudent(…)would be called constructing a new Student object, with thecurrentUserand the descriptor. -
Finally,
Model#setCurrentUser(…)would be called to updatecurrentUserwith the new details.Upon the successful execute of the editcommand,UserTabwould also be updated with the new user details.
3.1.2. Design Considerations
Aspect: How user credentials are stored.
-
Alternative 1 (current choice): Usage of a separate
CredentialStoreclass to store all user credentials.-
Pros: This allows for better security through abstraction. By having the user credentials stored away from the
User, they(users & malicious attackers) will not be able to explicitly manipulate the secured data outside the given parameters. -
Cons: Additional memory resources is used to store the data structures.
-
-
Alternative 2: Storing the user credentials within the
Userclass.-
Pros: This alternative is easier to implement.
-
Cons: Sacrifices security for ease of implementation.
-
Aspect: Data structure to support the user account features.
-
Alternative 1 (current choice): A
HashMapis used to store the credentials, using a username-credential(String→Credential) key-value pair.-
Pros: Considering that there is no possibility of duplicate usernames, utilizing a
HashMapdata structure would improve optimization when verifying a specific credential, with an O(1) search time. -
Cons: Additional memory resources is required for the usage of complex data structures.
-
-
Alternative 2: Using a
Listof Credentials-
Pros: Will require less memory resources. Additionally, it is easier to implement.
-
Cons: Should more and more user adopt the application, the increased volume of user credentials would result in an O(n) operation when verifying a user credential.
-
3.2. Generate Schedule Feature
This feature is for student users to generate a schedule containing the modules to take in each semester
during their entire university candidature. It is executed using the generate command.
The generate command can only be executed by users of type Student.
|
The section below will describe in detail the current implementation and design considerations of the
generate command.
3.2.1. Current Implementation
The sequence diagram shown below in Figure 1 illustrates the interactions between some of these components when the command is executed.
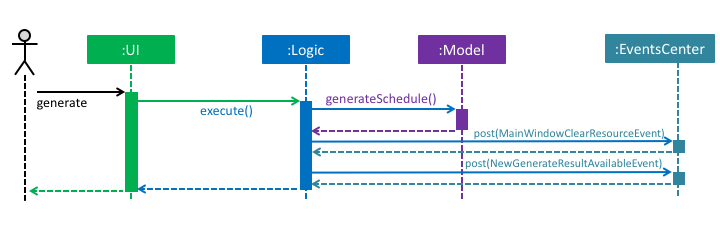
Figure 1. High Level Sequence Diagram for generate command
The command is facilitated by the following classes:
-
Generatecommand class
TheGeneratecommand class extends from theCommandclass. Figure 2 below depicts the UML diagram for theGeneratecommand class.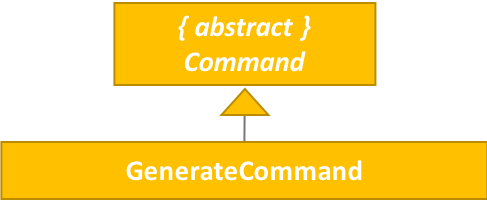
Figure 2. Generate command UML Diagram
-
Modelclass
The following methods in theModelclass are used in this command:-
isStudent()
This method checks if the current user is a student. -
canGenerate()
This method checks if it is possible to generate a schedule. -
generateSchedule()
This method generates a schedule.
-
-
Generatefrom theLogicpackage.
This class is used to encapsulate the processes for generating a schedule. The following methods are used in this command:-
canGenerate(Student)
This methods checks if all the module prerequisites from the student’s staged list is met. It does this by merging the staged and taken module list together.
Using the merged list, it extracts out the list of module codes. Each module in the staged list is checked to see if the prerequisite condition can be met. The following code snippet shows this process:public static Optional<List<Code>> canGenerate(Student student) { List<Code> cannotTakeCode = new ArrayList<>(); List<Code> codeChecklist = student.getTakenAndStageCode(); UniqueModuleList modulesStaged = student.getModulesStaged(); for (Module module : modulesStaged) { if (!module.checkPrereq(codeChecklist)) { cannotTakeCode.add(module.getCode()); } } // return list of codes that failed to met prerequisite condition or an empty value if the list is empty. } -
generateSchedule()
This method will create a schedule using modules that are in the student’s staged list.
It does this by going though the list of modules and removing those that satisfies the prerequisite condition. As it removes, the module code is added to a temporary list. This list is used during the checking of prerequisite conditions for the remaining modules.
The following code snippet will provide a clearer explanation of how the method works:public SemesterList generateSchedule() { SemesterList semesterList = new SemesterList(); Semester newSemester = new Semester(); List<Code> taken = new ArrayList<>(); while (modulesStaged.size() > 0) { for (Module element : modulesStaged) { if (element.checkPrereq(taken)) { // Remove module from staged list // Add module to semester and temporary list } } semesterList.addSemester(newSemester); newSemester = new Semester(); } return semesterList; }
-
This class is different from the Generate command class. The command class is for the execution of the
command, while the current one is for creating the schedule.
|
Execution phase of the generate command
Figure 3 below shows an overview of the steps performed during the execution phase of the command.
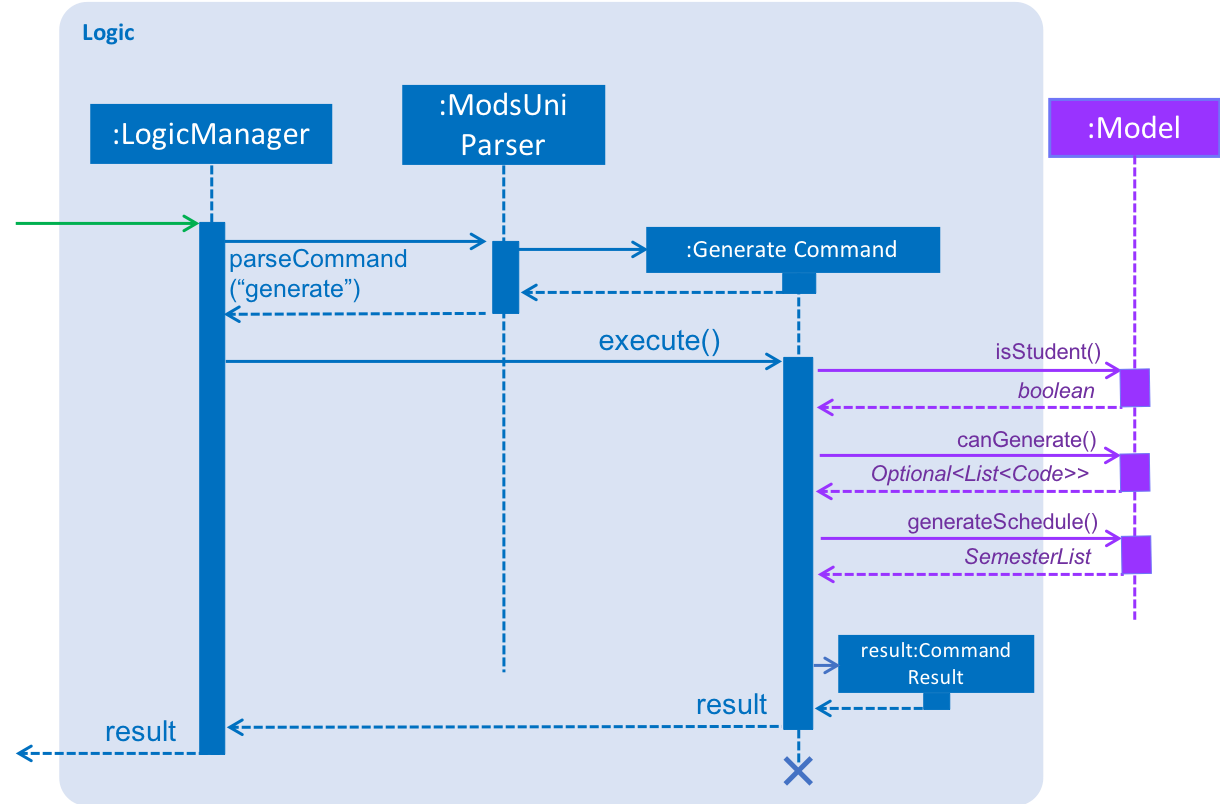
Figure 3. Sequence diagram for the interaction between Logic and Model Components when executing
generate.
In the execute method of the command, the following checks are performed:
-
Type of user account
This step checks if a user has logged in and the current user is a student. It is performed as only student accounts are able to generate a schedule. -
Modules in staged list
This step ensures that there modules are available to add into the schedule. -
Staged modules prerequisites
This step verifies that the prerequisites for all modules in the staged list are met. It is done to ensure that it is possible to generate a schedule.
If any of the checks fails, an error will be thrown. The following code snippet illustrates the
checking process:
if (model.getCurrentUser() == null) {
    throw new CommandException(MESSAGE_ERROR);
}

if (!model.isStudent()) {
    throw new CommandException(MESSAGE_INVALID_ROLE);
}

if (!currentStudent.hasModuleToTake()) {
    throw new CommandException(MESSAGE_NO_MODULES);
}

if (cannotTakeCodes.isPresent()) {
    return new CommandResult(MESSAGE_FAILURE + cannotTakeCodes.toString());
}
After passing all the checks, the command will proceed on and generate a schedule. To display the schedule in the user interface, two events will be created.
-
MainWindowClearResourceEvent
It is created to inform the current panel in the main window to clear it’s resources. -
NewGenerateResultAvailableEvent
This event will show the generated schedule in the main window.
These events will be sent to EventsCenter to process and execute it.
Example scenario of the generate command
Given below is an example usage scenario of how the generate command behaves:
The user launches the application for the first time and the currentUser will at this point be null.
Issuing the generate command at this point will throw an error message indicating to the user that they have
not registered an account or they are currently not logged in.
In order to utilise the generate command, the user must perform one of the following options:
-
The user executes
register user/demo …to register a newStudentaccount, followed byaddModuleS cs1010. -
The user executes
login user/demo pass/P@ssw0rd userdata/saveFile.xmlto log into account, followed byaddModuleS cs1010.
A new Student would be initialized and automatically set as the currentUser. The module cs1010 would
also be added to the student’s staged module list, enabling the student to perform generate command. |
3.2.2. Design Considerations
Aspect: Placement of methods for generating a schedule
-
Alternative 1 (current choice): Use a separate
Generateclass in theLogicpackage to encapsulate the processes for generating a schedule.-
Pros: Modification made to the generating of schedule does not affect the
Studentmodel. -
Cons: This approach adds complexity to the design of the application.
-
-
Alternative 2: Adding the logic for generating the schedule to the
Studentmodel.-
Pros: This alternative is easier to implement.
-
Cons: It breaks the single responsibility principle of the
Studentmodel.
-
Aspect: Checking of prerequisites before generating a schedule
-
Alternative 1 (current choice): Perform checks to ensure that all prerequisites for modules in staged list are fulfilled.
-
Pros: Ensures that the command will not cause an infinite loop.
-
Cons: The command will not always be able to generate a schedule as students may forget to add in the prerequisite modules.
-
-
Alterative 2: Assume that prerequisites for all modules are met.
-
Pros: Reduces the time complexity of the command.
-
Cons: The command might end up with an infinite loop as it keeps on trying to arrange the modules.
-
3.3. User Module Management
User Module Management involves mainly the interaction between users and their module lists. A user is able to add and remove the module only if he is a student and the module exists in the database. A user is allowed to search a module in the database.
The section below will describe in detail the Current Implementation and the Design Considerations of the User Module Management.
3.3.1. Current Implementation
The User Module Management is facilitated by the following classes:
-
Module
It stores all the necessary data contained within a single module. Thecodeof a module is considered as a key for searching and comparing purpose. Two modules with the samecodeis considered as the same module. -
ModuleList
It stores aUniqueModuleListwhich stores modules with unique code.-
UniqueModuleListstores an internalObservableListfor UI purpose.
-
-
User
It is the actor of the command. Add and remove commands are limited to a user whoseRolesisStudent.-
Studentstores twoModuleListnamelymodulesTakenandmodulesStaged, to store the modules chosen by the student.-
modulesTakenrepresents the module student has taken before. -
modulesStagedrepresents the module student is intending to take.
-
-
Implementation of the add feature
The add feature is facilitated by the AddModuleToStudentStagedCommand and AddModuleToStudentTakenCommand class.
It allows a user to add modules to his staged/taken module list by giving their code.
|
A user is allowed to add only if: the user has logged in the user is a student the module exists in the database at this moment both staged and taken module list do not contain the module already |
AddModuleToStudentStaged/TakenCommand extends the Command class. Figure 1(shown below) depicts the UML representation of AddModuleToStudentStaged/TakenCommand.
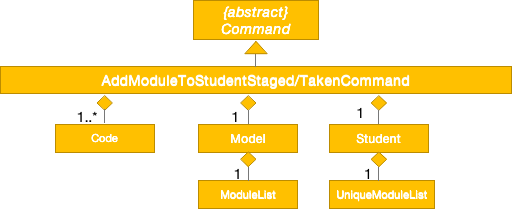
Figure 1. UML Diagram of AddModuleToStudentStaged/TakenCommand.
Parsing of command is performed by AddModuleToStudentStaged/TakenCommandParser,
which returns a AddModuleToStudentStaged/TakenCommand object after parsing input.
The Sequence Diagram shown below in Figure 2 illustrates the interactions between the Logic & Model components when AddModuleToStudentStaged/TakenCommand is being executed.
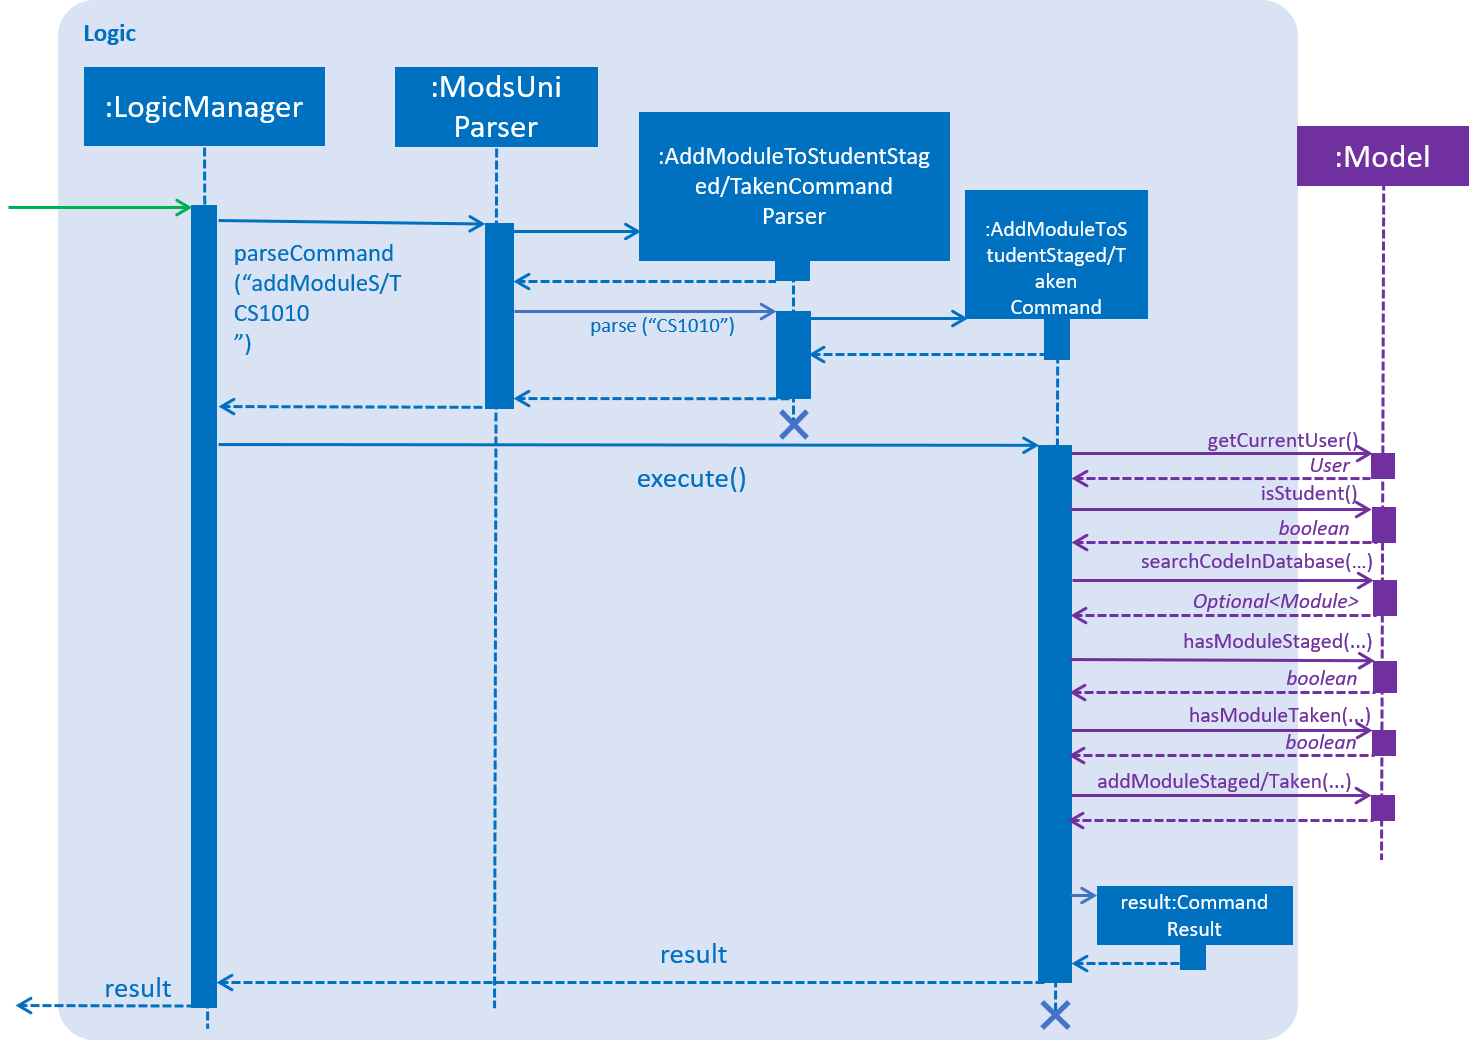
Figure 2. Sequence Diagram for the interaction between Logic and Model Components when executing AddModuleToStudentStaged/TakenCommand.
Figure 3 below shows the high-level sequence diagram of the command execution.
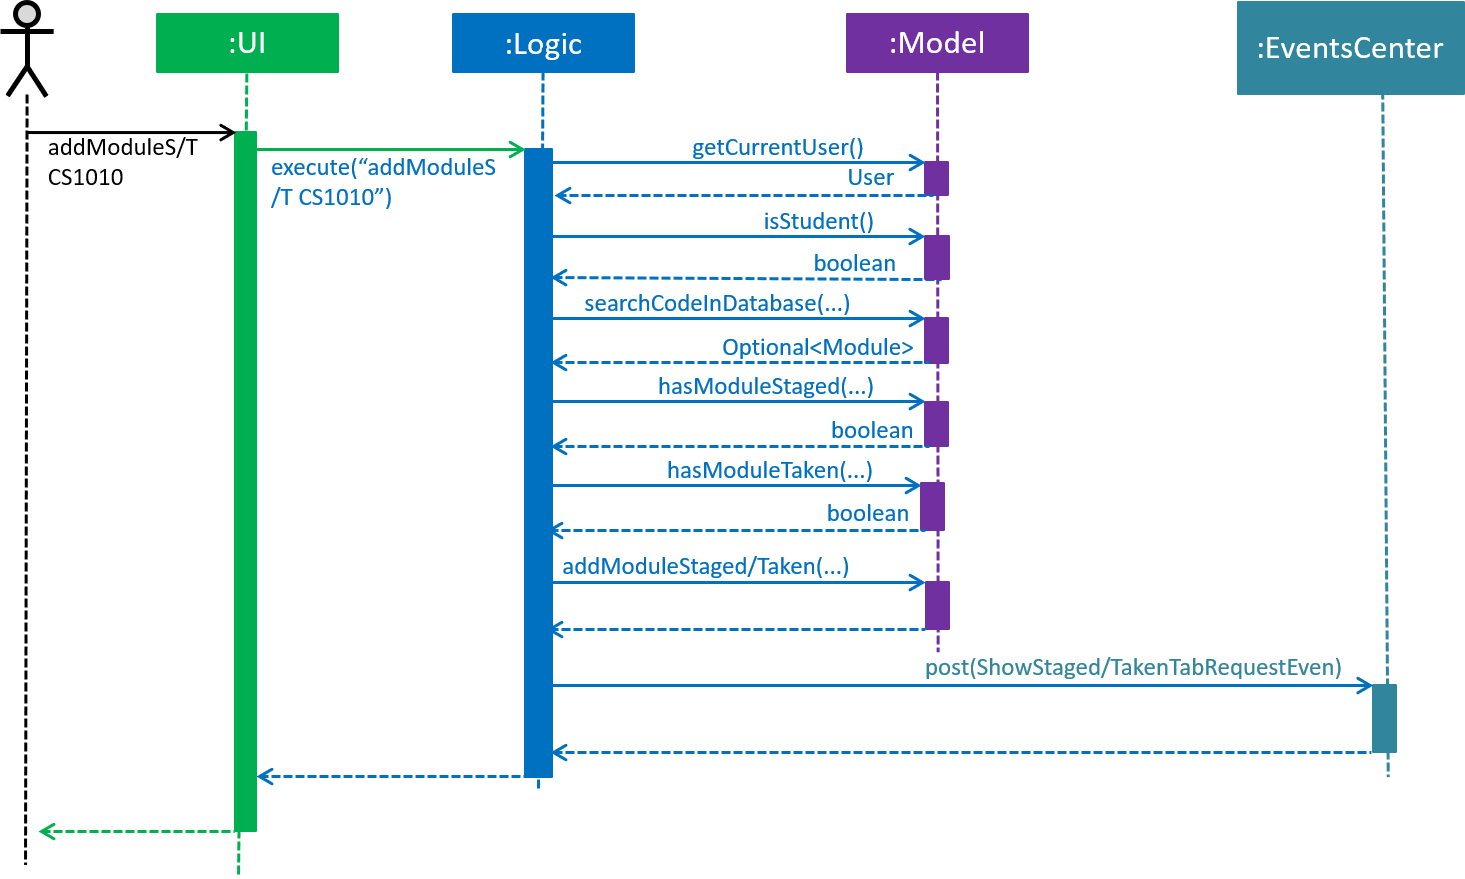
Figure 3. High-Level Sequence Diagram of adding a new module to the student’s staged/taken module list.
Given below is an example usage scenario and how the adding mechanism behaves at each step:
Step 1. The user launches the application.
If it is the first time the user uses the application, after login as a student,
a Student model will be created, then modulesTaken and modulesStaged will be initialized as an empty ModuleList.
If the user has logged in before, after login as a student, modulesTaken and modulesStaged will be recovered to the last saved version.
Step 2. After the user enters the command, AddModuleToStudentStaged/TakenCommandParser will create a AddModuleToStudentStaged/TakenCommand,
which contains two parameters.
The first parameter is an ArrayList of Code to be searched.
The second is a String contains the duplicate code entered by user.
Step 3. When the command is executed, AddModuleToStudentStaged/TakenCommand will call Model#getCurrentUser() and Model#isStudent() to check whether the user is a Student.
Model#searchCodeInDatabase(…) to check whether the module exists in the database and update toAdd to the searched module,
Model#hasModuleStaged(…) and Model#hasModuleTaken(…) to check whether the module has already existed in the student’s staged or taken module list,
Model#addModuleStaged/Taken(…) to finally add the module to the student’s staged/taken module list.
Step 4. After the module is added, the command will post a ShowStaged/TakenTabRequestEvent to show the user updated staged/taken module list.
A CommandResult containing the log of execution result will be returned.
Implementation of the remove feature
The remove feature is facilitated by the RemoveModuleFromStudentStagedCommand and RemoveModuleFromStudentTakenCommand class.
It allows a user to remove modules from his staged/taken module list by giving their code.
|
A user is allowed to remove only if: the user has logged in the user is a student the module exists in the database at this moment his staged/taken module list contains the module need to be removed |
The implementation of remove feature is similar to add feature. They have generally the same mechanism, except remove
command only use Model#hasModuleStaged/Taken(…) to ensure the respective module list contains the module, while add
command use both methods to ensure the ensure does not exist in neither module list. See Step 3 of the adding mechanism for reference.
Implementation of the search feature
The search feature is facilitated by the SearchCommand class.
It allows a user to search modules in the database using one or several prefixes.
| The command does not require user to login or register. |
|
The command does not support using a substring for searching. Eg. search 1010 can not being used for searching "CS1010"
|
|
The command only supports to search within database module list. The design consideration is that it does not make sense to search staged or taken module list as the scale of these two lists tend to be small. |
SearchCommand extends the Command class. Figure 4(shown below) depicts the UML representation of SearchModule.
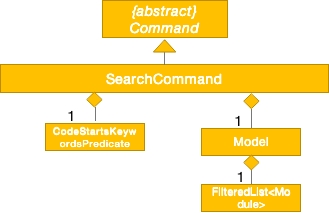
Figure 4. UML Diagram of SearchCommand.
The Sequence Diagram shown below in Figure 5 illustrates the interactions between the Logic & Model components when SearchCommand is being executed.

Figure 5. Sequence Diagram for the interaction between Logic and Model Components when executing SearchCommand.
Figure 6 below shows the high-level sequence diagram of the command execution.
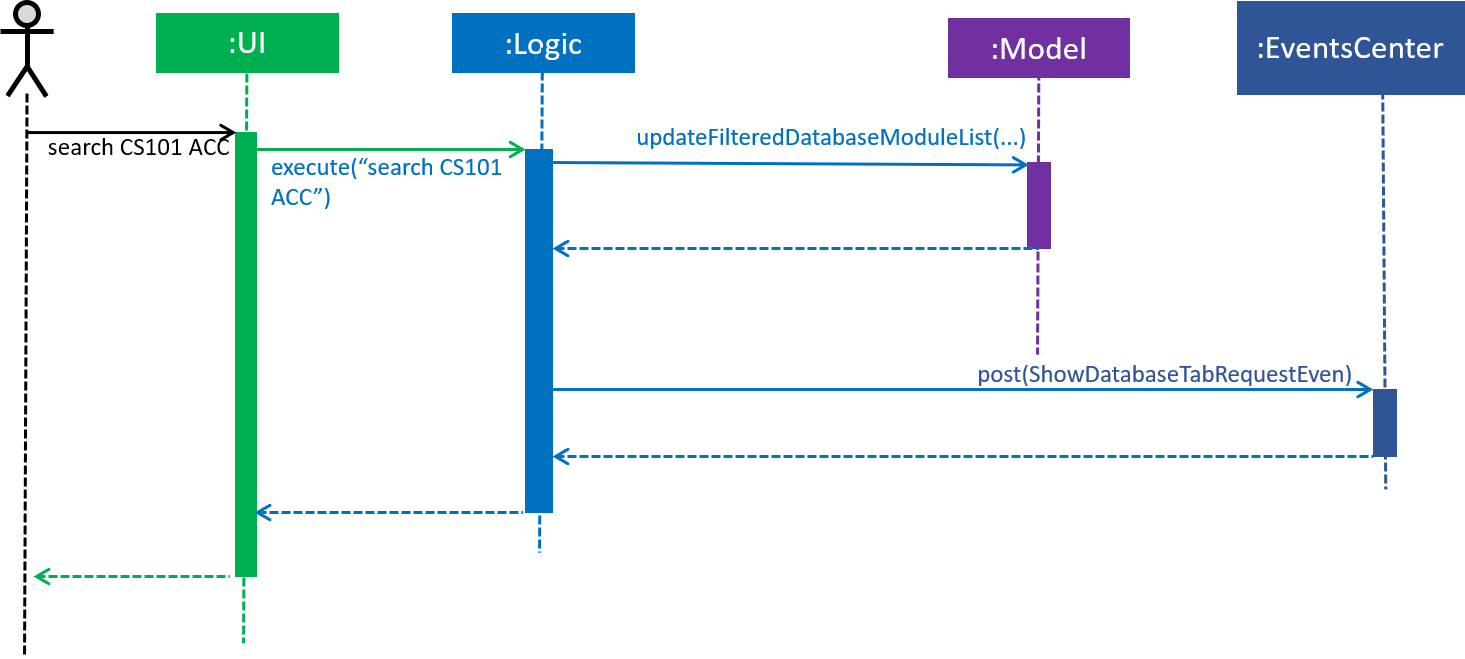
Figure 6. High-Level Sequence Diagram of search modules in database module list.
Given below is an example usage scenario and how the searching mechanism behaves at each step:
Step 1. User enters the command, then ModsUniParser will handle it and create a SearchCommandPraser.
SearchCommandPraser will use CodeStartsKeywordsPredicate to create a predicate. SearchCommandPraser then will
use the predicate as a parameter to create a SearchCommand.
Step 2. When the command is executed, SearchCommand will call Model#updateFilteredDatabaseModuleList(…) to use
the predicate to filter filteredDatabaseModules. UI of DatabaseModuleListPanel will change accordingly.
Step 3. The command will post a DatabaseTabRequestEvent to show the user updated database module list.
A CommandResult containing the execution result will be returned.
3.3.2. Design Considerations
Aspect: How to search database using Code
-
Alternative 1 (current choice): Use
Codeas a key to searchmoduleListone by one.-
Pros: Easy to implement. Do not need to refactor
moduleListto support this feature. -
Cons: Efficiency of searching is low. The time complexity is
O(N).
-
-
Alternative 2: Refactor
moduleListto be aHashMapfor searching.-
Pros: Efficiency of searching will increase. The time complexity is
O(1). -
Cons: May not be cost-efficient to refactor
moduleListonly to support this feature.
-
3.4. Module Database Administration
Module database administration is a series of commands that administrators can use to make necessary changes to keep the module database up to date, or to cater to their own needs.
The commands pertaining to module database administration can only be executed by users of type Admin.
|
Administrators can choose to add, remove or edit a module using addModuleDB, removeModuleDB and editModule respectively.
The changes will then be reflected
in both the module list in memory and in storage. Figure 1(shown below) describes the general flow of the administration
of the module database in an activity diagram.
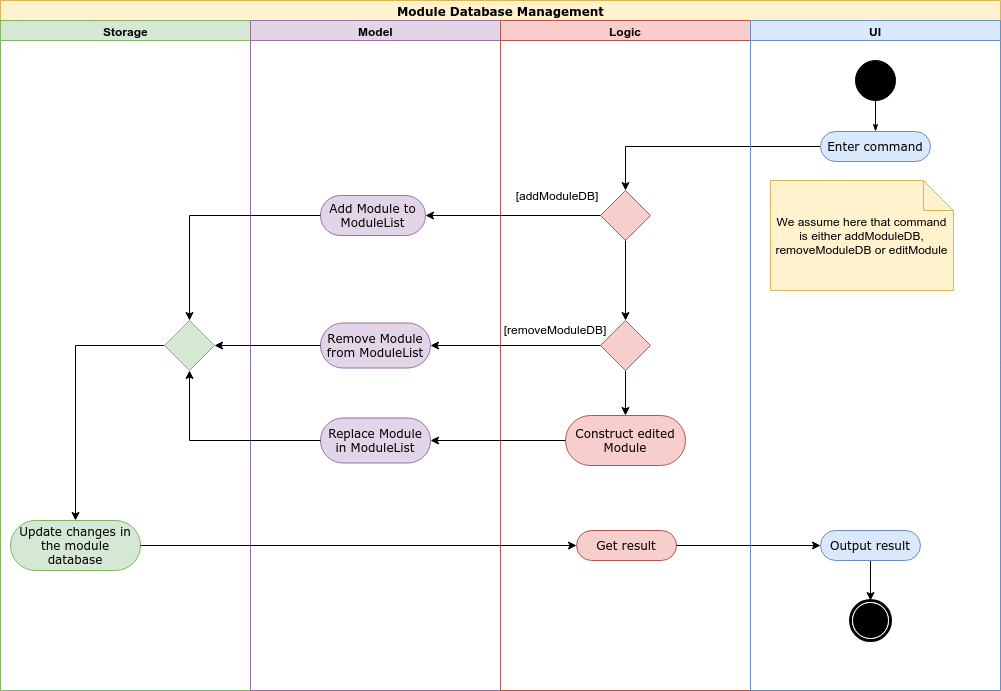
Figure 1. Activity diagram for module database administration.
3.4.1. Current Implementation
The Module database administration mechanism is facilitated by ModuleList in Model via the following operations:
-
ModuleList#addModule(…)— This method adds a module to the module list. -
ModuleList#removeModule(…)— This method removes a module from the module list. -
ModuleList#hasModule(…)— This method checks if the given module already exists. -
ModuleList#updateModule(…)— This method replace the specified target module with the given edited module.
These operations are exposed in the Model interface as Model#addModuleToDatabase(…),
Model#removeModuleFromDatabase(…), Model#hasModuleInDatabase(…) and Model#updateModule(…) respectively.
|
Each module database administration commands is facilitated by a command class in modsUni. The following list illustrates each command and their respective command class:
-
addModuleDB—AddModuleToDatabaseCommand -
removeModuleDB—RemoveModuleFromDatabaseCommand -
editModule—EditModuleCommand
Adding module to database
addModuleDB mechanism is facilitated by AddModuleToDatabaseCommand. It allows the addition of modules to database.
The AddModuleToDatabaseCommand extends for Command. Figure 2(shown below) depicts the UML representation of the
AddModuleToDatabaseCommand.
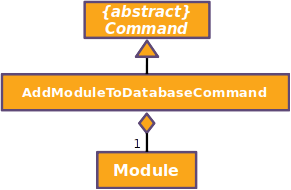
Figure 2. UML diagram of AddModuleToDatabaseCommand.
Parsing of command is performed by AddModuleToDatabaseCommandParser, which returns a AddModuleToDatabaseCommand
object after parsing ModuleCode, Title, Credit, Department, Description, AvailableSem and Prereq. Figure 3(shown below)
shows the
sequence diagram of the AddModuleToDatabaseCommandParser.
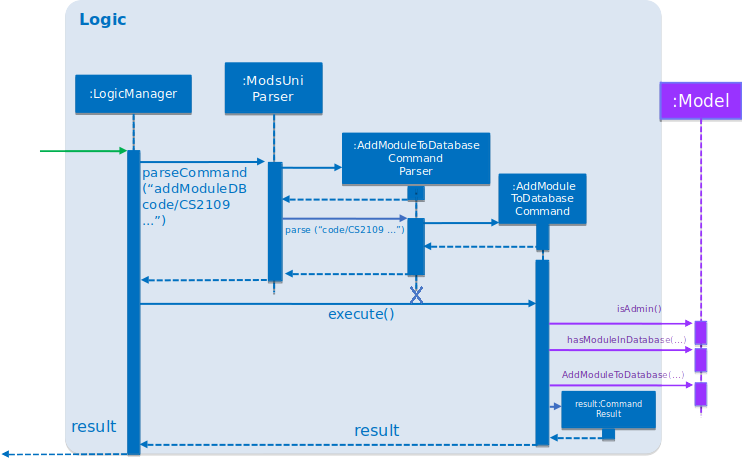
Figure 3. Sequence diagram for the interaction between Logic and Model Components when executing
AddModuleToDatabaseCommand.
Figure 4(shown below) shows the high-level sequence diagram of the command execution.
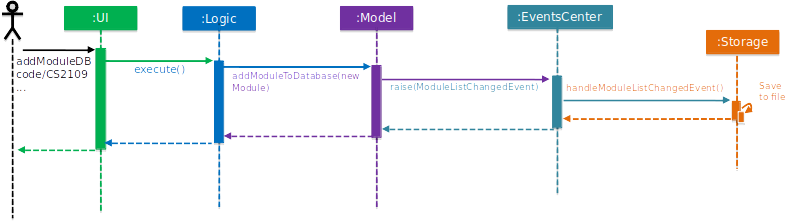
Figure 4. High-Level Sequence diagram of adding a module to database.
Given below is an example usage scenario and how the addModuleDB mechanism behaves at each step:
| For this example usage scenario, we assume that module "CS2109" did not exist in the database initially. |
-
An admin executes
addAdminDBwith valid arguments to add a module with module code “CS2109” to the module list. TheaddModuleDBcommand callsModel#addModuleToDatabase(…), causing the new model to be added toModuleListand subsequently update themoduleList.xmlfile with the new list. -
Another admin did not know the new module has already been added and tries to add the “CS2109” again by executing
addModuleDB. TheaddModuleDBcommand callsModel#hasModuleInDatabase(…), causing a feedback to return, informing the admin that the module already exists, and the module is not added.
The code snippet below shows how user input is parsed into a AddModuleToDatabaseCommand object.
public AddModuleToDatabaseCommand parse(String args) throws ParseException {
ArgumentMultimap argMultimap =
ArgumentTokenizer.tokenize(args, PREFIX_MODULE_CODE, PREFIX_MODULE_DEPARTMENT, PREFIX_MODULE_TITLE,
PREFIX_MODULE_DESCRIPTION, PREFIX_MODULE_CREDIT, PREFIX_MODULE_AVAILABLE, PREFIX_MODULE_PREREQ);
if (!arePrefixesPresent(argMultimap, PREFIX_MODULE_CODE, PREFIX_MODULE_DEPARTMENT, PREFIX_MODULE_TITLE,
PREFIX_MODULE_DESCRIPTION, PREFIX_MODULE_CREDIT, PREFIX_MODULE_AVAILABLE, PREFIX_MODULE_PREREQ)
|| !argMultimap.getPreamble().isEmpty()) {
throw new ParseException(String.format(MESSAGE_INVALID_COMMAND_FORMAT,
AddModuleToDatabaseCommand.MESSAGE_USAGE));
}
String codeName = argMultimap.getValue(PREFIX_MODULE_CODE).get();
Code code = new Code(codeName);
String department = argMultimap.getValue(PREFIX_MODULE_DEPARTMENT).get();
String title = argMultimap.getValue(PREFIX_MODULE_TITLE).get();
String description = argMultimap.getValue(PREFIX_MODULE_DESCRIPTION).get();
int credit = Integer.parseInt(argMultimap.getValue(PREFIX_MODULE_CREDIT).get());
boolean[] sems = getAvailableSems(argMultimap.getValue(PREFIX_MODULE_AVAILABLE).get());
Prereq prereq = ParserUtil.parsePrereq(argMultimap.getValue(PREFIX_MODULE_PREREQ).get());
Module module = new Module(code, department, title, description, credit,
sems[0], sems[1], sems[2], sems[3], new ArrayList<Code>(), prereq);
return new AddModuleToDatabaseCommand(module);
}The created Command object then execute the command, shown in the code snippet below.
public CommandResult execute(Model model, CommandHistory history) throws CommandException {
requireNonNull(model);
if (model.getCurrentUser() == null) {
throw new CommandException(MESSAGE_NOT_LOGGED_IN);
}
if (!model.isAdmin()) {
throw new CommandException(MESSAGE_NOT_ADMIN);
}
if (model.hasModuleInDatabase(toAdd)) {
throw new CommandException(MESSAGE_DUPLICATE_MODULE);
}
model.addModuleToDatabase(toAdd);
return new CommandResult(String.format(MESSAGE_SUCCESS));
}Deleting module from database
removeModuleDB mechanism is facilitated by the RemoveModuleFromDatabaseCommand class. It allows Admin to remove
Module from the database.
The RemoveModuleFromDatabaseCommand extends for Command. Figure 5(shown below) depicts the UML representation of the
RemoveModuleFromDatabaseCommand.
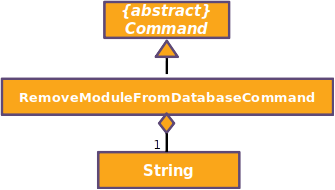
Figure 5. UML diagram of RemoveModuleFromDatabaseCommand.
Parsing of command is performed by RemoveModuleFromDatabaseParser, which returns a RemoveModuleFromDatabase object
after parsing moduleCode object. Figure 6(shown below) shows the sequence diagram of the RemoveModuleFromDatabaseCommandParser.
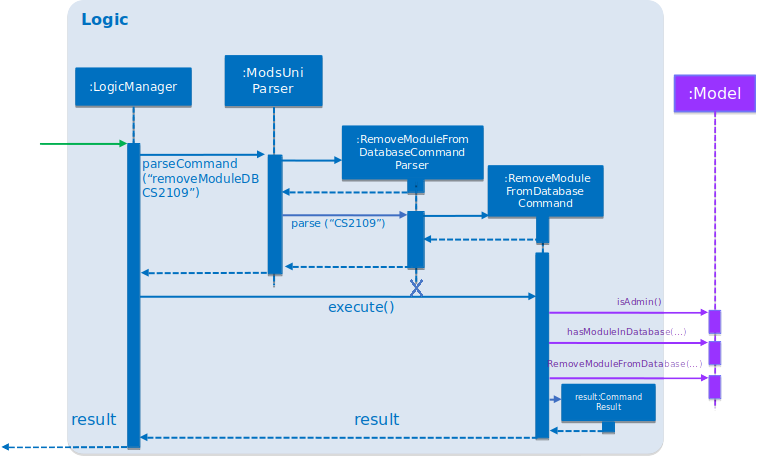
Figure 6. Sequence diagram for the interaction between Logic and Model Components when executing
RemoveModuleFromDatabase.
Figure 7(shown below) shows the high-level sequence diagram of the command execution.
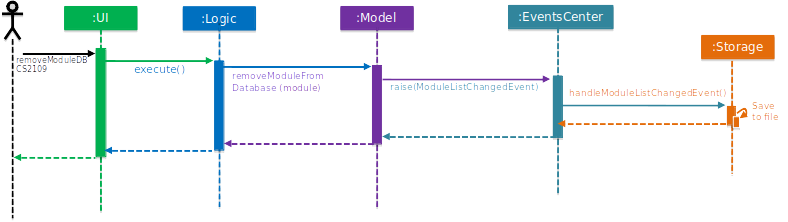
Figure 7. High-Level sequence diagram of removing a module from database.
Given below is an example usage scenario and how the removeModuleDB mechanism behaves at each step:
| For this example usage scenario, we assume that module "CS2109" already existed. |
-
An admin executes
removeAdminDB CS2109to remove the module with module code “CS2109” from the module list. TheremoveModuleDBcommand callsModel#removeModuleFromDatabase(…), causing the module with module code “CS2109” to be removed from the module list and subsequently update themoduleList.xmlfile with the new list. -
Another admin did not know that module “CS2109” has already been removed and tries to remove it again by executing
removeModuleDB CS2109. TheremoveModuleDBcommand returns a feedback informing the admin that the module “CS2109” does not exist, and no changes is made toModuleListandmoduleList.xml.
Editing module from database
editModule mechanism is facilitated by the EditModuleCommand class. It allows Admin to edit Module from the
database.
The EditModuleCommand extends for Command. Figure 8(shown below) depicts the UML representation of the EditModuleCommand.
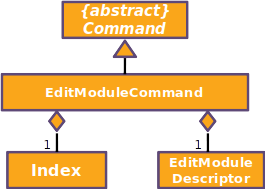
Figure 8. UML diagram of EditModuleCommand.
Parsing of command is performed by the EditModuleCommandParser, which returns a EditModuleCommand object after parsing
ModuleCode, Title, Credit, Department, Description, AvailableSem and Prereq. Figure 9(shown below) shows the sequence
diagram of the EditModuleCommandParser.
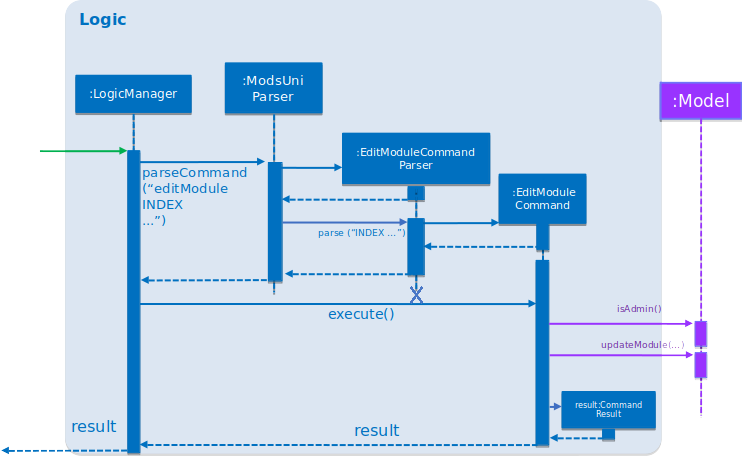
Figure 9. Sequence diagram for the interaction between Logic and Model Components when executing EditModule.
Figure 10(shown below) shows the high-level sequence diagram of the command execution.
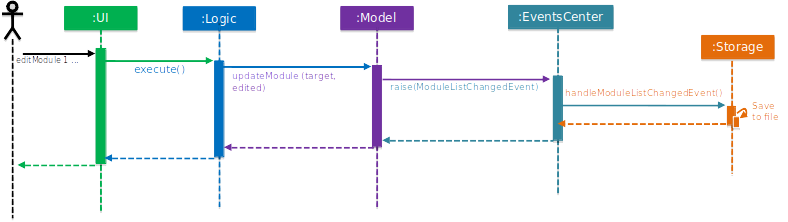
Figure 10. High-level sequence diagram of editing a module from database.
3.4.2. Design Considerations
Aspect: How add & remove executes
-
Alternative 1 (current choice): Interact with
moduleListloaded frommoduleList.xml.-
Pros: It is easy to implement.
-
Cons: There may be performance issues in terms of memory usage.
-
-
Alternative 2: Interact directly with
moduleList.xml-
Pros: There will be less memory used for storing module list.
-
Cons: Students may experience performance issues as they have to read from
moduleList.xmlin the hard disk every time they execute command that requires reading the module list.
-
Aspect: Data structure for module list
-
Alternative 1 (current choice): Using a list of
Module.-
Pros: We can simply store
Moduleobjects directly into the list. -
Cons: We have to iterate through the list to check if a module exist, resulting in a linear time complexity.
-
-
Alternative 2: Using a hash map with
ModuleCodekey andModulevalue.-
Pros: We can simply check if a
ModuleCodekey exists, which is fast as it is in constant time. -
Cons: Each module can only have one module code. Thus if a module have multiple module codes, we have to create another module just to store the other module codes. This can be heavy on memory usage.
-
3.5. Save User Feature
The save user feature involves mainly the saving process of a user’s attributes. A user can save their data only after they have logged in or registered an account.
Data refers to a user’s attributes listed in SaveCommand under the current implementation of the save user feature in the next section.
|
This section will describe in details the current implementation and the design considerations of the save user feature.
3.5.1. Current Implementation
The save mechanism is facilitated by the following classes:
-
SaveCommand
TheSaveCommandstores the following attributes of aUserobject:-
Attributes that exist in all user:
-
Username
The username of a user. -
Name
The name of the user. -
Role
The role of the user.Usernameis unique to every user and is used for logging in.Nameis non-unique and multiple users can use the sameName.
-
-
Attributes that only exist in an admin:
-
Salary
The salary of an administrator. -
Employment Date
The employment date of an administrator.
-
-
Attributes that only exist in a student:
-
Enrollment Date
The enrollment date of a student. -
Major(s)
A list of a student’s major. -
Minor(s)
A list of a student’s minor. -
Modules Taken
A list of modules took by a student. -
Modules Staged
A list of modules staged for the generation of candidature.A student must have at least one major and can have no minor.
-
-
-
UserStorage
It provides methods to save the current user’s attributes as well as to load a file containing previously saved data.
UserStorageimplements the following operations:-
StorageManager#saveUser(…)— Save the user’s data into the specified file path. -
StorageManager#readUser(…)— Reads the user’s data from the specified file path.
-
Implementation of the save feature
The save mechanism of modsUni is facilitated by SaveCommand class and is event-driven.
It allows a user to save their data as an XML file.
| Both admin and student can use the save feature. |
The SaveCommand class extends from the Command class as shown below in Figure 1.
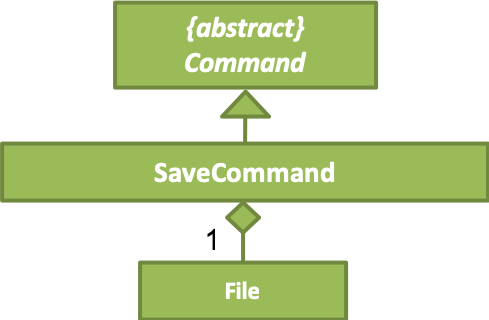
Figure 1. SaveCommand UML Diagram
The parsing of command is performed by SaveCommandParser, which returns a SaveCommand object after parsing the save file path.
The sequence diagram shown below in Figure 2 illustrates the interactions between the Logic and Model components when the SaveCommand is being executed.
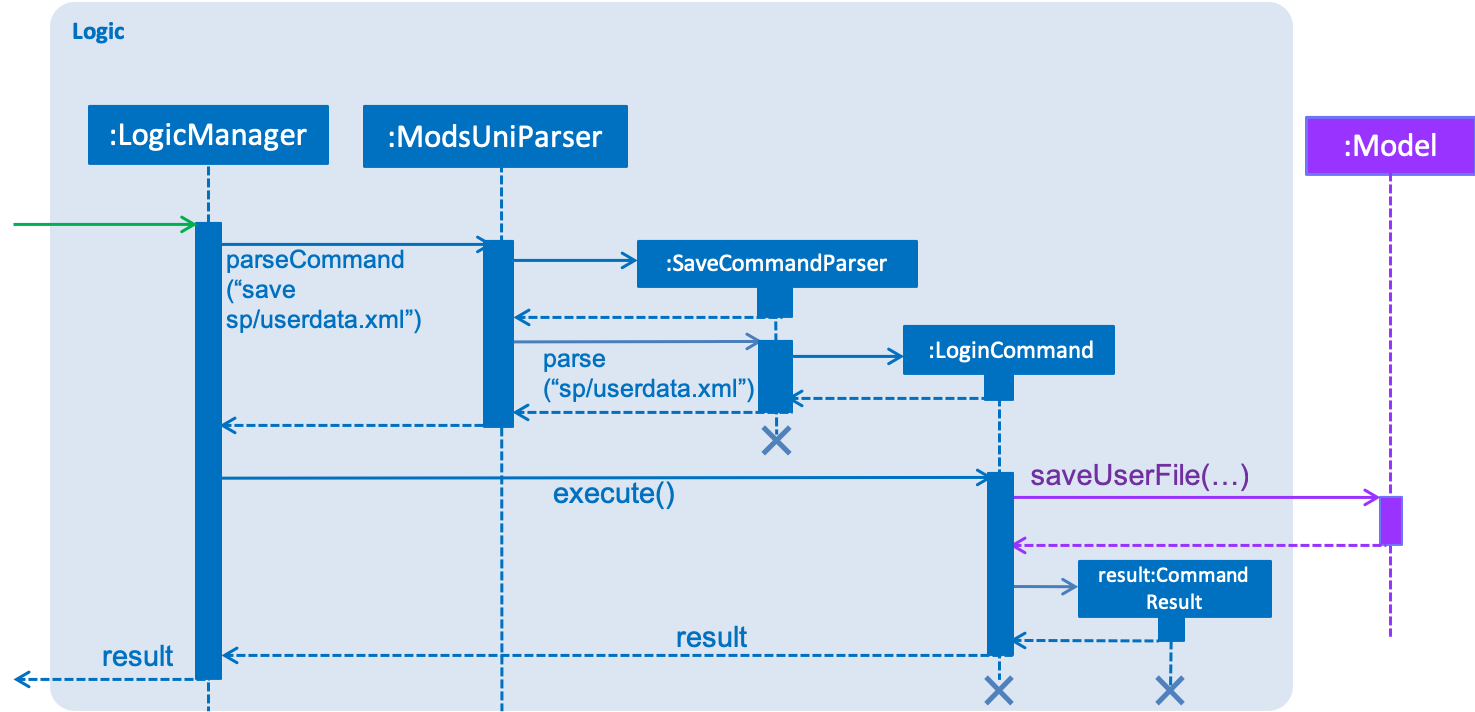
Figure 2. Sequence Diagram for the interaction between Logic and Model Components when executing SaveCommand
The save feature uses multiple components of the modsUni application.
The sequence diagram shown below in Figure 3 illustrates the interactions between some of these components.
In addition, the sequence diagram also illustrates that SaveCommand is driven by the SaveUserChangedEvent.
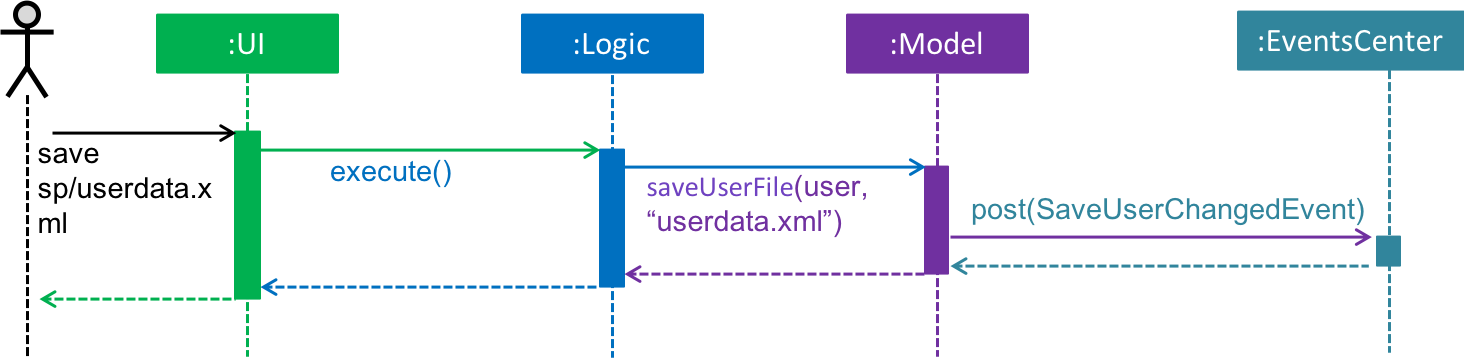
Figure 3. High-Level Sequence Diagram for the save sp/userdata.xml command
The SaveUserChangedEvent mentioned above is handled by the Storage component as shown in Figure 4.
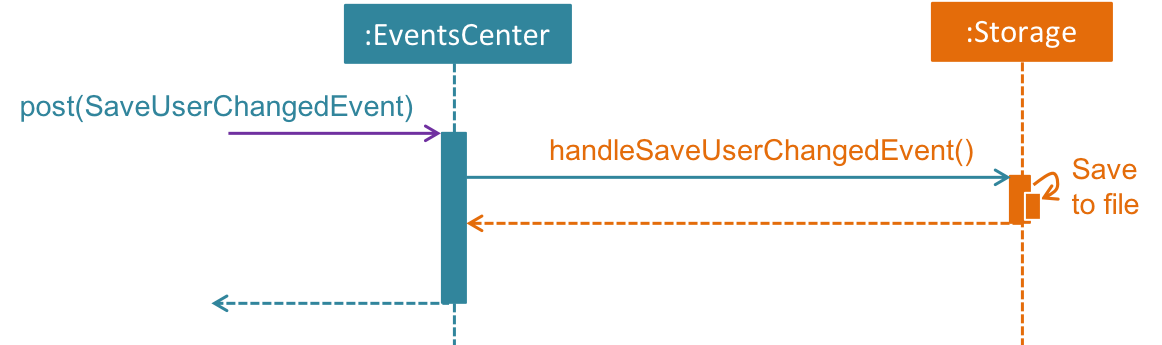
Figure 4. High-Level Sequence Diagram showing how the Storage component handles SaveUserChangedEvent which was triggered by EventsCenter
The Storage component makes use of XmlUserStorage class to write User to a file specified by the file path.
Both the conversion of User object to XmlSerializableUser as well as writing to file is shown in the following code snippet below:
public void saveUser(User user, Path filePath, String password) throws IOException {
// ... null checks ...
FileUtil.createIfMissing(filePath);
XmlFileStorage.saveDataToFile(filePath, new XmlSerializableUser(user, password));
}XmlFileStorage#saveDataToFile(…) utilizes XmlUtil#saveDataToFile(…) to save the newly created XmlSerializableUser object to the file as shown in the code snipplets below:
public static void saveDataToFile(Path file, XmlSerializableUser user) throws FileNotFoundException {
try {
XmlUtil.saveDataToFile(file, user);
} catch (JAXBException e) {
throw new AssertionError("Unexpected exception " + e.getMessage(), e);
}
}Given below is an example usage scenario and how the save mechanism behaves:
-
A student will first log into their account and add their preferred modules.
-
Upon issuing the command
save sp/userdata.xml, the save command will callModel#saveUserFile(…)which then raisesSaveUserChangedEvent. ThisSaveUserChangedEventis then handled byStorageManager. -
StorageManagerthen utilizesXmlUserStorage#saveUser(…)which saves the file to the file path specified by the user.
A newly registered Student would be initialized and automatically logged in which enables the student to perform the save command. |
The following activity diagram shown in Figure 5 summarizes what happens when a user executes the save command.
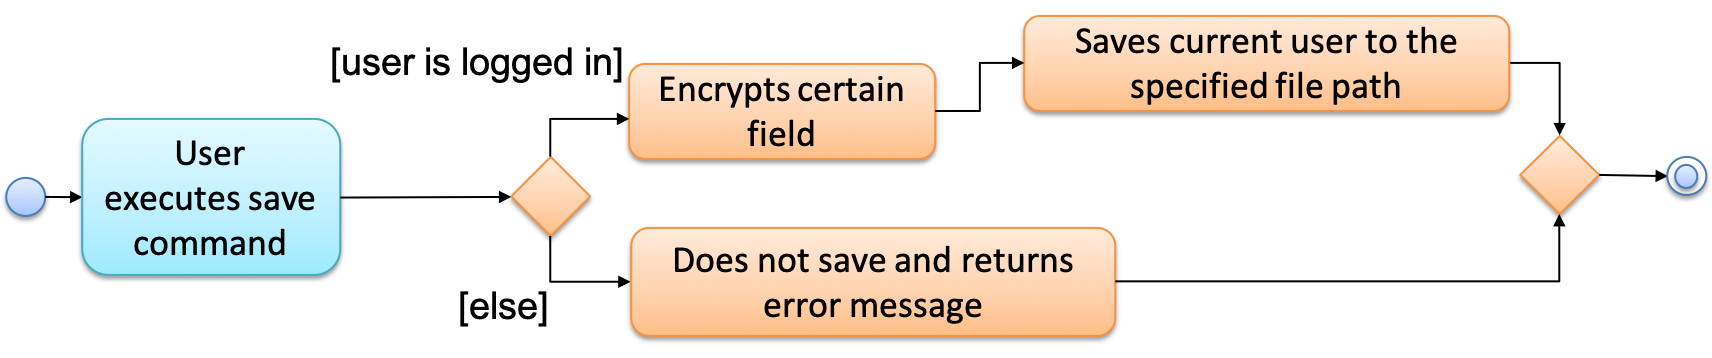
Figure 5. Activity Diagram for the save command
3.5.2. Design Considerations
Aspect: Data to save
-
Alternative 1 (current choice): Save every attribute of a
User.-
Pros: Able to restore to any state of a user.
-
Cons: Harder to implement as support for converting data of user to XML format needs to be added.
-
-
Alternative 2: Save only the staged modules.
-
Pros: Will use less storage space (saving only staged module vs saving all user data).
-
Cons: Does not restore the state of a user entirely.
-
3.6. Data Security Feature
The data security feature involves mainly the encryption of the user data file when using the save command and the decryption of a user data file when logging in using the login command.
| Advanced Encryption Standard (AES) is the algorithm used for encryption. |
This section will describe in details the current implementation and the design considerations of the data encryption & decryption feature.
3.6.1. Current Implementation
The data security feature is facilitated by DataSecurityUtil class.
DataSecurityUtil implements the following operations:
-
DataSecurityUtil#encrypt(…)— Encrypts abyte[]with the specified password and returns the encryptedbyte[]. -
DataSecurityUtil#decrypt(…)— Decrypts abyte[]with the specified password and returns the decryptedbyte[].
DataSecurityUtil class utilizes javax.crypto.cipher and javax.crypto.spec.SecretKeySpec packages for the operations mentioned above.
The Hashing class is also used to generate an SHA-1 hash to ensure that there are at least 16 bytes (128 bits) which is required to generate SecretKeySpec.
The encryption and decryption of user data are performed in XMLAdaptedUser.
Implementation of the encryption feature
The encryption feature is integrated with the Save User Feature.
During the conversion of a User object to XML, the encryption is performed in XMLAdapterUser, right before the file is written locally.
Currently, only Username (for all users) and Salary (for administrators) is encrypted.
The following code snippet shown below illustrates the encryption process:
public XmlAdaptedUser(User user, String password) {
// ... null checks ...
// All users
this.username = DataSecurityUtil.bytesToBase64(DataSecurityUtil.encrypt(
user.getUsername().toString().getBytes(), password));
this.name = user.getName().toString();
this.role = user.getRole().toString();
this.pathToProfilePic = user.getPathToProfilePic().toString();
// Admin
if (user.getRole() == Role.ADMIN) {
Admin admin = (Admin) user;
this.salary = DataSecurityUtil.bytesToBase64(DataSecurityUtil.encrypt(
admin.getSalary().toString().getBytes(), password));
this.employmentDate = admin.getEmploymentDate().toString();
}
// ... removed for brevity ...
}The sequence diagram shown below in Figure 1 illustrates the integration of encryption with the save user feature.
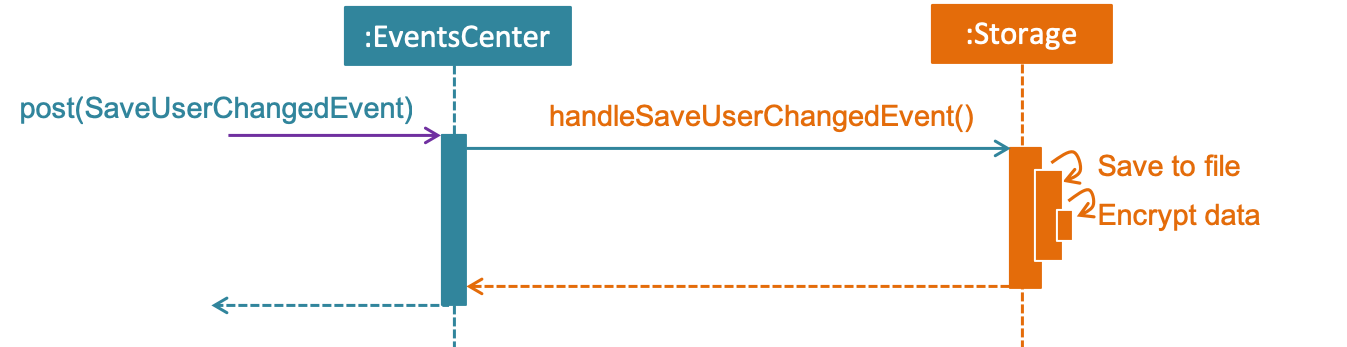
Figure 1. Sequence Diagram for the interaction between EventsCenter and Storage Components when executing SaveCommand with encryption
Implementation of the decryption feature
The decryption feature is integrated with the login feature under User Account Management.
When LoginCommand calls model.readUser(…) the loading of user file will commence and the decryption will occur in XMLAdapterUser#toModelType(…).
This is shown in the following code snippets below:
public User toModelType(String password) throws IllegalValueException, CorruptedFileException,
NoSuchPaddingException, InvalidPasswordException, NoSuchAlgorithmException, InvalidKeyException {
User user = null;
checkMandatoryFields();
// Applies to all user
String decryptedUsername = decryptUsername(password);
// Applies to only admin
if ("ADMIN".equals(role)) {
checkAdminFields();
String decryptedSalary = decryptSalary(password);
user = new Admin(new Username(decryptedUsername), new Name(name), Role.ADMIN, new Salary(decryptedSalary), new EmployDate(employmentDate));
}
// ... removed for brevity ...
return user;
}The code snippets of decryptUsername(…) and decryptSalary(…) are shown below respectively:
private String decryptUsername(String password) throws NoSuchAlgorithmException, InvalidKeyException,
InvalidPasswordException, CorruptedFileException, NoSuchPaddingException {
return new String(DataSecurityUtil.decrypt(
DataSecurityUtil.base64ToBytes(username), password), StandardCharsets.UTF_8);
}
private String decryptSalary(String password) throws NoSuchAlgorithmException, InvalidKeyException,
InvalidPasswordException, CorruptedFileException, NoSuchPaddingException {
return new String(DataSecurityUtil.decrypt(
DataSecurityUtil.base64ToBytes(salary), password), StandardCharsets.UTF_8);
}The sequence diagram shown below in Figure 2 illustrates the integration of decryption with the login feature.
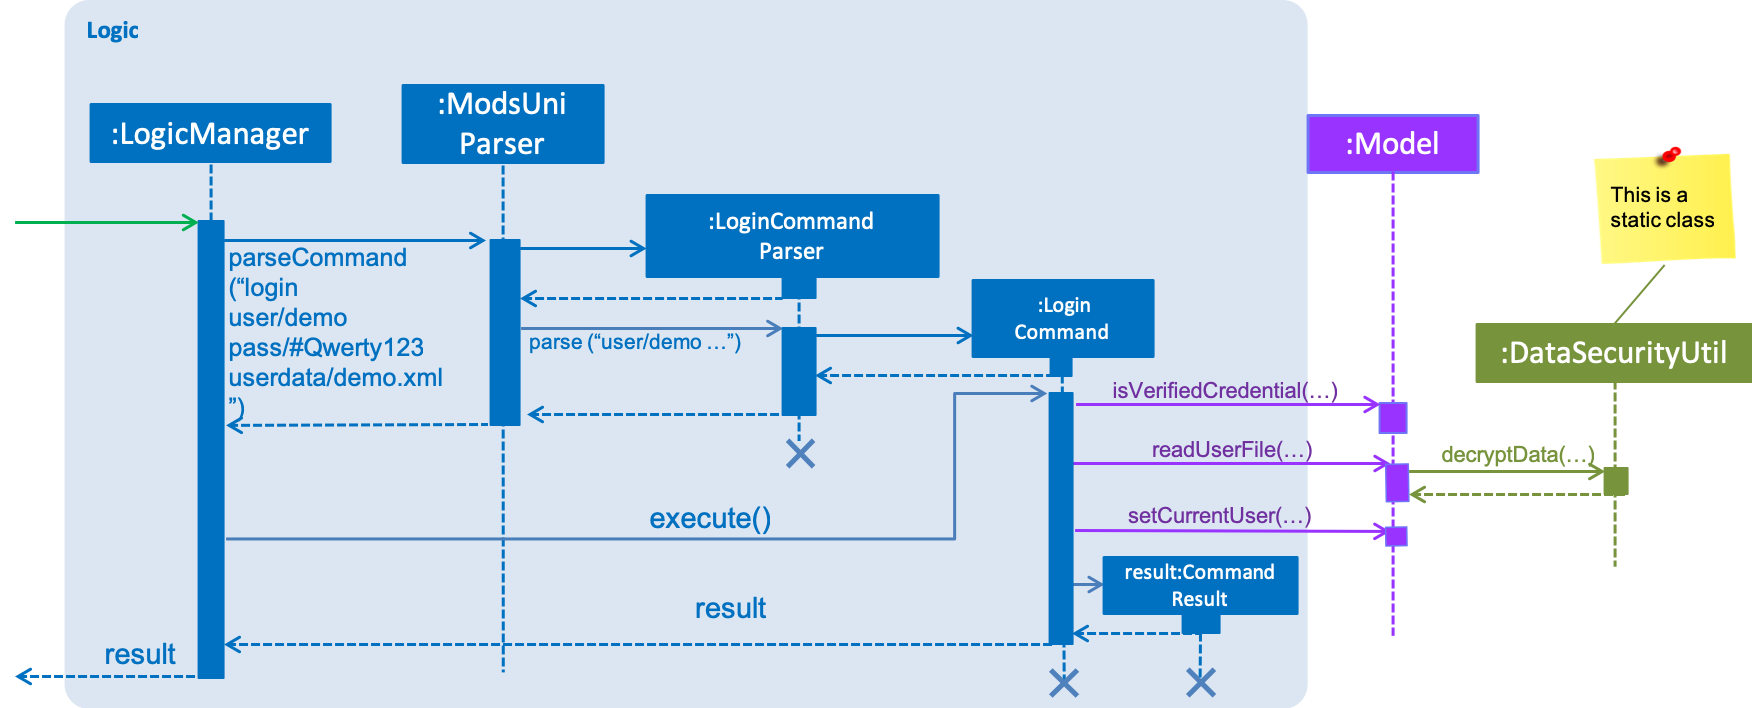
Figure 2. Sequence Diagram for the interaction between Logic Component and DataSecurityUtil when executing LoginCommand
The following activity diagram shown in Figure 3 summarizes what happens in the decryption process when a user executes the login command.
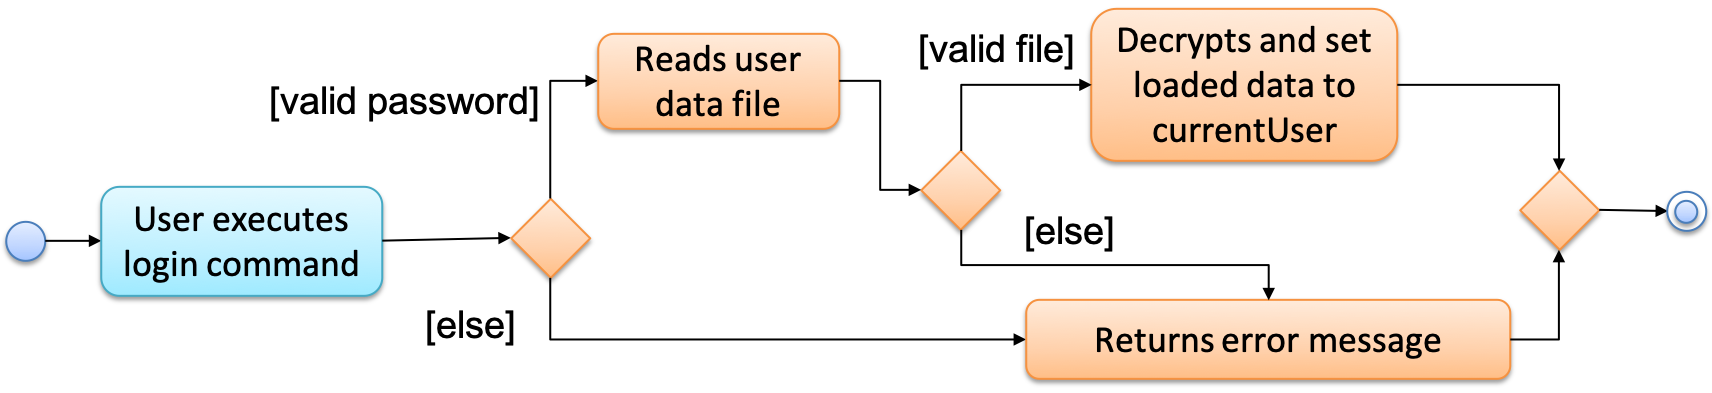
Figure 3. Activity Diagram for decryption feature in the login command
3.6.2. Design Considerations
Aspect: How encryption is implemented
-
Alternative 1 (current choice): Implement as an inbuilt feature.
-
Pros: Confidentiality of a user’s data file is preserved at all times.
-
Cons: User does not have full control over user data file.
-
-
Alternative 2: Implement as a command.
-
Pros: User will have more control over data security.
-
Cons: Enforcement of data security outside of the application would be harder.
-
Aspect: Generation of security key for encryption/decryption
-
Alternative 1 (current choice): Generate the key using a user’s password.
-
Pros: User does not need to supply additional information or file for encryption or decryption.
-
Cons: User is unable to decrypt their user data file if they forget their password.
-
-
Alternative 2: Generate the key using
KeyGeneratorand an additional file is needed to log in.-
Pros: The key will be more secured compared to the key generated from alternative one since a weak password that is susceptible to password cracking may be used by a user.
-
Cons: User is unable to decrypt their user data file if the key file is lost or corrupted.
-
Aspect: What fields to encrypt
-
Alternative 1 (current choice): Encrypt some fields (Username and Salary).
-
Pros: The encryption of username ensures that a malicious user is unable to correlate a specific user data file to a credential in the credential store. In addition, advance users can edit unencrypted fields in the user data file.
-
Cons: The user data file will contain unencrypted information.
-
-
Alternative 2: Encrypt every field.
-
Pros: The user data file is secure since every field is encrypted.
-
Cons: Advance user are unable to edit from the user data file manually.
-
3.7. Load User feature
The load user feature involves mainly the loading process of a user’s attributes.
This feature is integrated into the login command, however it functions independently from authentication process.
This section will describe in details the current implementation and the design considerations of the load user feature.
3.7.1. Current Implementation
The load mechanism is facilitated by the UserStorage class.
It provides a method to load the user’s attributes from a saved file.
The following operation is used for the loading process:
StorageManager#readUser(…) — Reads the user’s data from the specified file path.
Implementation of the save feature
The load mechanism of modsUni is facilitated by LoginCommand class and is event-driven.
It allows a user to load their data in modsUni from an XML file.
The load feature uses multiple components of the modsUni application.
Parsing of command is performed by LoginCommandParser, which returns a LoginCommand object after parsing
the save file path.
The sequence diagram shown below in Figure 1 illustrates the interactions between some of these components.
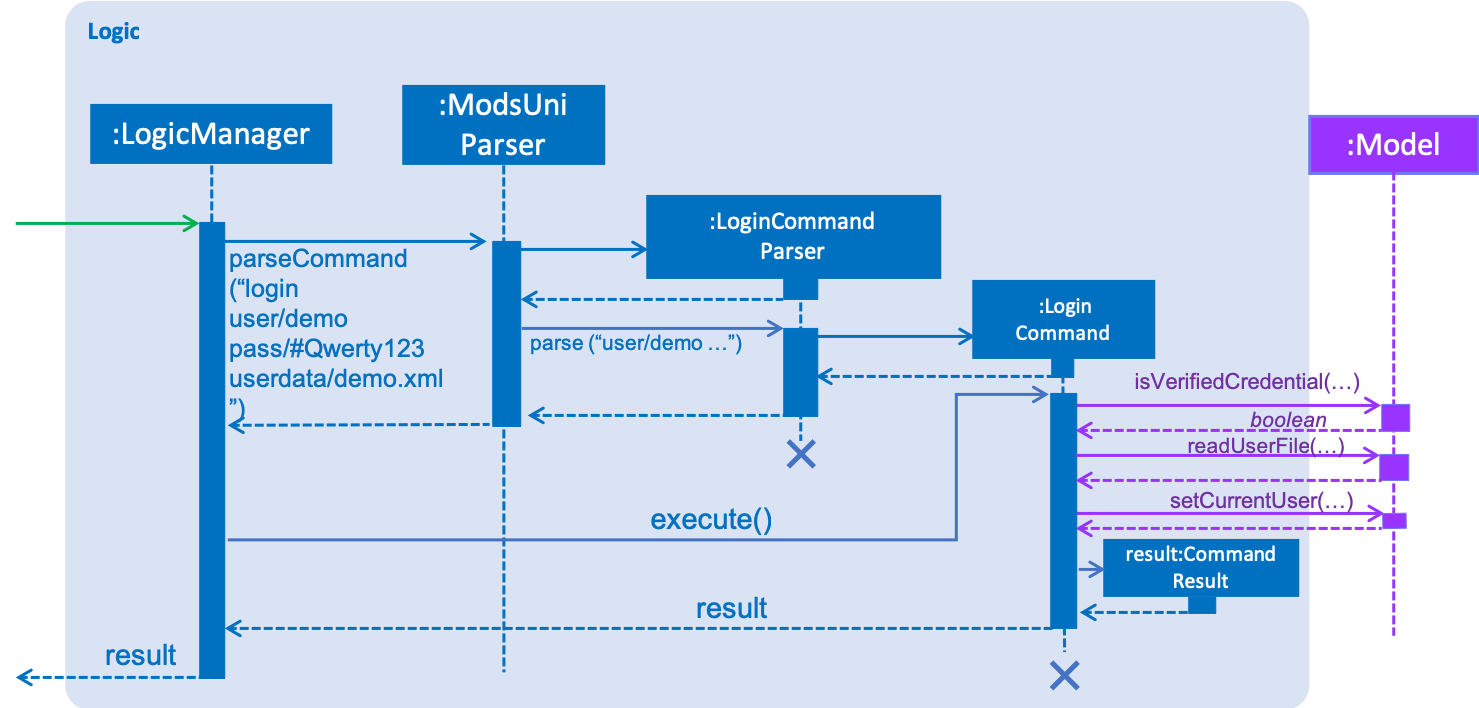
Figure 1. Sequence Diagram for the interaction between Logic and Model Components when executing LoginCommand
Figure 2. High-Level Sequence Diagram of the login process.
The Storage component makes use of XmlUserStorage class to read User from the file specified by the file path.
The conversion from XmlSerializableUser to User object is shown in the following code snippet below:
public Optional<User> readUser(Path filePath, String password) throws DataConversionException, FileNotFoundException {
// ... null checks ...
XmlSerializableUser xmlUser = XmlFileStorage.loadUserDataFromSaveFile(filePath);
try {
return Optional.of(xmlUser.toModelType(...));
} catch (IllegalValueException ive) {
logger.info("Illegal values found in " + filePath + ": " + ive.getMessage());
throw new DataConversionException(ive);
}
}The method XmlFileStorage#loadUserDataFromSaveFile(…) as shown in the code snippets below:
public static XmlSerializableUser loadUserDataFromSaveFile(Path file) throws DataConversionException, FileNotFoundException {
try {
return XmlUtil.getDataFromFile(file, XmlSerializableUser.class);
} catch (JAXBException e) {
throw new DataConversionException(e);
}
}Given below is an example usage scenario and how the save mechanism behaves:
-
A student will use the login command to log into their account.
-
Upon issuing the login command , the login command will call
Model#readUserFile(…)which then loads the file into anXmlSerializableUserusingXmlFileStorage.loadUserDataFromSaveFile(…). -
The
XmlSerializableUserobject is then converted to anUserobject using theXmlSerializableUser#toModelType(…).
3.7.2. Design Considerations
Aspect: Load command
-
Alternative 1 (current choice): Loads file together with login.
-
Pros: Able to load a user saved file without entering an additional command.
-
Cons: Reduce flexibility.
-
-
Alternative 2: Load file using an independent load command.
-
Pros: More control over when a file is loaded..
-
Cons: Additional command which may lead to more bug.
-
3.8. Logging
We are using java.util.logging package for logging. The LogsCenter class is used to manage the logging levels and logging destinations.
-
The logging level can be controlled using the
logLevelsetting in the configuration file (See Section 3.9, “Configuration”) -
The
Loggerfor a class can be obtained usingLogsCenter.getLogger(Class)which will log messages according to the specified logging level -
Currently log messages are output through:
Consoleand to a.logfile.
Logging Levels
-
SEVERE: Critical problem detected which may possibly cause the termination of the application -
WARNING: Can continue, but with caution -
INFO: Information showing the noteworthy actions by the App -
FINE: Details that is not usually noteworthy but may be useful in debugging e.g. print the actual list instead of just its size
3.9. Configuration
Certain properties of the application can be controlled (e.g App name, logging level) through the configuration file (default: config.json).
4. Documentation
We use asciidoc for writing documentation.
| We chose asciidoc over Markdown because asciidoc, although a bit more complex than Markdown, provides more flexibility in formatting. |
4.1. Editing Documentation
See UsingGradle.adoc to learn how to render .adoc files locally to preview the end result of your edits.
Alternatively, you can download the AsciiDoc plugin for IntelliJ, which allows you to preview the changes you have made to your .adoc files in real-time.
4.2. Publishing Documentation
See UsingTravis.adoc to learn how to deploy GitHub Pages using Travis.
4.3. Converting Documentation to PDF format
We use Google Chrome for converting documentation to PDF format, as Chrome’s PDF engine preserves hyperlinks used in webpages.
Here are the steps to convert the project documentation files to PDF format.
-
Follow the instructions in UsingGradle.adoc to convert the AsciiDoc files in the
docs/directory to HTML format. -
Go to your generated HTML files in the
build/docsfolder, right click on them and selectOpen with→Google Chrome. -
Within Chrome, click on the
Printoption in Chrome’s menu. -
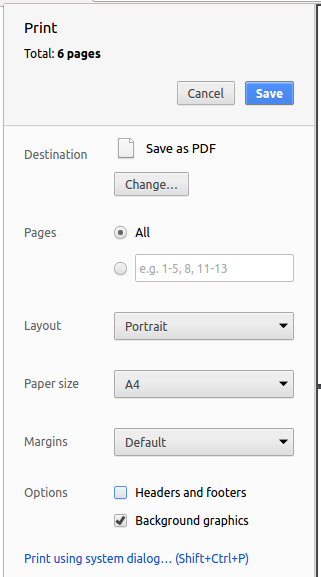
Set the destination to
Save as PDF, then clickSaveto save a copy of the file in PDF format. For best results, use the settings indicated in the screenshot below.
4.4. Site-wide Documentation Settings
The build.gradle file specifies some project-specific asciidoc attributes which affects how all documentation files within this project are rendered.
Attributes left unset in the build.gradle file will use their default value, if any.
|
| Attribute name | Description | Default value |
|---|---|---|
|
The name of the website. If set, the name will be displayed near the top of the page. |
not set |
|
URL to the site’s repository on GitHub. Setting this will add a "View on GitHub" link in the navigation bar. |
not set |
|
Define this attribute if the project is an official SE-EDU project. This will render the SE-EDU navigation bar at the top of the page, and add some SE-EDU-specific navigation items. |
not set |
4.5. Per-file Documentation Settings
Each .adoc file may also specify some file-specific asciidoc attributes which affects how the file is rendered.
Asciidoctor’s built-in attributes may be specified and used as well.
Attributes left unset in .adoc files will use their default value, if any.
|
| Attribute name | Description | Default value |
|---|---|---|
|
Site section that the document belongs to.
This will cause the associated item in the navigation bar to be highlighted.
One of: * Official SE-EDU projects only |
not set |
|
Set this attribute to remove the site navigation bar. |
not set |
4.6. Site Template
The files in docs/stylesheets are the CSS stylesheets of the site.
You can modify them to change some properties of the site’s design.
The files in docs/templates controls the rendering of .adoc files into HTML5.
These template files are written in a mixture of Ruby and Slim.
|
Modifying the template files in |
5. Testing
5.1. Running Tests
There are three ways to run tests.
| The most reliable way to run tests is the 3rd one. The first two methods might fail some GUI tests due to platform/resolution-specific idiosyncrasies. |
Method 1: Using IntelliJ JUnit test runner
-
To run all tests, right-click on the
src/test/javafolder and chooseRun 'All Tests' -
To run a subset of tests, you can right-click on a test package, test class, or a test and choose
Run 'ABC'
Method 2: Using Gradle
-
Open a console and run the command
gradlew clean allTests(Mac/Linux:./gradlew clean allTests)
| See UsingGradle.adoc for more info on how to run tests using Gradle. |
Method 3: Using Gradle (headless)
Thanks to the TestFX library we use, our GUI tests can be run in the headless mode. In the headless mode, GUI tests do not show up on the screen. That means the developer can do other things on the Computer while the tests are running.
To run tests in headless mode, open a console and run the command gradlew clean headless allTests (Mac/Linux: ./gradlew clean headless allTests)
5.2. Types of tests
We have two types of tests:
-
GUI Tests - These are tests involving the GUI. They include,
-
System Tests that test the entire App by simulating user actions on the GUI. These are in the
systemtestspackage. -
Unit tests that test the individual components. These are in
seedu.modsuni.uipackage.
-
-
Non-GUI Tests - These are tests not involving the GUI. They include,
-
Unit tests targeting the lowest level methods/classes.
e.g.seedu.modsuni.commons.StringUtilTest -
Integration tests that are checking the integration of multiple code units (those code units are assumed to be working).
e.g.seedu.modsuni.storage.StorageManagerTest -
Hybrids of unit and integration tests. These test are checking multiple code units as well as how the are connected together.
e.g.seedu.modsuni.logic.LogicManagerTest
-
5.3. Troubleshooting Testing
Problem: HelpWindowTest fails with a NullPointerException.
-
Reason: One of its dependencies,
HelpWindow.htmlinsrc/main/resources/docsis missing. -
Solution: Execute Gradle task
processResources.
6. Dev Ops
6.1. Build Automation
See UsingGradle.adoc to learn how to use Gradle for build automation.
6.2. Continuous Integration
We use Travis CI and AppVeyor to perform Continuous Integration on our projects. See UsingTravis.adoc and UsingAppVeyor.adoc for more details.
6.3. Coverage Reporting
We use Coveralls to track the code coverage of our projects. See UsingCoveralls.adoc for more details.
6.4. Documentation Previews
When a pull request has changes to asciidoc files, you can use Netlify to see a preview of how the HTML version of those asciidoc files will look like when the pull request is merged. See UsingNetlify.adoc for more details.
6.5. Making a Release
Here are the steps to create a new release.
-
Update the version number in
MainApp.java. -
Generate a JAR file using Gradle.
-
Tag the repo with the version number. e.g.
v0.1 -
Create a new release using GitHub and upload the JAR file you created.
6.6. Managing Dependencies
A project often depends on third-party libraries. For example, modsUni depends on the http://wiki.fasterxml
.com/JacksonHome[Jackson library] for XML parsing. Managing these dependencies can be automated using Gradle. For example, Gradle can download the dependencies automatically, which is better than these alternatives.
a. Include those libraries in the repo (this bloats the repo size)
b. Require developers to download those libraries manually (this creates extra work for developers)
Appendix A: Product Scope
Target user profile: NUS undergraduates, in particular, a freshman who has just started their candidature and have absolutely no idea how to plan their modules.
Value proposition: A candidature planner for NUS Undergraduates to assist them in their module planning process.
Appendix B: User Stories
Priorities: High (must have) - * * *, Medium (nice to have) - * *, Low (unlikely to have) - *
| Priority | As a … | I want to … | So that… |
|---|---|---|---|
|
student |
my search queries to be case-insensitive |
I can type commands faster |
|
student |
be able to know the total workload of the modules |
I will not overload |
|
student |
set a preferred semester to take a module |
I can take it with friends |
|
student |
remove modules |
my schedule will be updated |
|
student |
add in modules that I would like to take |
it will be added into my schedule |
|
student |
set a preferred max of semesters |
I can I can graduate earlier |
|
student |
add in modules that I’ve taken previously |
I can see what modules I can take |
|
student |
load my schedule |
I do not need to plan it again |
|
user |
see what commands are available |
I know what i can do |
|
student |
save my schedule |
I do not need to plan it again |
|
student |
search through a list of available modules |
I can determine the exact module code |
|
student |
check if my module plan is feasible |
I know if I need to make any changes |
|
student |
search for a module |
I can find out details about it |
|
developer |
be able to view all documentation on methods |
I can include additional features in the future |
|
student |
be able to see the prerequisite modules of a module |
I can see what modules to take |
|
student |
an application that is standalone |
I do not have to download dependency |
|
student |
be able to determine if I have preclusion to a module |
i will not end up taking modules i am not suppose to take |
|
user |
be able to contact the developer |
I can report bugs to improve the software |
|
student |
be able to generate a module planner |
I can plan for my entire candidature in my respective university |
|
user |
to customise the look of the software |
it is pleasing to the eyes |
|
advanced user |
to have auto complete commands |
I do not need to type so much |
|
student |
to be able to edit modules |
I don’t need to generate a new plan if I need to make any changes |
|
student |
to search for a professor |
I know what mods is he teaching |
|
student |
to be warned of the timetable clashes |
I will not make an unreasonable schedule |
|
student |
my personal information to be stored securely |
I am not subjected to identity theft |
|
developer |
to be able to integrate my plugins |
I can enhance user experience |
|
student |
to be able to view student reviews on modules |
I can better inform myself on what to expect of certain modules |
|
student |
to be able to print the schedule |
I can better store it |
|
user |
to be able to store my settings in cloud |
I can access them everywhere |
|
student |
to be able to view exam schedules |
I can better prepare for finals |
Appendix C: Use Cases
(For all use cases below, the System is the modsUni and the Actor is the NUS Undergraduate, unless specified otherwise)
Use case: Add module
MSS
-
User starts up application
-
User type in the relevant commands [
add <MOD_CODE>]Use case ends.
Extensions
-
1a. Load existing module configurations.
Use case ends.
Use case: Delete module
MSS
-
User starts up application
-
User type in the relevant commands [
remove <MOD_CODE>]Use case ends.
Use case: Generate Candidature Plan
MSS
-
User starts up application
-
User add module [UC01] using command line
-
User generate plan using relevant command [
generate]Use case ends.
Extensions
-
3a. Student able to generate plan based on years of candidature using relevant command [
generate <NUM_YEAR>year].Use case ends.
-
3b. Student able to generate plan based on specifying the semester in which a module is preferred to be taken using relevant command [
generate <MOD_CODE><SEMESTER>] Use case ends.
Use case: Search module
MSS
-
User type in the relevant command [search <KEYWORD>]
-
modsUni output search results in a list on the screen if any
Use case ends.
Use case: See prerequisites of a module
MSS
-
User type in the relevant command [
prereq <MODULE CODE>] -
System output the prerequisites for the module
Use case ends.
Use case: Load existing configuration
MSS
-
User starts up application
-
User type in the relevant command [
load <CONFIG_FILE>]Use case ends.
Appendix D: Non Functional Requirements
-
Should work on any mainstream OS as long as it has Java
9or higher installed. -
A user with above average typing speed for regular English text (i.e. not code, not system admin commands) should be able to accomplish most of the tasks faster using commands than using the mouse.
-
Should be able to generate a user’s schedule under less than 10 seconds.
-
Sensitive information (e.g. passwords) should not be saved in plaintext.
-
A user should be able to remove any personal identifiable information (PII) from the application.
-
An administrator should not be able to log in on behalf of a user.
Appendix E: Glossary
- CLI
-
CLI is an acronym for Command Line Interface. It is a text-based interface which facilitates interaction between the user and the software.
- Mainstream OS
-
Windows, Linux, Unix, OS-X
- Modules
-
Modules are classes on a specific set of topic, and assignments are often included to facilitate the learning process. Each module has its own code and module name, when coupled acts as an unique identifier to the module.
- User
-
There are two types of use mainly
StudentandAdministrator. Each of them have different functions implemented based on their role. - XML
-
XML represent eXtensible Markup Language. It is used to create a common information format which facilitates the sharing of information through different interfaces.
Appendix F: Instructions for Manual Testing
Given below are instructions to test the app manually.
| These instructions only provide a starting point for testers to work on; testers are expected to do more exploratory testing. |
F.1. Launch and Shutdown
-
Initial launch
-
Download the jar file and copy into an empty folder
-
Double-click the jar file
Expected: Shows the GUI. You should be greeted with a prompt to login or register. The window size may not be optimum.
-
-
Saving window preferences
-
Resize the window to an optimum size. Move the window to a different location. Close the window.
-
Re-launch the app by double-clicking the jar file.
Expected: The most recent window size and location is retained.
-
F.2. Registering a Student Account
Below are some test cases you can perform to test the RegisterCommand for User Account Management feature.
The below test cases only cater to Student accounts
|
-
Test case:
register user/max33 pass/#Qwerty4321 n/Max Verstappen enroll/15/03/2015 maj/CS maj/DA min/BA min/MA
Expected: A new account is created. TheStudentdetails as provided in the command should be automatically displayed inUserTab. A successful message should be displayed in the Output Display. Additionally, a save location is provided to the user. Examine the project’s root folder to determine if the file is indeed created.
Do note that registering a Student account is possible without any min/ parameters. This is in consideration that certain students do not have any minors
|
-
Test case:
register user/m@x33 pass/#Qwerty4321 n/Max Verstappen enroll/15/03/2015 maj/CS maj/DA min/BA min/MA
Expected: No new account is created. A invalidUsernameerror should be shown in the the Output Display. Rest of the UI remains unchanged. -
Prerequisite: A Student Account with
Usernamemax33 already exists inCredentialStore
Test case:register user/max33 pass/#Qwerty4321 n/Max Verstappen enroll/15/03/2015 maj/CS maj/DA min/BA min/MA
Expected: No new account is created. Error details should be shown in the Output Display. Rest of the UI remains unchanged. -
Other incorrect
registercommands to try:-
register user/max33 pass/Qwerty4321 n/Max Verstappen enroll/15/03/2015 maj/CS maj/DA min/BA min/MA -
register user/max33 pass/#Qwerty4321 enroll/15/03/2015 maj/CS maj/DA min/BA min/MA -
register user/max33 pass/#Qwerty4321 n/Max Verstappen maj/CS maj/DA min/BA min/MA -
register user/max33 pass/#Qwerty4321 n/Max Verstappen enroll/15/03/2015 min/BA min/MA
-
F.3. Logging in into a Student Account
Below are some test cases you can perform to test the LoginCommand for User Account Management feature.
-
Prerequisite: A student account should already be registered(i.e. an account registered under
max33) and the respective userdata file be available.
Test case:login user/max33 pass/#Qwerty4321 userdata/max33.xml
Expected: Student will be logged in. TheStudentdetails will be loaded from the file provided and will be displayed in the application(in their respective tabs). Additionally, a successful message will be displayed in the Output Display. -
Test case:
login user/max33 pass/wrongPass userdata/max33.xml
Expected: User will not be logged in. Error details should be shown in the Output Display. Rest of the UI remains unchanged. -
Other incorrect
logincommands to try:-
login user/max33 pass/#Qwerty4321 userdata/fileNotFound.xml -
login user/inv@lidUsername pass/#Qwerty4321 userdata/max33.xml -
login user/max33 pass/wrongPass userdata/max33.xml -
login user/max33 userdata/max33.xml -
login user/max33 pass/#Qwerty4321 -
login pass/#Qwerty4321 userdata/max33.xml -
login
-
F.4. Editing Student Details
Below are some test cases you can perform to test the EditStudentCommand for the User Account Management feature.
-
Prerequisite: A student account should already be registered(i.e. max33) and the respective userdata file be available. Student should also be logged in.
Test case:edit n/Max Emilian Verstappen maj/CS min/
Expected:Studentdetails will be updated accordingly. The new details will be displayed inUser Tab. Additionally, a successful message will be displayed in the Output Display. -
Test case:
edit -
Expected:
Studentdetails will not be updated. Error details would be shown in the Output Display. Rest of the UI remains unchanged.
F.5. Logging out from account
Below are the test case you can perform to test the LogoutCommand for the User Account Management feature.
-
Prerequisite: You should already be logged in either with a
Studentor anAdminaccount. -
Test case:
logout -
Expected:
Userwill be logged out. User details as displayed in the UI will be removed and all UI elements should be reset to its original state. Additionally, a successful message would be shown in the Output Display. -
Prerequisite: No user should be logged in.
Test case:logout
Expected: Logout attempt will fail. Error details would be shown in the Output Display. Rest of the UI remains unchanged.
F.6. Generating a schedule
-
Generate a schedule using modules in the student’s staged list
-
Prerequisites: Login using a student user account and download the sample modules database.
-
Test case:
-
addModuleS cs2030 cs2040 -
generate
Expected: Generate fail due to missing prerequisites.
-
-
Test case:
-
addModuleS cs1010 -
generate
Expected: Successful execution of the generate command. Schedule will be shown in the panel on the right of the application.
-
-
Other failures that might occur:
-
Invalid user account
loginusing an admin account -
No logged in user
generatewithout logging in -
No modules in staged list
generatewithout adding modules to staged list
-
-
F.7. Saving a user
-
Saving a user
-
Prerequisites: You must be logged in as a User (Admin or Student).
-
Test case:
save sp/userdata.xml
Expected: You should see a success message at the bottom and a file should be created/overwritten. In addition, the main panel should display your current user information. The timestamp in the user tab should also be updated. -
Test case:
save sp/userdata(without extension)
Expected: No data is saved. Error details shown at the bottom of the application. Timestamp in user tab should remain the same. -
Other incorrect save commands to try:
save sp,save sp/.xml.xml,save xx/userdata.xml
Expected: Similar to previous.
-
F.8. Modifying of user data file
-
Modify of admin data file
-
Prerequisites: You must have an admin data file (the master admin is provided).
-
Test case: Open up the admin file and edit the contents in the <name> tag. Now login as the admin using the updated user data file.
Expected: You should see a success login message at the bottom. In addition, you should see the updated name of the admin account. The timestamp in the user tab should be the time you logged in. -
Test case: Open up the admin file and edit the contents in the <employmentDate> tag (follow the original format of dd/mm/yyyy). Now login as the admin using the updated user data file.
Expected: You should see a success login message at the bottom. In addition, you should see the updated employment date data of the admin account. The timestamp in the user tab should be the time you logged in. -
Test case: Open up the admin file and change the order of tags (e.g. swap the order of name and role). Ensure that there are no extra spaces or empty lines. Now login as the admin using the updated user data file.
Expected: You should be able to login as per normal and see a success login message at the bottom. The timestamp in the user tab should be the time you logged in. -
Test case: Open up the admin file and duplicate the tags (e.g. add <name>master2</name> below the existing <name>master</name> tag). Ensure that there are no extra spaces or empty lines. Now login as the admin using the updated user data file.
Expected: You should see a success login message at the bottom. In addition, you should see the admin name to be "master2". The timestamp in the user tab should be the time you logged in. You can also duplicate restricted tags(username, role, employmentDate), however the furthest (from the first line) tag will be the one that is read. So you can have invalid values in prior duplicated tags. -
Test case: Open up the admin file and edit the contents in the <username> tag . Now login as the admin using the updated user data file.
Expected: You should see an error message at the bottom. -
Other invalid modification to try: removing the entire tag, modifying contents from role and salary
Expected: Similar to previous.
-
-
Modify of student data file
-
Prerequisites: You must have a student data file (you can obtain one by registering an account and adding some modules to staged and taken).
-
Test case: Open up the student file and edit the contents in the <name> tag. Now login as the student using the updated user data file.
Expected: You should see a success login message at the bottom. In addition, you should see the updated name of the student account. The timestamp in the user tab should be the time you logged in. -
Test case: Open up the student file and edit the contents in the <enrollmentDate> tag (follow the original format of dd/mm/yyyy). Now login as the student using the updated user data file.
Expected: You should see a success login message at the bottom. In addition, you should see the updated enrollment date data of the student account. The timestamp in the user tab should be the time you logged in. -
Test case: Open up the student file and edit the contents in the <major> and <minor> tag (you must follow the original format of [a, b, c], with comma and space in-between). Contraints are that you must have at least one major and can have zero minor. The inputs for major and minor must consist of only unaccented alphabetical letters (e.g. a-zA-Z). Now login as the student using the updated user data file.
Expected: You should see a success login message at the bottom. In addition, you should see the updated major or minor data of the student account. The timestamp in the user tab should be the time you logged in. -
Test case: Open up the student file and edit the <lockModules> or <parsedPrereq> tag from <moduleStaged> (e.g. instead of <lockModules>CS2030</lockModules> it should look like <lock>CS2030</lock> after editing). Now login as the student using the updated user data file.
Expected: You should see a success login message at the bottom. The timestamp in the user tab should be the time you logged in. However, that information will not be loaded and may cause generate feature to fail. -
Test case: Open up the student file and edit any contents in the <moduleTaken> or <moduleStaged> tag (it is recommended to start with <code> so you get a feel of the update). Now login as the student using the updated user data file.
Expected: You should see a success login message at the bottom. The timestamp in the user tab should be the time you logged in. Now navigate (switch tab/staged or switch tab/taken) staged or taken tab depending on where you change, you should see the updated module code.
Module information (represented by <code>, <department>, <title>, <description>, <credit>, <isAvailableInSem1>, <isAvailableInSem2>, <isAvailableInSpecialTerm1>, <isAvailableInSpecialTerm2>, <lockedModules>, <parsedPrereq>) are given as it is for testing purpose. If you change the information (module code/prerequisite), the application will generate based on the information in the user data. So the generate feature may fail depending on what you changed. You can create unique cases such as taking CS2030 without completing CS1010. An example would be to remove CS1010 as a prerequisite for CS2030 in the user data file. Now when log back in and add CS2030 to staged, you will be able to use the generate feature as expected even without having to add CS1010 to staged or taken. -
Test case: Open up the student file and edit the contents in the <username> tag . Now login as the student using the updated user data file.
Expected: You should see an error message at the bottom. -
Other invalid modification to try: removing the entire <code> tag from a module in <modulesStaged> or <modulesTaken>, remove characters from mandatory tags (code, department, title, description in <modulesTaken or <modulesStaged>), .
Expected: Similar to previous.
-
F.9. Adding a module
Below are some test cases you can perform to test the AddModuleToDatabaseCommand for the database administration feature:
The below test cases only cater to Admin accounts
|
-
Test case:
addModuleDB code/CS2103T department/Computing title/The New Module credit/4 available/1100
           description/This course is newly offered by the school of computing. Visit the module website for more details
           prereq/|(|CS1020,CS1020E,CS2020,)(&CS2030,(|CS2040,CS2040C,))
Expected: A new module is created. TheModuledetails as provided in the command should be automatically displayed in the database tab. A successful message should be displayed in the Output Display. Additionally, the module details is saved inmodules.xml. Examinemodules.xmlto determine if the module is indeed created. -
Prerequisite: A module with module code CS2103T already exists in
modules.xml
Test case:addModuleDB code/CS2103T department/Computing title/The New Module credit/4 available/1100 description/This course is newly offered by the school of computing. Visit the module website for more details prereq/|(|CS1020,CS1020E,CS2020,)(&CS2030,(|CS2040,CS2040C,))
Expected: No new module is created. Error details should be shown in the Output Display. Rest of the UI remains unchanged.
F.10. Editing module details
Below are some test cases you can perform to test the EditModuleCommand for the module database administration feature:
The below test cases only cater to Admin accounts
|
-
Prerequisite: A module with index 1 already exists in the database tab.
Test case:editModule 1 code/#CS1010
Expected: module information is not edited. Error details should be shown in the output dsiplay. Rest of the UI remains unchanged. -
Other incorrect
editModulecommands to try:-
editModule code/CS1010 -
editModule 1 prereq/&& -
editModule 1 prereq/&CS1010 -
editModule 1 prereq/|CS1010,()
-