By: Team W17-2 Since: Sep 2018 Licence: MIT
- 1. Introduction
- 2. Quick Start
- 3. Features
- 3.1. Viewing help :
help - 3.2. Adding a module to student’s staged module list:
addModuleS - 3.3. Adding a module to student’s taken module list:
addModuleT - 3.4. Deleting a module from student’s staged module list:
removeModuleS - 3.5. Deleting a module from student’s taken module list:
removeModuleT - 3.6. Searching for a module in the database:
search - 3.7. Listing all modules in the database:
list - 3.8. Showing the detail of a module in the database:
showModule - 3.9. Saving user data:
save - 3.10. Switch left panel tabs:
switch - 3.11. Generate schedule:
generate - 3.12. Register a Student Account :
register - 3.13. Login to User Account :
login - 3.14. Edit Student Account :
edit - 3.15. Logout from User Account :
logout - 3.16. Data Encryption
- 3.1. Viewing help :
- 4. Administrator Features
- 4.1. Add a new administrator account:
addAdmin - 4.2. Edit the currently logged in administrator account:
editAdmin - 4.3. Remove a existing user account:
removeUser - 4.4. Show the list of usernames:
showUser - 4.5. Add a new module to database:
addModuleDB - 4.6. Edit details of a module in database:
editModule - 4.7. Remove a existing module from database:
removeModuleDB
- 4.1. Add a new administrator account:
- 5. FAQ
- 6. Command Summary
1. Introduction
modsUni is an application for NUS students who want to quickly generate a plan for the modules to take during their entire university life.
Currently, modsUni is an application that makes use of a Command Line Interface (CLI) for ease of use and increased productivity. The application also utilises a Graphical User Interface (GUI) for displaying of results.
This way, you are able to use the application easily and effectively without compromising its aesthetics.
Interested? Jump to the Section 2, “Quick Start” to get started. Enjoy!
2. Quick Start
-
Ensure you have Java version
9or later installed in your Computer. -
Download the latest
modsUni.jarhere. -
Copy the file to the folder you want to use as the home folder for modsUni.
-
Create a
datafolder in the home folder and placemodules.xmlandcredentialstore.xmlinto this folder. -
Download the latest
modules.xmlhere -
Download the latest
credentialstore.xmlhere -
Put the
masterconfig.xmlin the root folder. -
Download the latest
masterconfig.xmlhere -
Copy the XML file to the
datafolder. -
Double-click
modsUni.jarto start the app. The GUI should appear in a few seconds.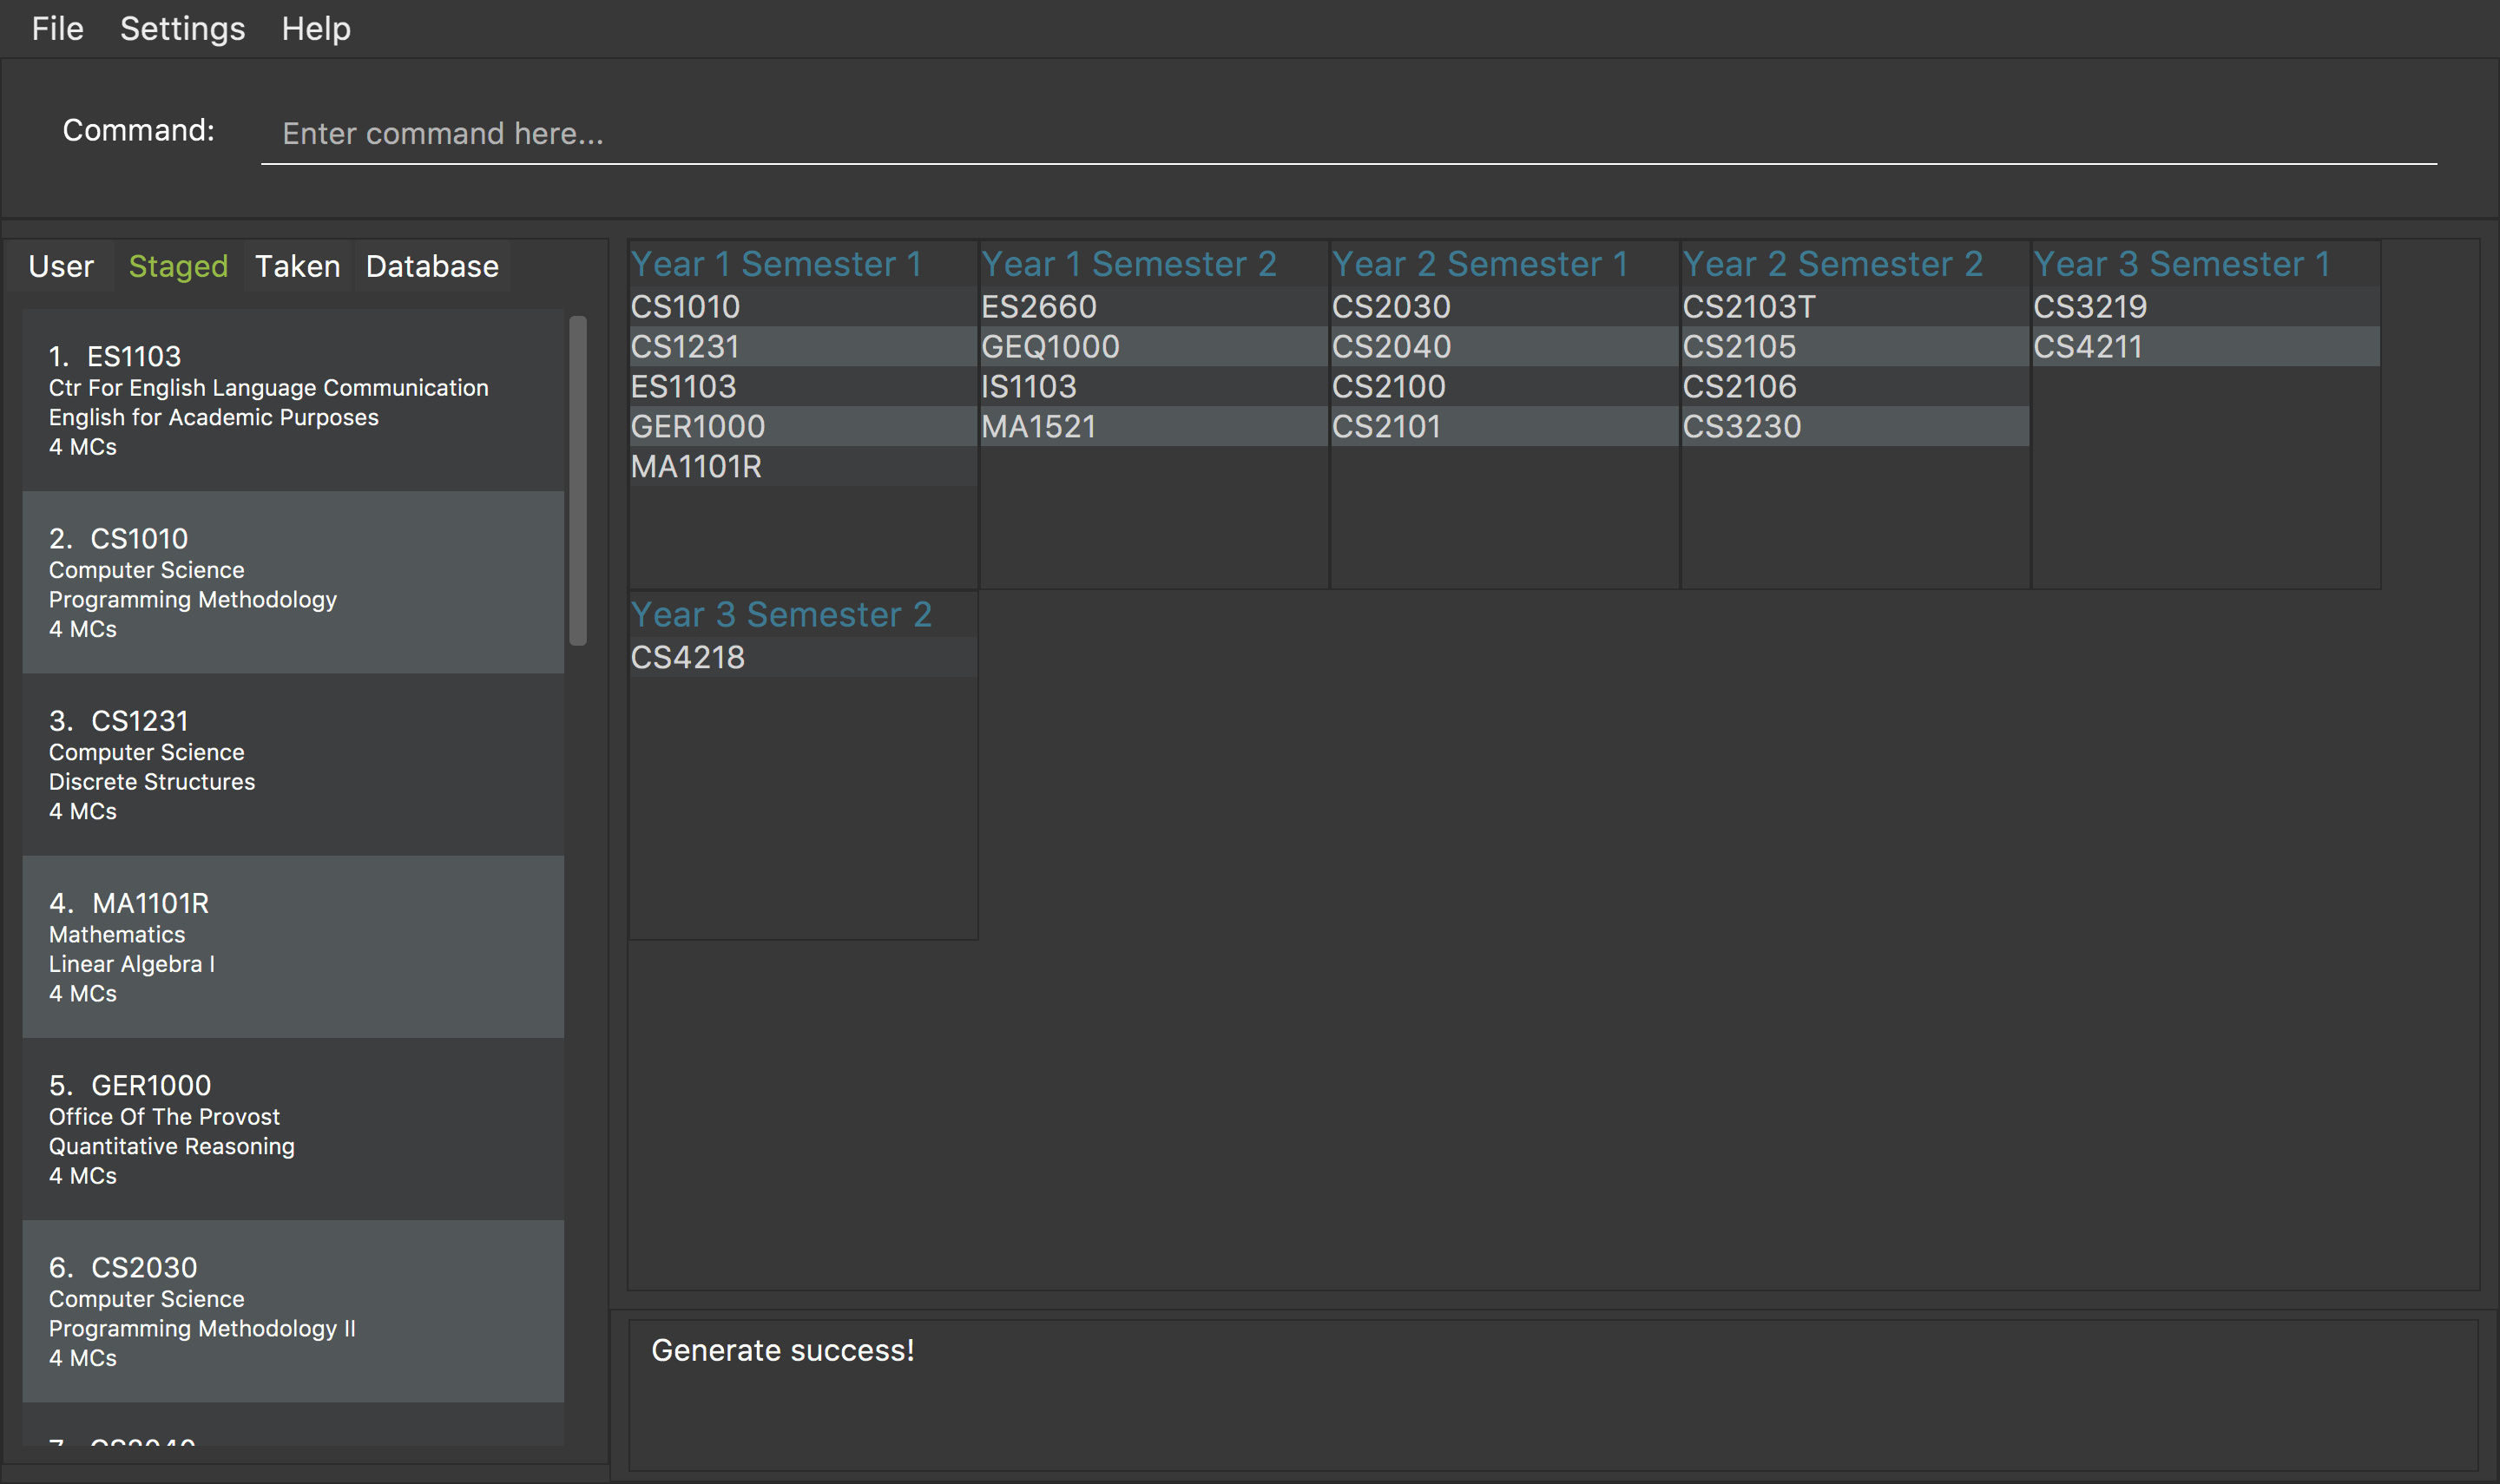
Type the command in the command box and press Enter to execute it.
e.g. typing help and pressing Enter will open the help window.
Some example commands you can try:
-
registeruser/max33 pass/#Qwerty4321 n/Max Verstappen enroll/15/03/2015 maj/CS maj/DA min/BA min/MA: creates a new student account -
addModuleSCS2103T: adds the module CS2103T to the staged modules configuration -
removeModuleSCS2103T: removes the module CS2103T to the staged module configuration -
exit: exits the app
Refer to Section 3, “Features” for details of each command.
To begin using administrator commands, login to the default master account with the following command:
login user/master pass/Pass#123 userdata/masterconfig.xml
Refer to Section 4, “Administrator Features” for details of each admin command.
3. Features
This section displays the current implemented features as well as features that will be implemented in the future.
Command Format
-
Words in
UPPER_CASEare the parameters to be supplied by the user. UsingaddModuleS <MOD_CODE>as an example, you can issue the commandaddModuleS CS2103Tto add the moduleCS2103Tto the staged module list. -
Items in square brackets are optional e.g
MOD_CODE [MORE MOD_CODES]can be used asaddModuleS CS2103T CS2101or asaddModuleS CS2103T.
3.1. Viewing help : help
Gives the list of command available for the user to use.
Format: help
3.2. Adding a module to student’s staged module list: addModuleS
Adds a module to the student’s staged module list.
A staged module list is a list of modules a student is intending to take.
This command is case insensitive.
Format: addModuleS <MOD_CODE> [MORE MOD_CODE]
Examples:
-
addModuleS CS2103T -
addModuleS cS2103t
Both the above commands will have the same effect. -
addModuleS CS2103T CS2101 CS1010
Figure 1 shows an example of the usage of addModuleS command in the application
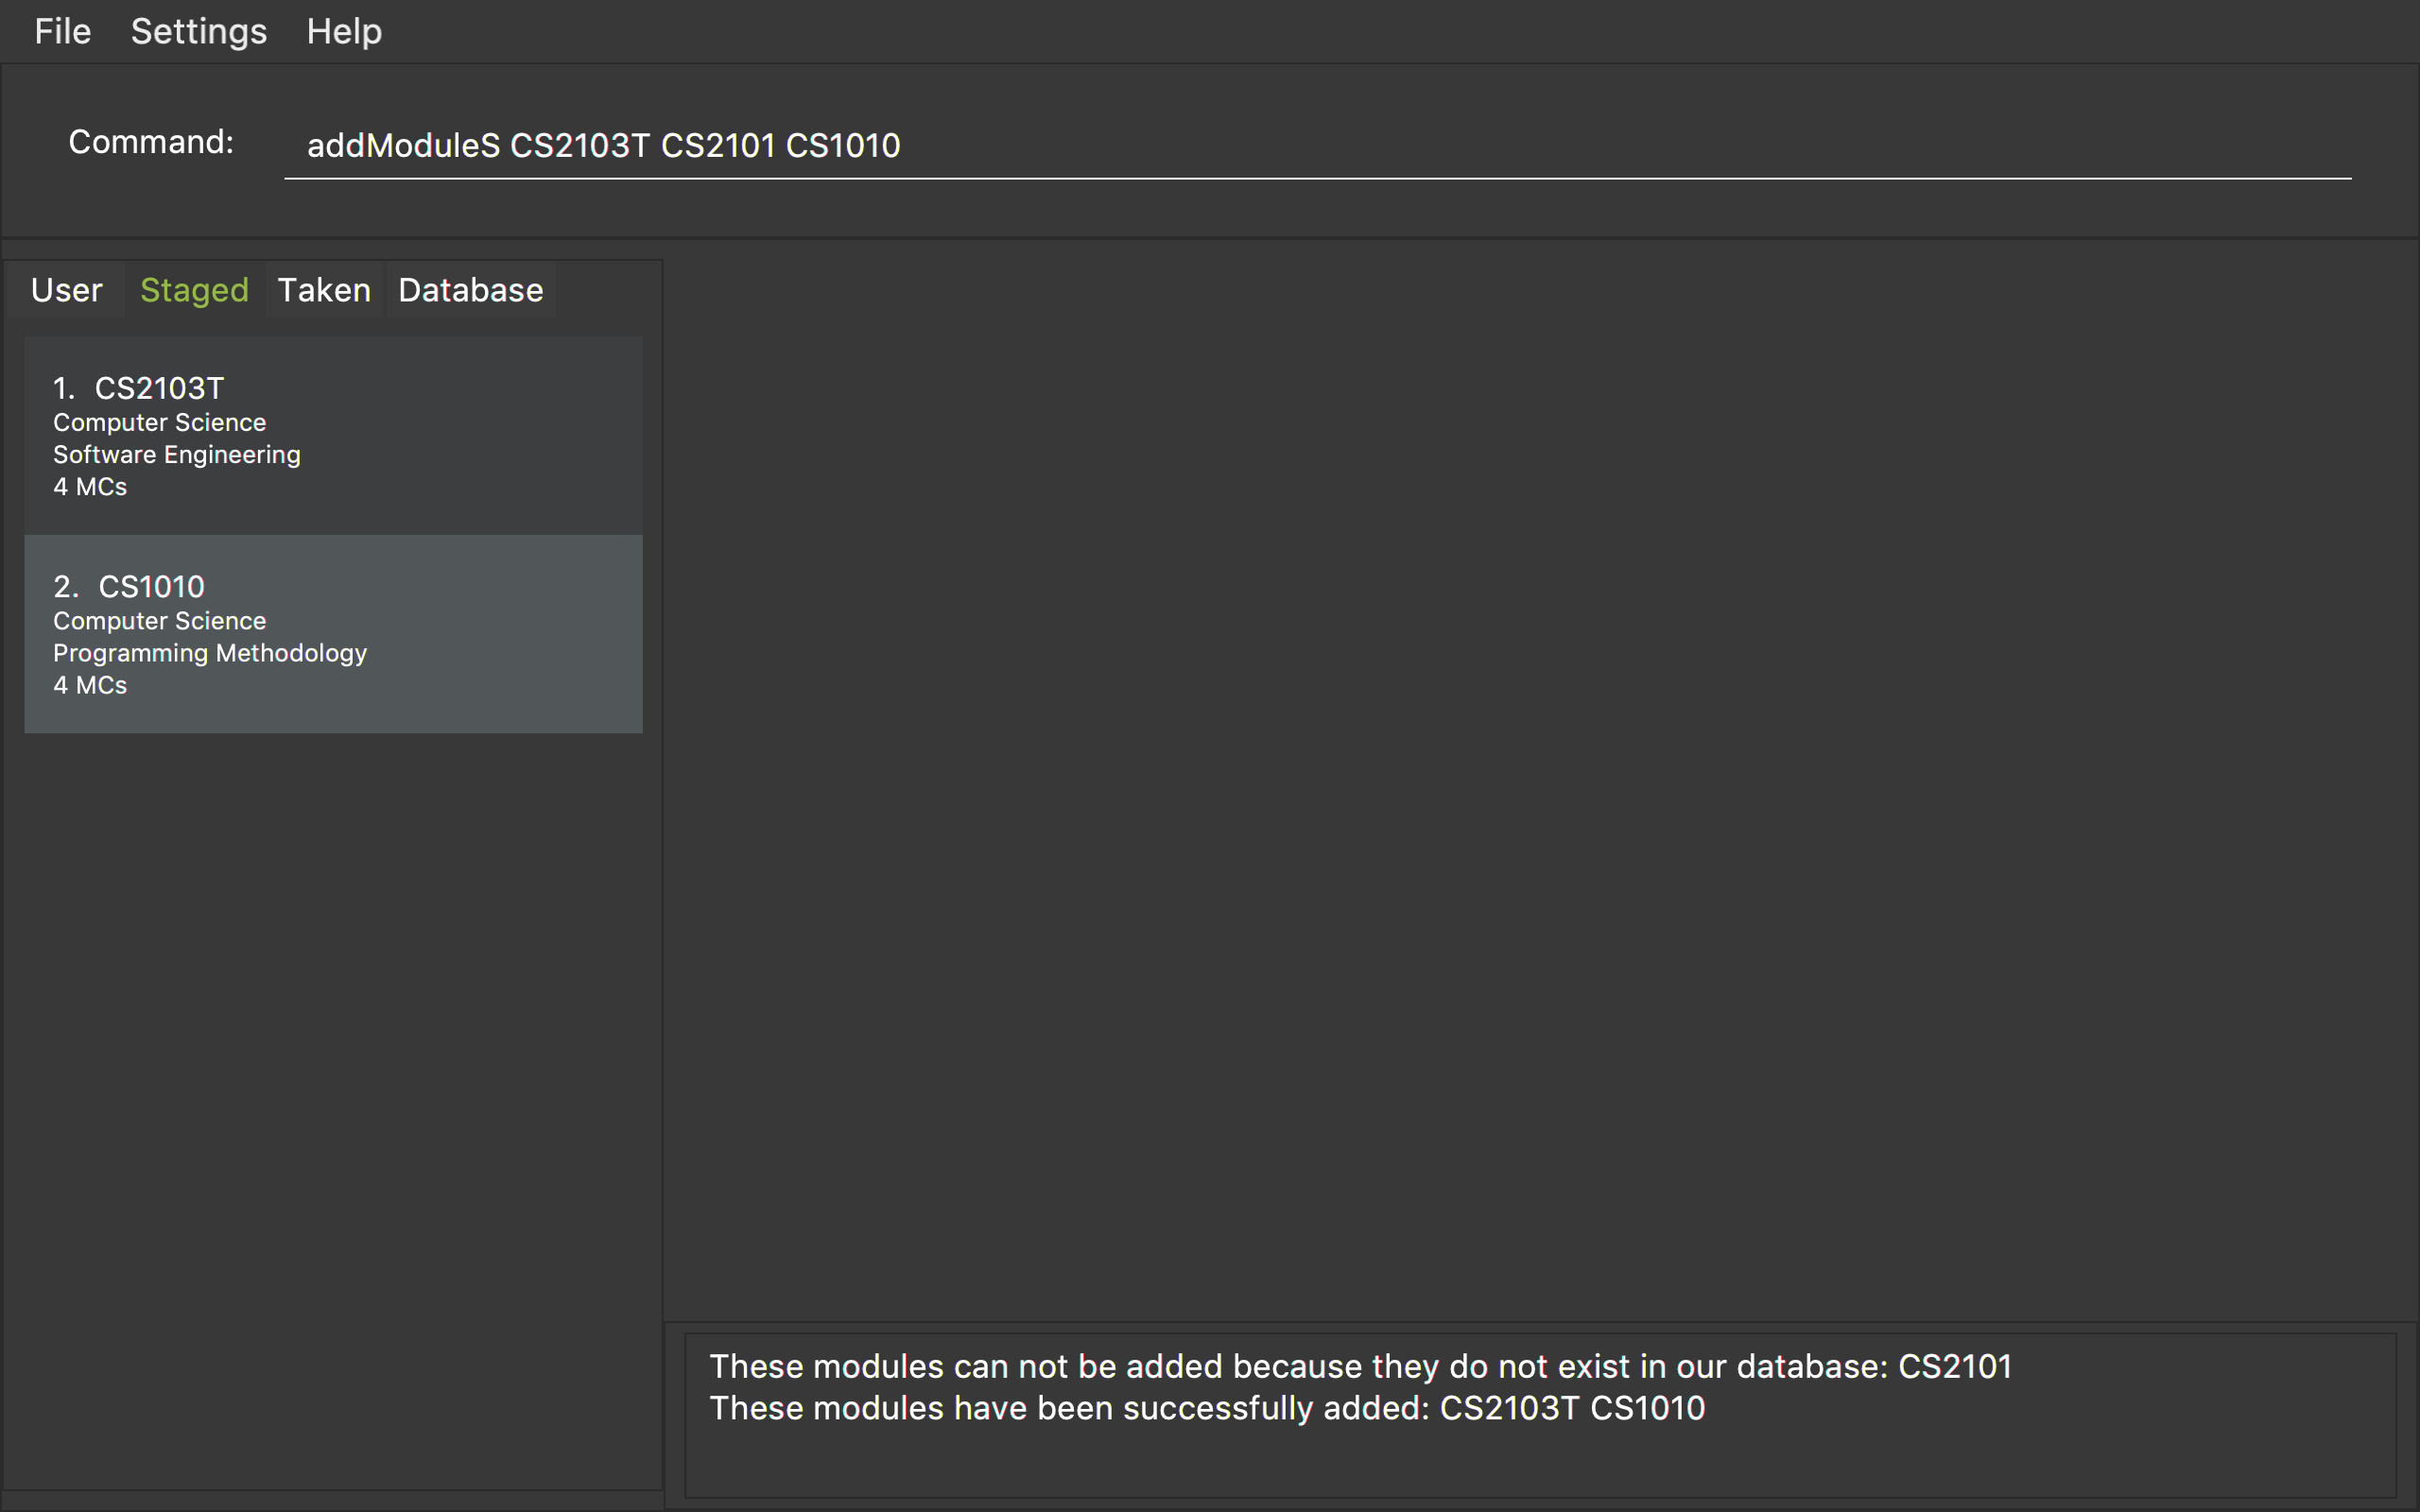
Figure 1. An example of an addModuleS command
Only a student can execute this command. Please register or login as a student
before executing.Same for addModuleT, removeModuleS and removeModuleT.
|
The module you added has not been saved. If you wish to save the module,
use command save before logout or exit.Same for addModuleT, removeModuleS and removeModuleT.
|
To add the module successfully, you must ensure the module do not exist in
neither your staged nor taken module list, and it should exist in our database module list.
You can use switch or showModule to check.Same for addModuleT.
|
|
By executing add/remove command, the application will automatically display
respective module list. Apply to addModuleS, addModuleT, removeModuleS, removeModuleT.
|
3.3. Adding a module to student’s taken module list: addModuleT
Adds a module to the student’s taken module list.
Taken list is the list of modules student has taken.
This command is case insensitive.
Format: addModuleT <MOD_CODE> [MORE MOD_CODE]
Examples:
-
addModuleT CS2103T -
addModuleT cS2103t
Both the above commands will have the same effect. -
addModuleT CS2103T CS2101 CS1010
3.4. Deleting a module from student’s staged module list: removeModuleS
Deletes a module from the student’s staged module list.
A staged module list is a list of modules a student is intending to take.
This command is case insensitive.
Format: removeModuleS <MOD_CODE> [MORE MOD_CODE]
Examples:
-
removeModuleS CS2103T -
removeModuleS Cs2103t
Both the above commands will have the same effect. -
removeModuleS CS2103T CS2101 CS1010
| To delete the module successfully, you must ensure the module exists in both staged module list and our database module list. |
3.5. Deleting a module from student’s taken module list: removeModuleT
Deletes a module form the student’s taken module list.
Taken list is the list of modules student has taken.
This command is case insensitive.
Format: removeModuleT <MOD_CODE> [MORE MOD_CODE]
Examples:
-
removeModuleT CS2103T -
removeModuleT Cs2103t
Both the above commands will have the same effect. -
removeModuleT CS2103T CS2101 CS1010
| To delete the module successfully, you must ensure the module exists in both taken module list and our database module list. |
3.6. Searching for a module in the database: search
Searches for all modules in the database that match the given prefix. Searching is case insensitive.
Format: search <MOD_CODE_PREFIX> [MORE MOD_CODE_PREFIX]
Examples:
-
search CS101 ACC
Returns a list of modules that begin with "CS101" or "ACC". -
search cs101 aCc
Returns the same result as above.
Figure 1 shows an example of the usage of search command in the application
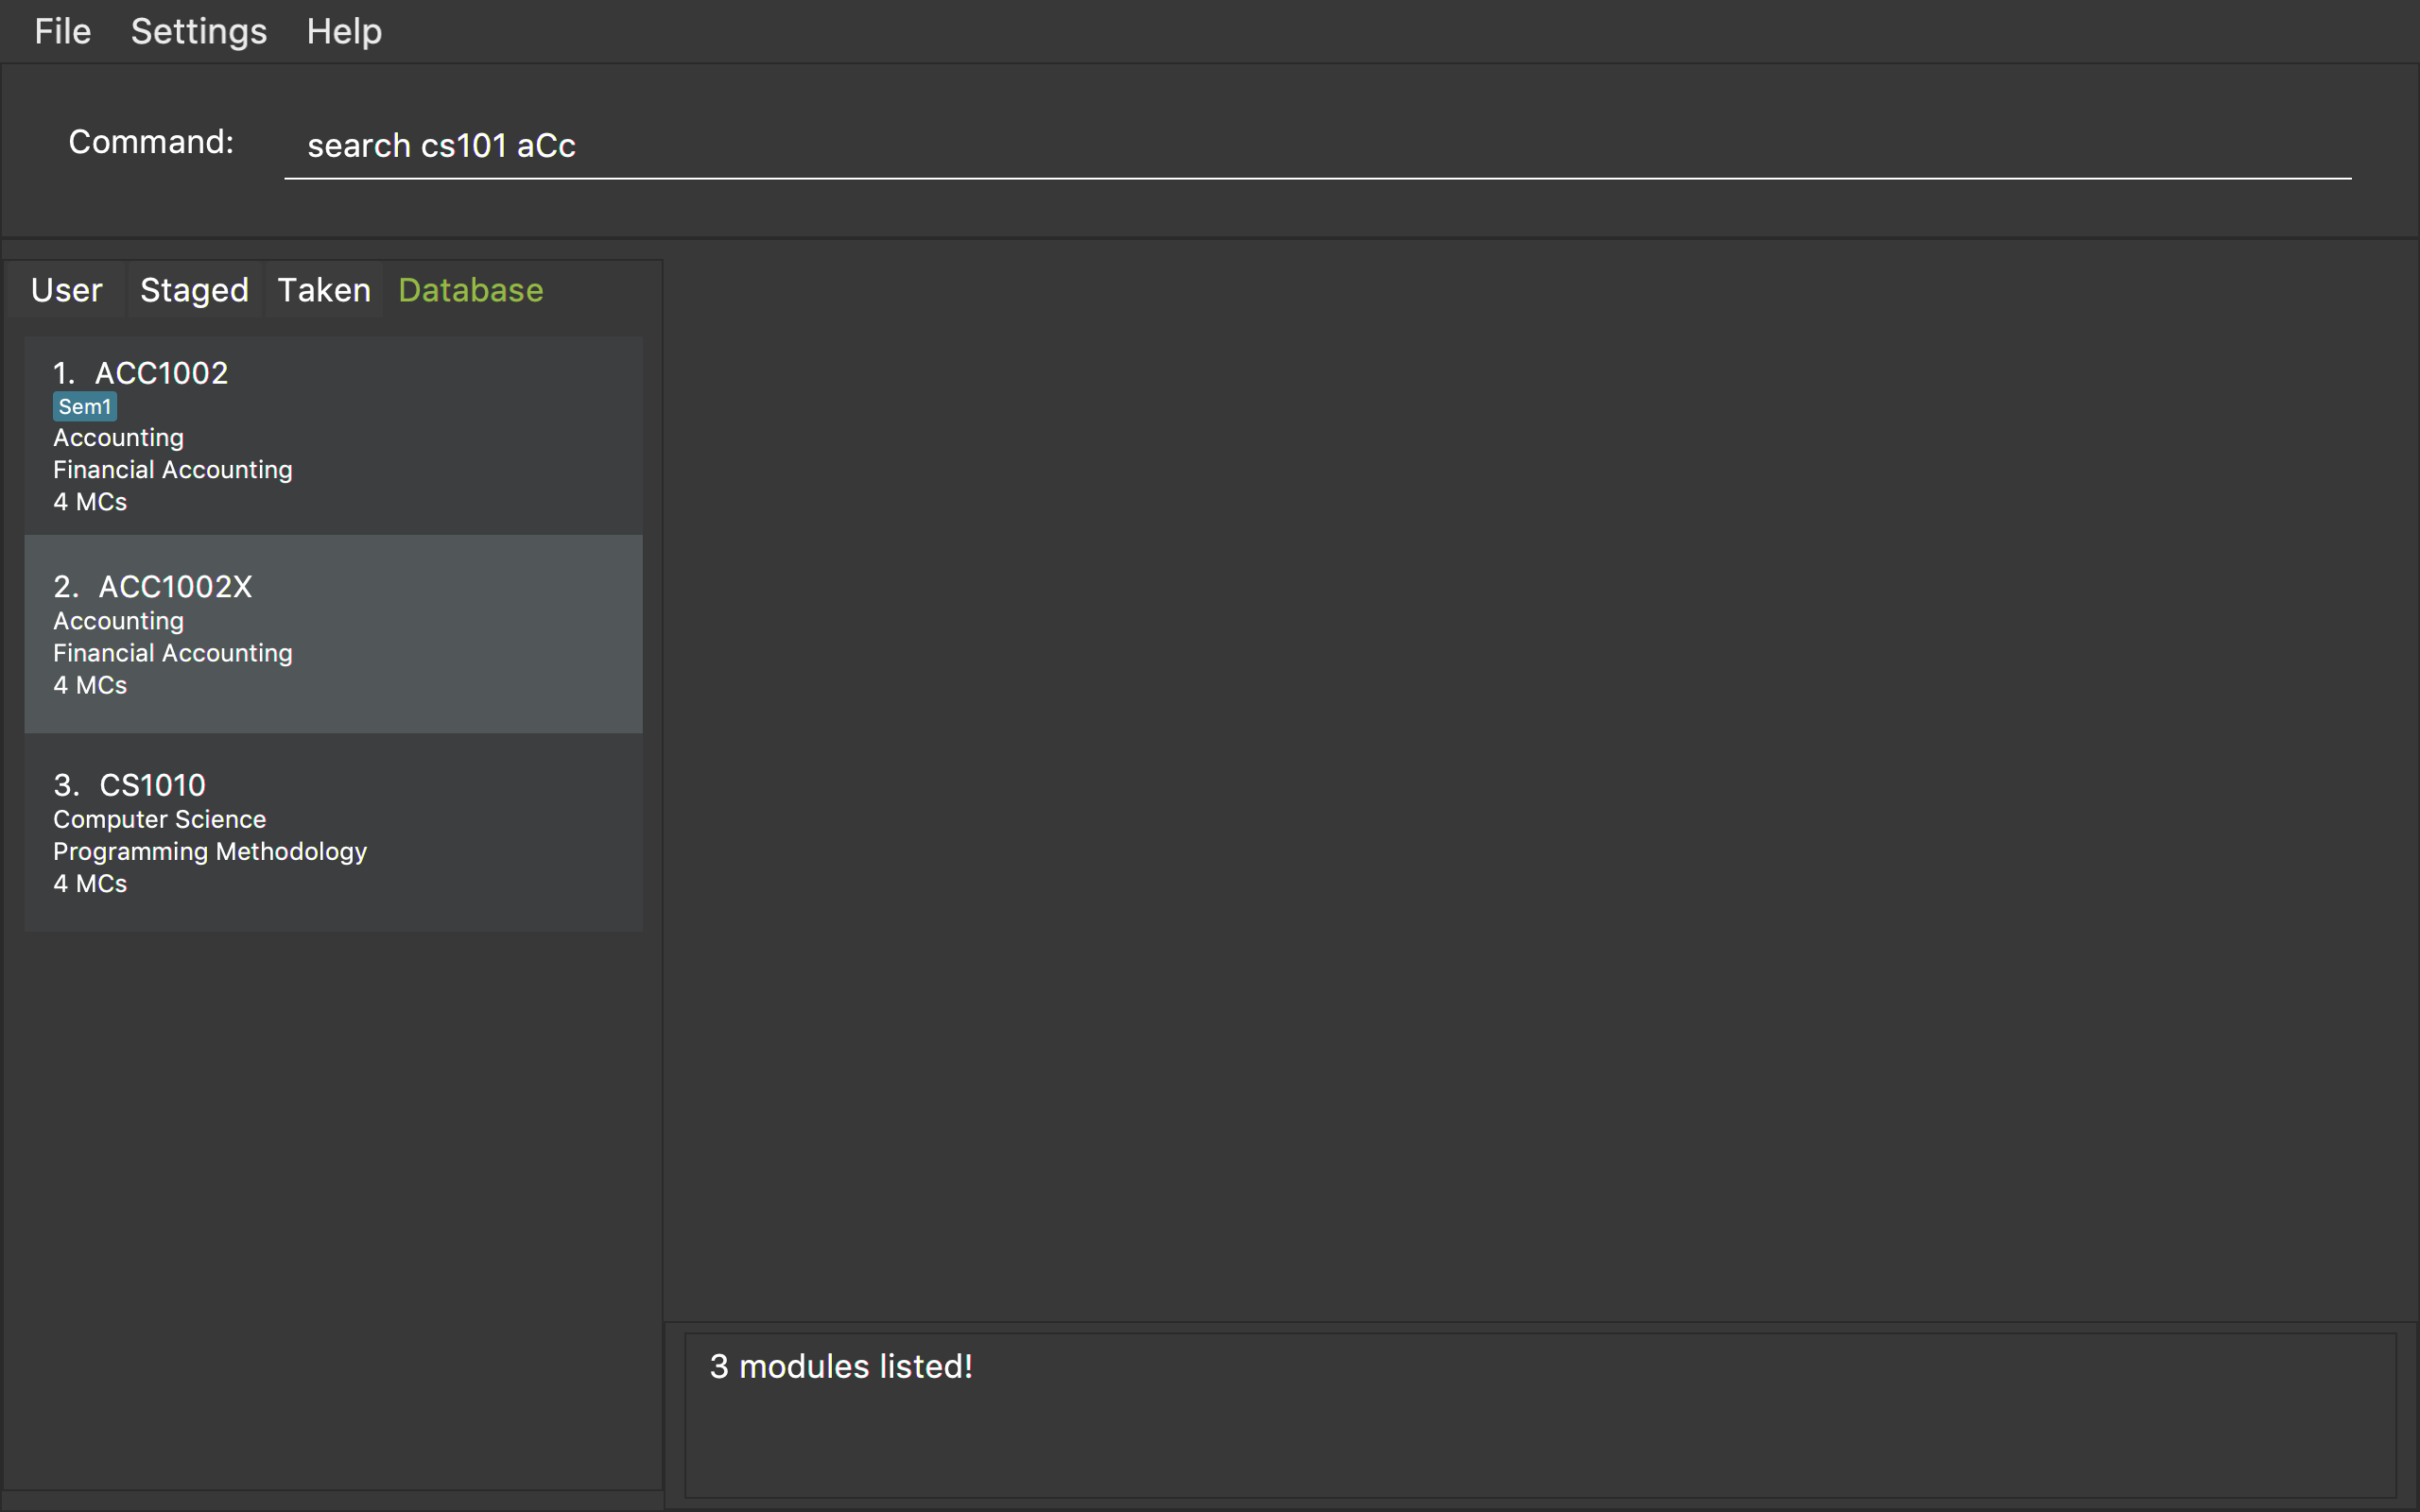
Figure 1. An example of a search command
This command does not require user to login or register before executing.Same for list and showModule.
|
|
This command does not support using a substring to search. Eg. search 1010 cannot search for "CS1010".
|
By executing database related command, the application will automatically
display the database module list. Apply to search, list and showModule.
|
3.7. Listing all modules in the database: list
Shows a list of all modules in the database module list.
Format: list
3.8. Showing the detail of a module in the database: showModule
Shows the detailed information of a certain module in the database module list.
This command is case insensitive.
Format: showModule <MOD_CODE>
Example:
-
showModule CS2103T
Displays the detailed information of module CS2103T. -
showModule cs2103T
Displays the same result as the above command.
Figure 1 shows an example of the usage of showModule command in the application
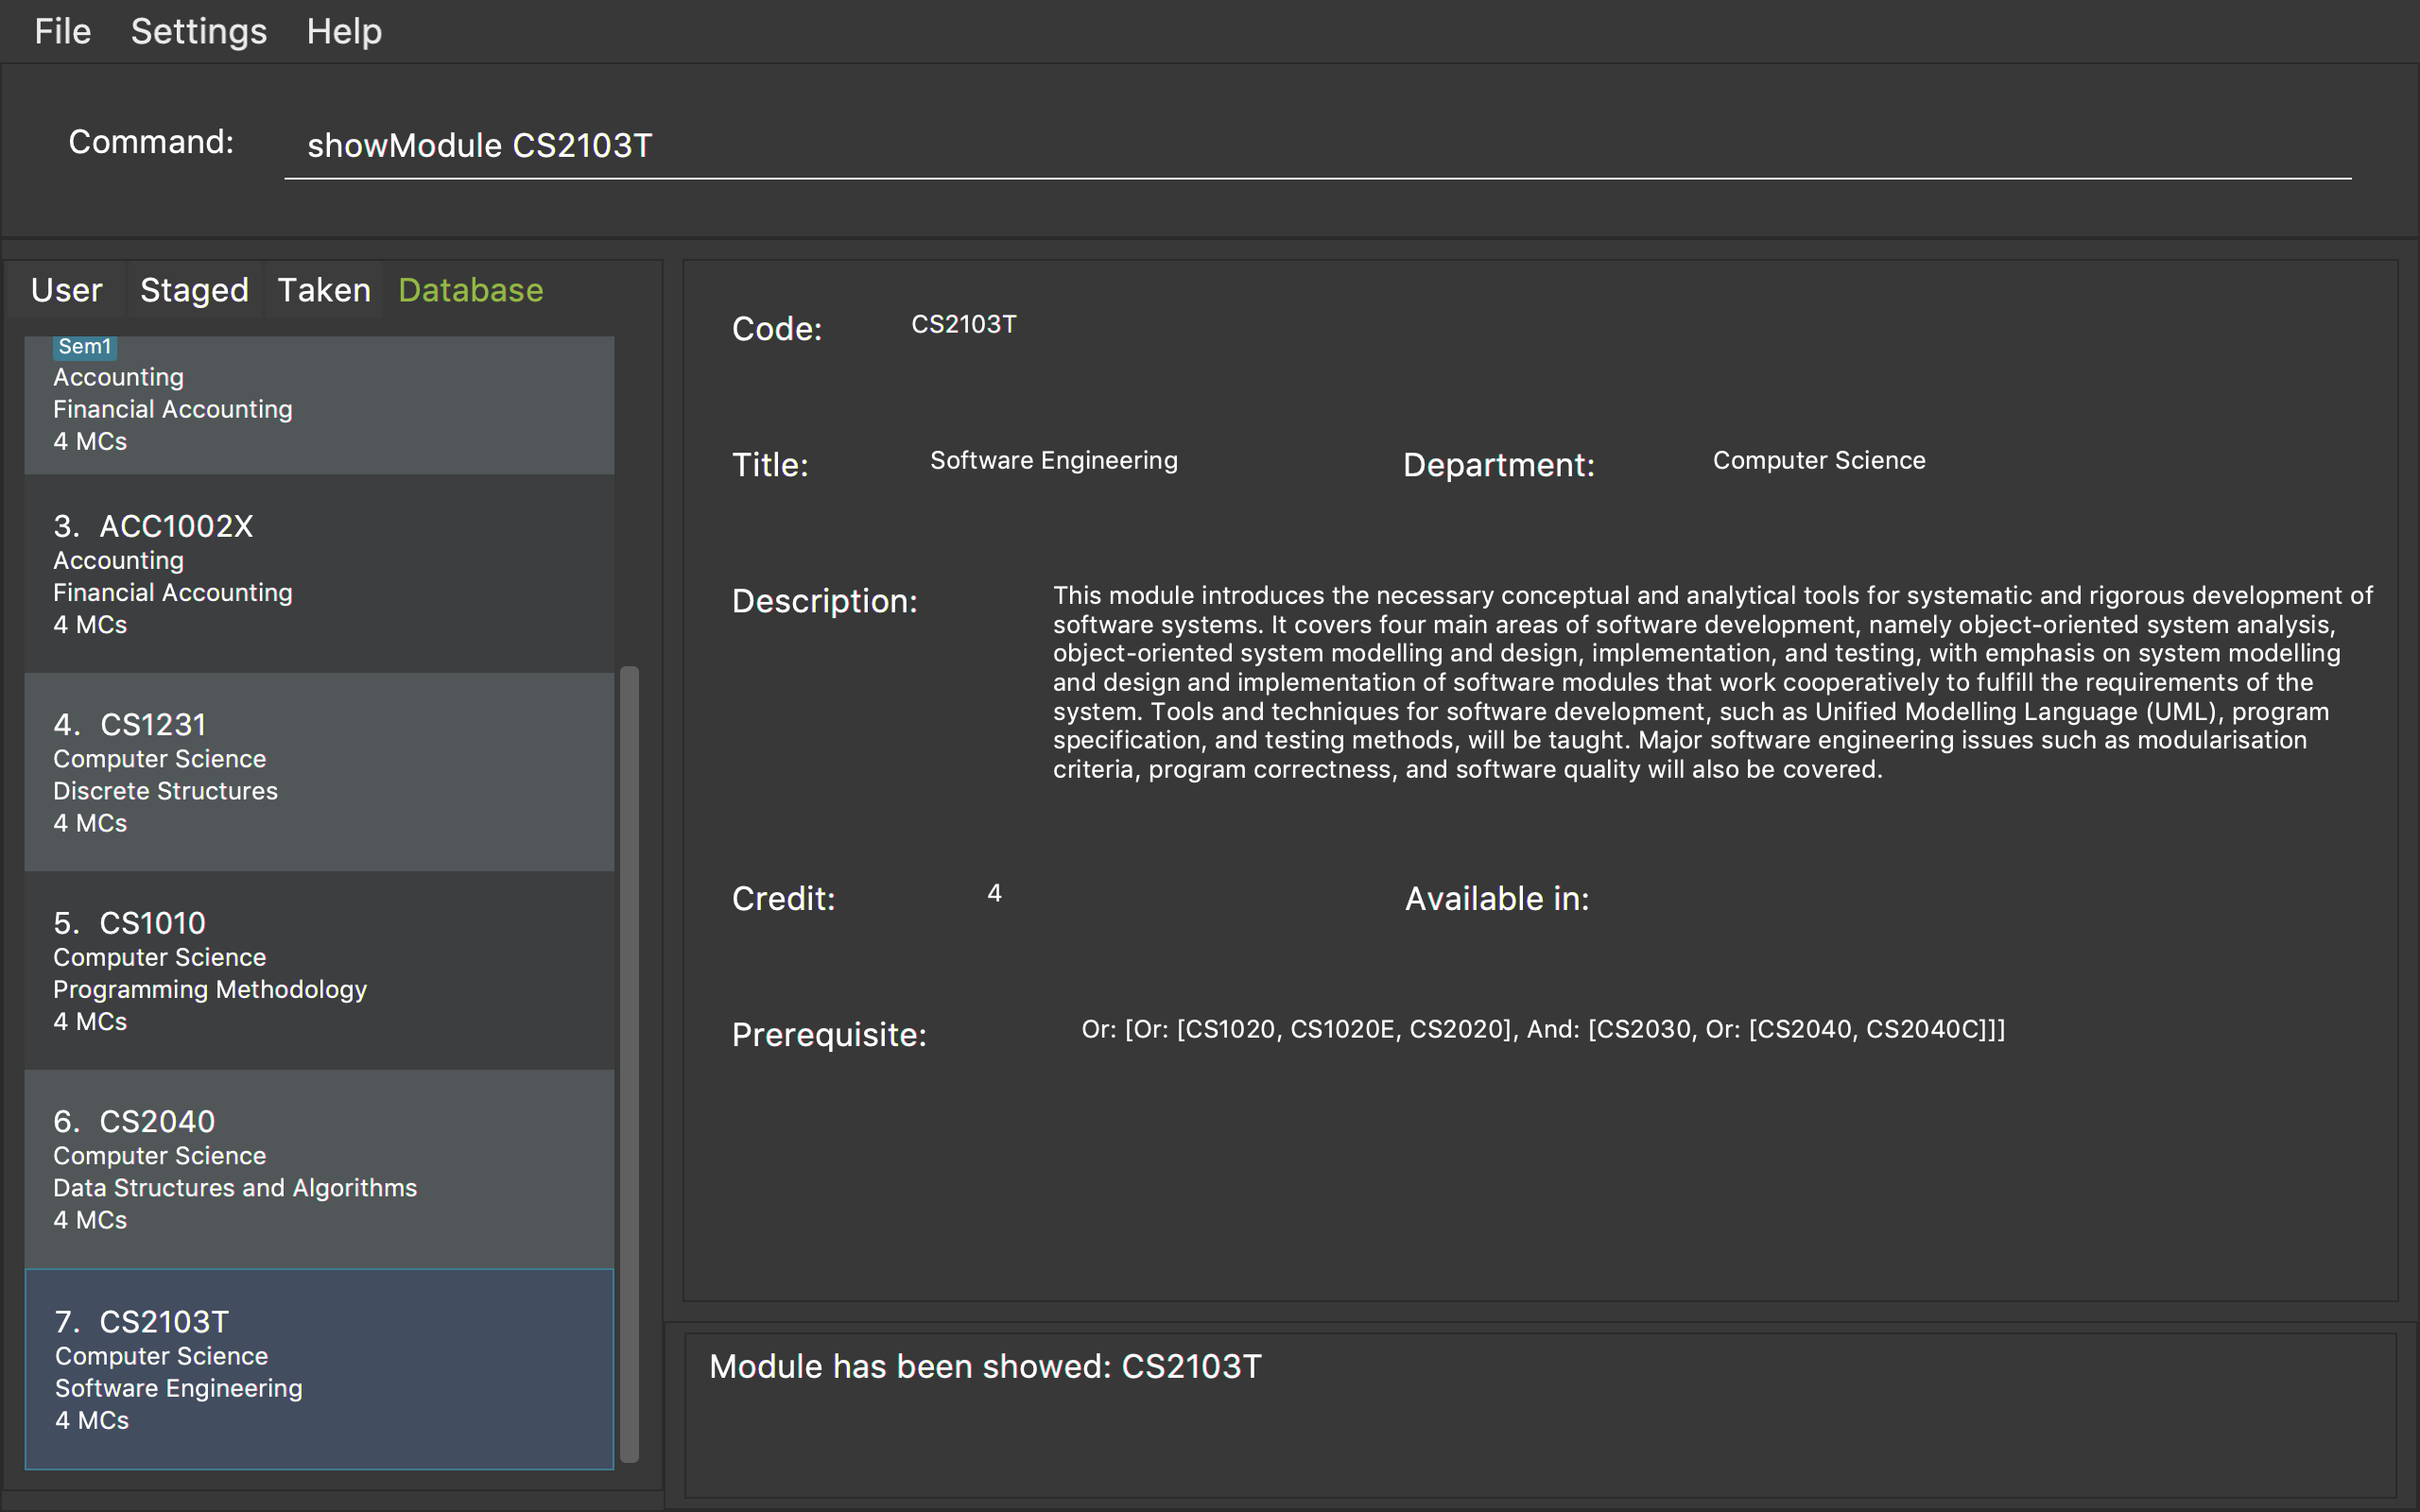
Figure 1. An example of a showModule command
Please use the full code name of the module to execute this command. If you are not sure
the module code, use search command to get the full code name first.
|
3.9. Saving user data: save
The save command stores the current user’s information locally to a file. The saved file is used during the login process to restore a user’s information.
Format: save sp/<FILE_NAME>.xml
Example:
-
save sp/userdata.xml
Saves the current user’s data to the file nameuserdata.xml.
The prefix "sp" is the short form for "save path".
|
Figure 1 shows an example on the usage of the save command in the application.
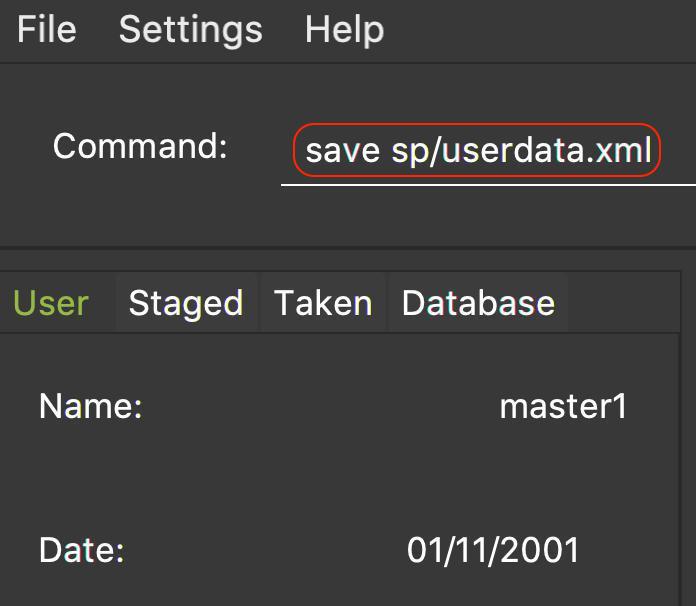
Figure 1. An example of a save command typed in the CLI
Upon entering the command, you will see the types of information stored as well as a successful message as shown in Figure 2.
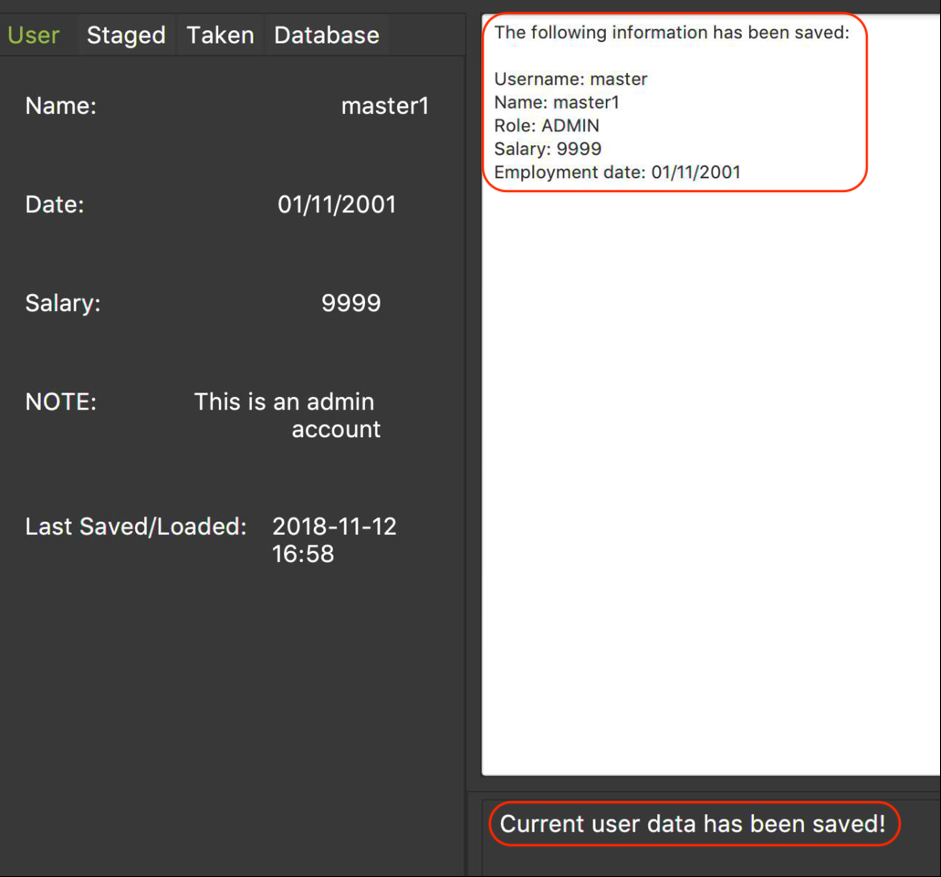
Figure 2. An example of the application displaying the saved information and successful message upon entering save command
Upon entering the save command, a file depicted in Figure 3 will be generated. This file will be required when logging in.
| Modifying the saved file may result in the loss of data that is unrecoverable. Edit at your own risk! |
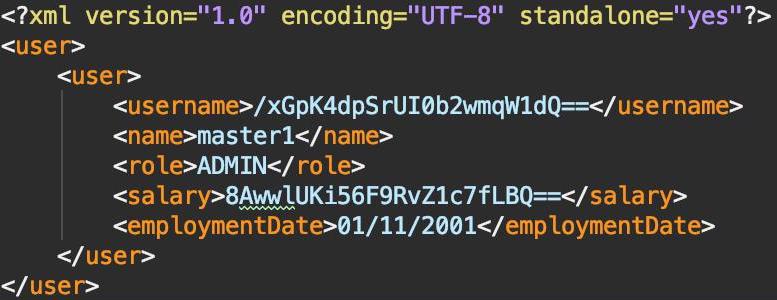
Figure 3. An example of a saved file containing a user’s information
3.10. Switch left panel tabs: switch
Switches to the selected tab on the left panel.
Format: switch tab/<OPTION>
Available options:
-
User tab:
tab/user -
Staged tab:
tab/staged -
Taken tab:
tab/taken -
Database tab:
tab/database
Example:
-
switch tab/database
Switches the left panel to the database tab.
| You do not need to be logged in to use the switch command. |
Figure 1 shows an example of the usage of switch command in the application.
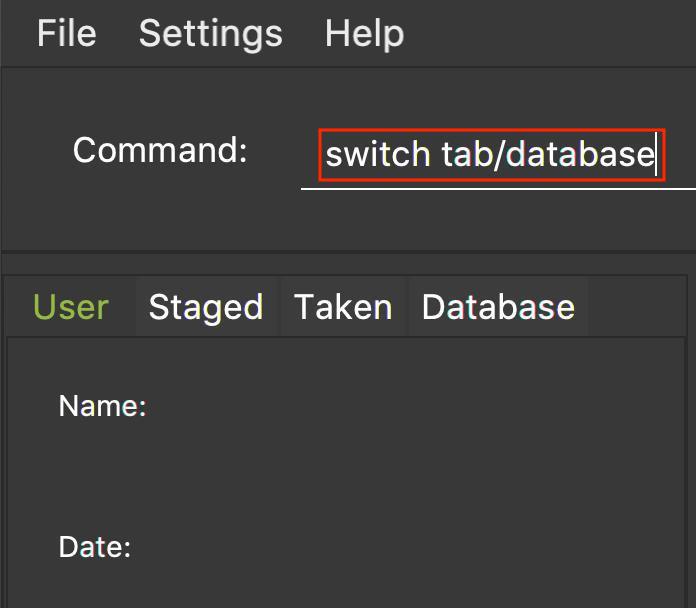
Figure 1. An example of a switch to the database tab
Upon entering the command, you will see that the left panel switches to the database panel as shown in Figure 2.
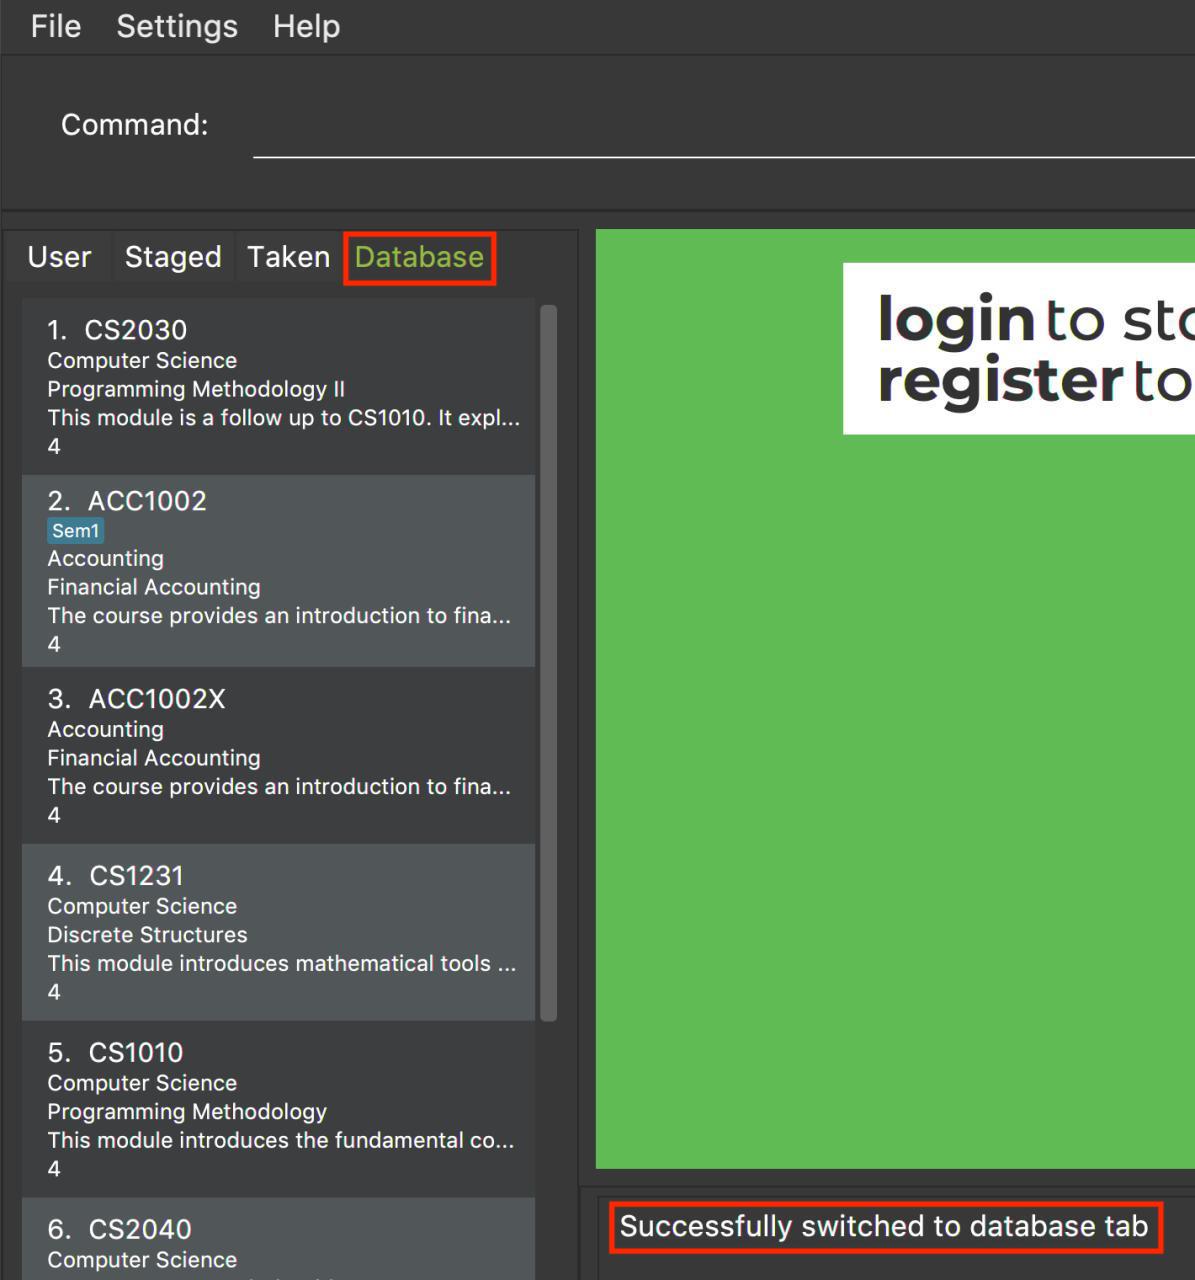
Figure 2. A successful example of switching to the database tab
3.11. Generate schedule: generate
Generates a schedule based on the modules that has been added using addModuleS command.
Format: generate
| This command can only be executed when logged in using a student account. |
Example:
-
To generate a schedule successfully, follow the following steps:
-
addModuleS CS1010 CS2030 CS2040 CS2103T -
generate
The schedule will be displayed as shown in figure 1 below.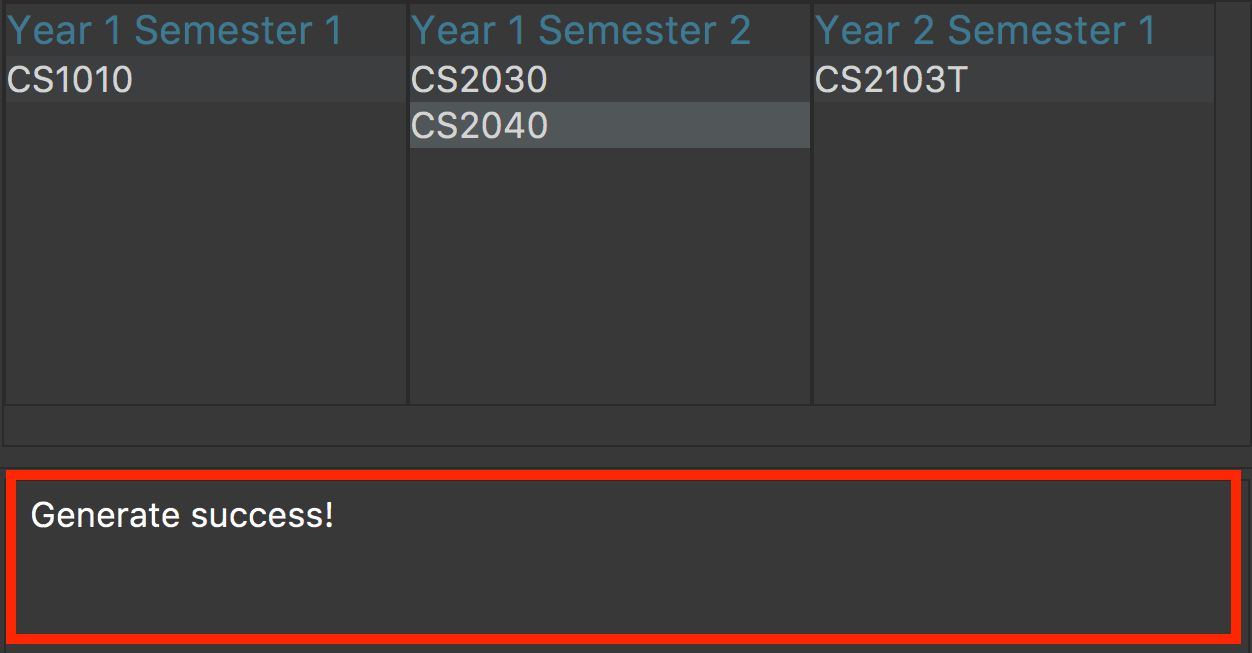
Figure 1. An example of a schedule
If the command has executed successfully, the message in the red box will say "Generate success!". -
There are instances where the command will fail to generate a schedule. The following is a list of possible reasons why a failure might occur and the steps required to resolve it.
Examples of possible failures:
-
Missing prerequisites
The following message in figure 2 will be shown for this failure.

Figure 2. Error message shown when there are prerequisites are missing.
Steps to rectify:
-
Execute
showModule CS2030to identify the missing prerequisite module as shown in figure 3.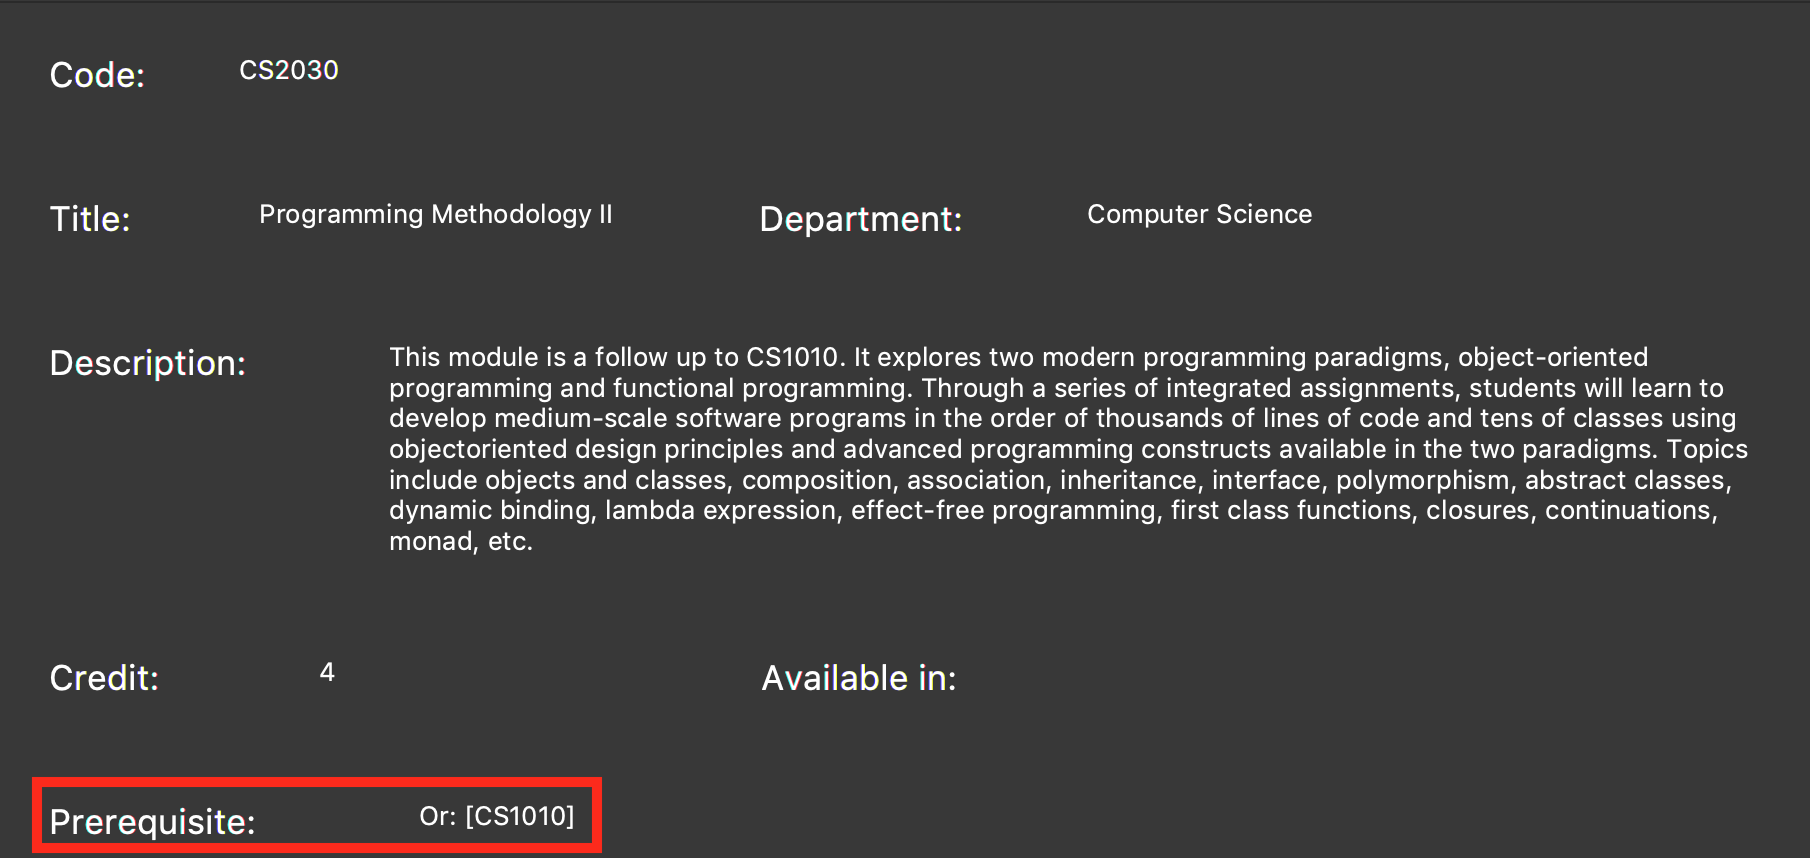
Figure 3. Output of the
showModule CS2030command.The prerequisites are shown in the red box. -
Add the missing prerequisite module using
addModuleS CS1010. -
Run the
generatecommand again. -
Verify the application’s output with the figure 4 as shown below. The green box should show the schedule and message in the red box should say "Generate success!".
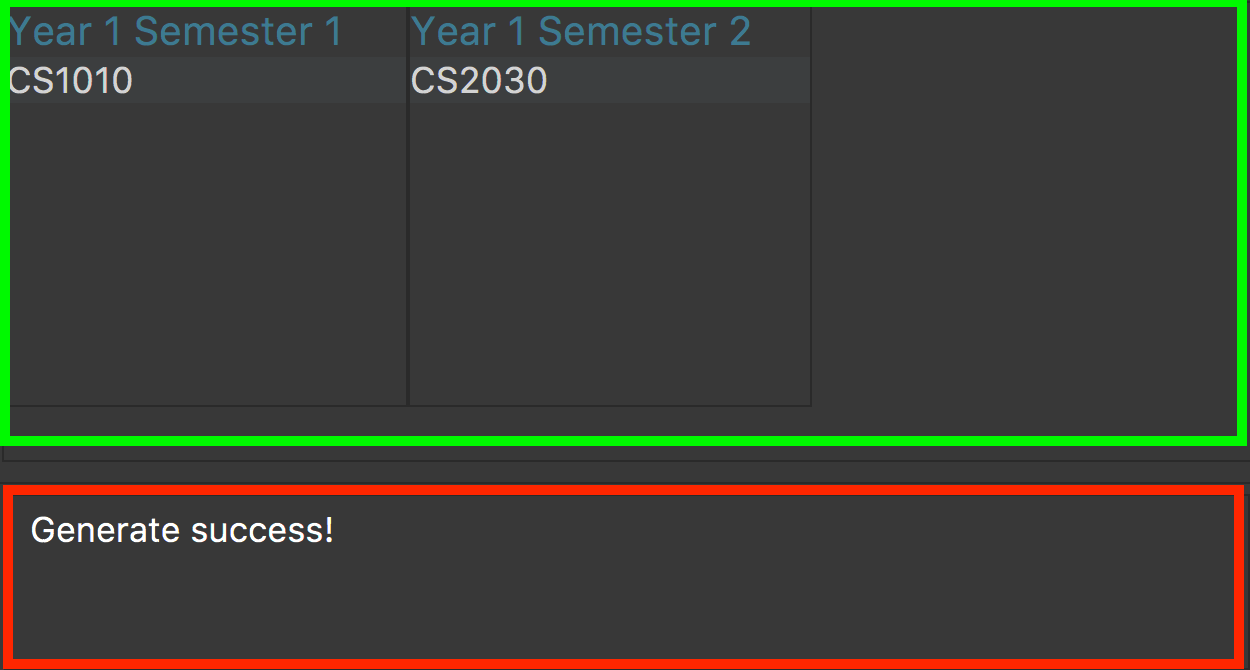
Figure 4. Output when the schedule has been successfully generated.
-
-
No modules added to staged list
The following message in figure 5 will be shown for this failure.

Figure 5. Error message shown when there are no modules in the staged list.
Steps to rectify:
-
Add a module to your staged list using
addModuleS CS1010. -
Execute
switch tab/stagedto ensure that the module has been successfully added to your staged list.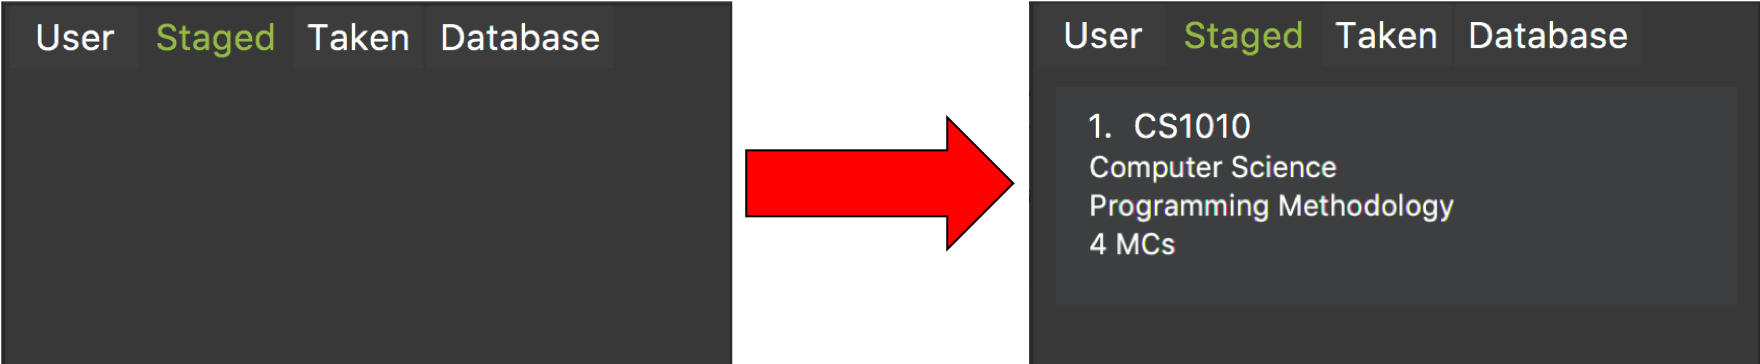
Figure 6. Before and after ouput after adding a module to the staged list.
-
Run the
generatecommand again. -
Verify the application’s output with the image below. The green box should show the schedule and message in the red box should say "Generate success!".
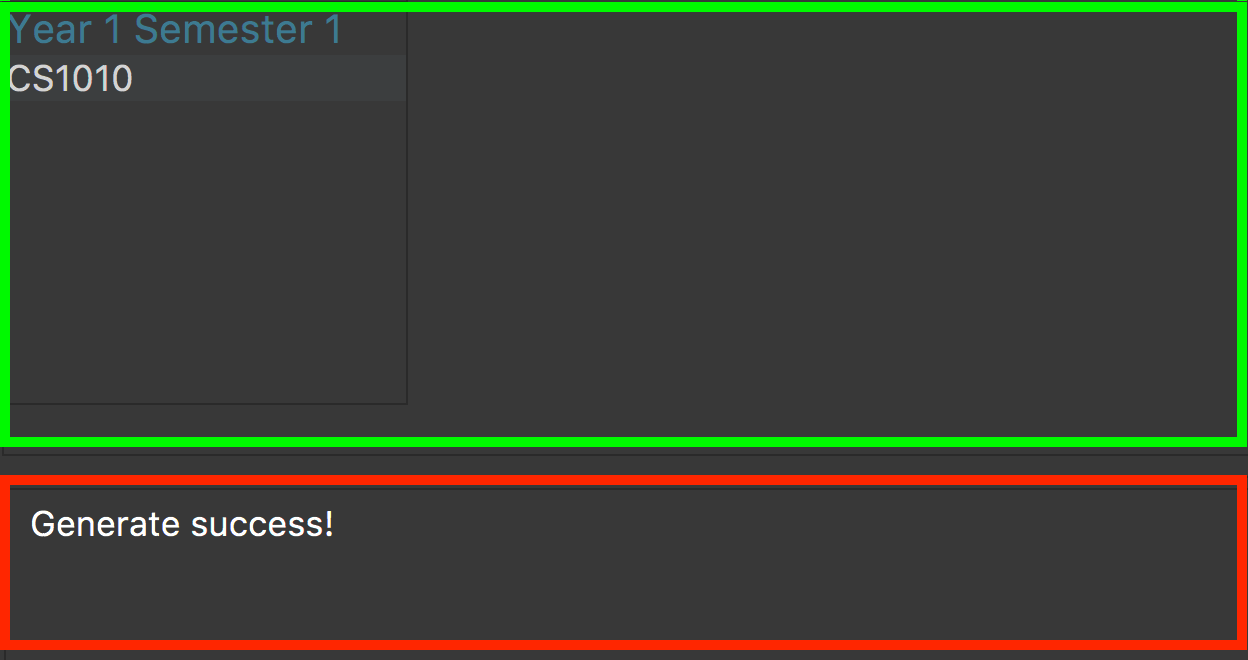
Figure 7. Output when the schedule has been successfully generated.
-
3.12. Register a Student Account : register
Register a Student Account with the input parameters.
Format: register [OPTION]/[INPUT]…
Available Option:
-
Username :
user/<USERNAME> -
Password :
pass/<PASSWORD> -
Name :
n/[NAME] -
Enrollment Date:
enroll/<ENROLLMENT_DATE> -
Major(s) :
maj/[MAJOR_CODE] maj/[MAJOR_CODE] -
Minor(s) :
min/[MINOR_CODE] min/[MINOR_CODE]
|
The password must contain at least three character categories among the following: - Uppercase characters (A-Z) - Lowercase characters (a-z) - Digits (0-9) - Special characters (~!@#$%^&*_-+=`|\(){}[]:;"'<>,.?/) |
Example:
-
register user/max33 pass/#Qwerty4321 n/Max Verstappen enroll/15/03/2015 maj/CS maj/DA min/BA min/MA
The above command creates a student account with the following details:-
Username :
max33 -
Password :
#Qwerty4321 -
Name :
Max Verstappen -
Enrollment Date:
15/03/2015 -
Major(s) :
CS,DA -
Minor(s) :
BA,MA
-
The figure below displays the UI updates that you should expect to observed after the successful execution of the register command.
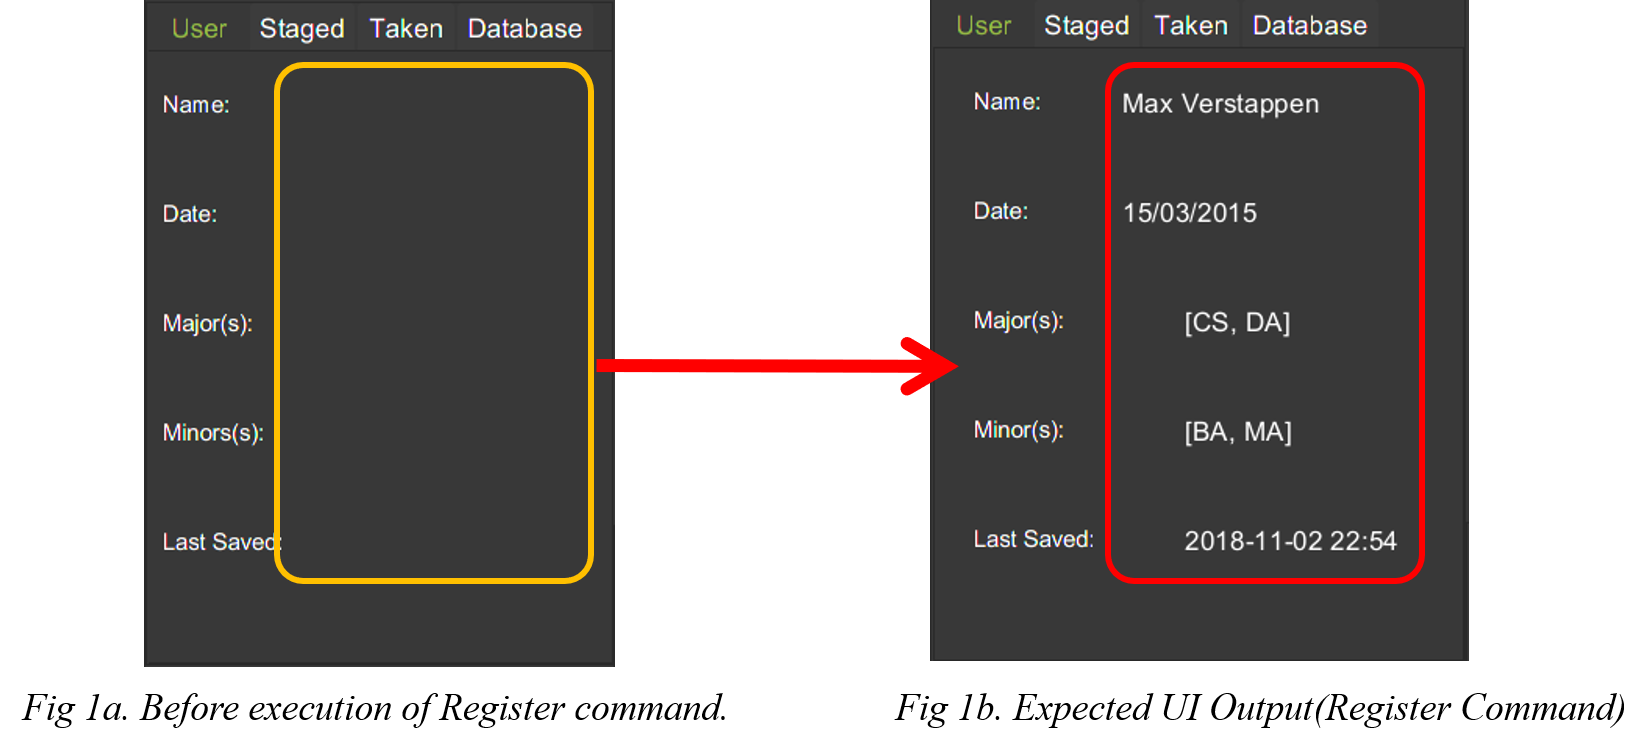
| Notice how the respective fields related to the newly registered user is automatically updated. |

Fig 1c. Expected Command Message after running register command.
A temporary save file path is generated and used to save the details of the newly
registered user. Do remember the location of the save file. You may choose to save
the file in another location by executing the save command as detailed in Section 3.9, “Saving user data: save”.
|
3.13. Login to User Account : login
Login to the User Account with the corresponding credentials.
Format: login user/<USERNAME> pass/<PASSWORD> userData/<PATH_TO_DATA_FILE>
Examples:
-
login user/max33 pass/#Qwerty4321 userdata/max33.xml
The above command essentially sends a login request toCredentialStorewith the following credential details:-
Username :
max33 -
Password :
#Qwerty4321 -
Userdata :
max33.xml
-
Specified userdata/ option should specify a relative filepath.
|
The figure below displays the UI updates that you should expect to observed after the successful execution of a login command.
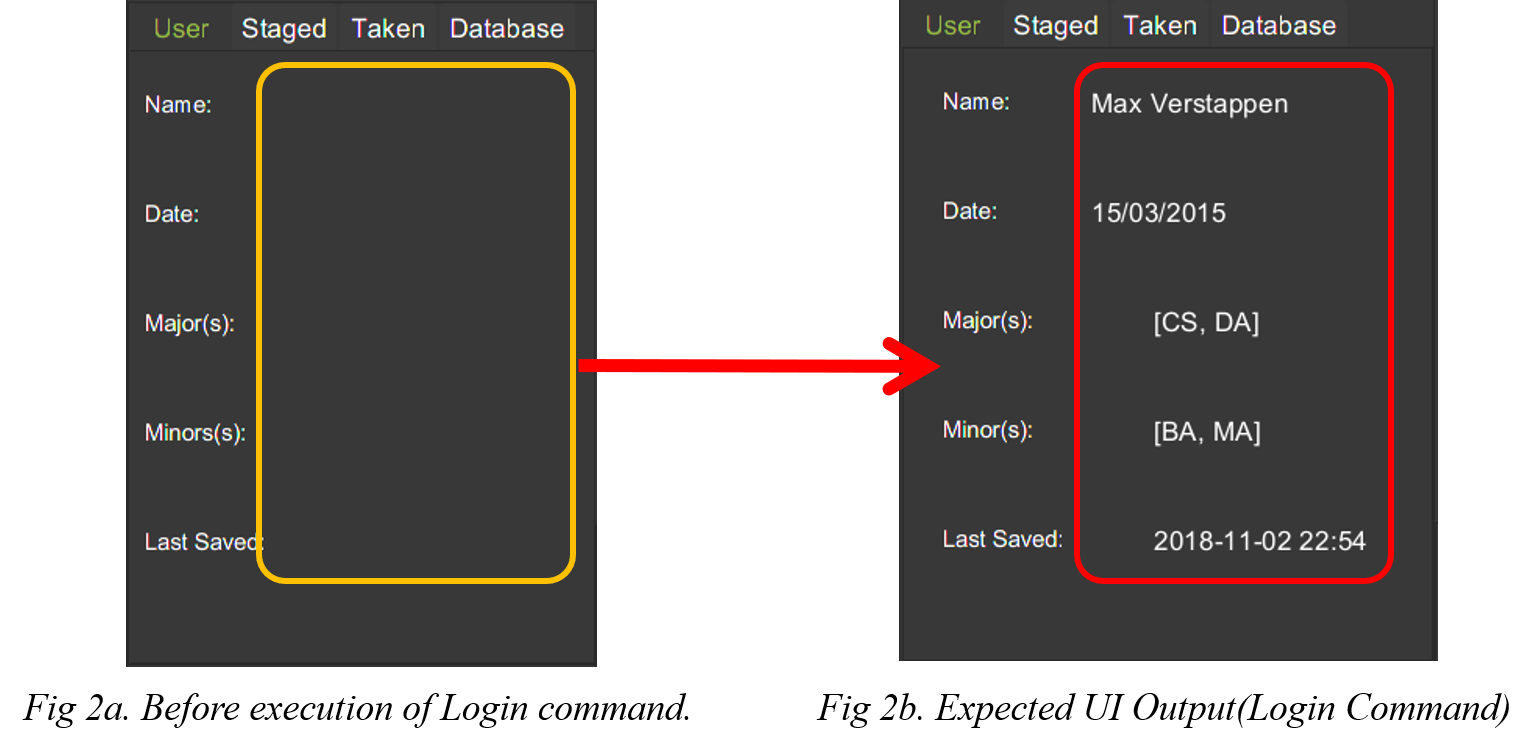
| Note that your details will automatically be displayed in the User Tab and a simple successful message is displayed on the bottom right window. |
3.14. Edit Student Account : edit
Edits the Student specific information as specified in the input parameters.
Format: edit [OPTION]/[INPUT]…
Available Options:
-
Edit Name :
n/[NAME] -
Edit Enrollment Date:
enroll/[ENROLLMENT_DATE] -
Edit Major :
maj/[MAJOR_CODE] -
Edit Minor :
min/[MINOR_CODE]
Example:
-
edit n/Max Emilian Verstappen maj/CS min/
The above command edits the current student with the new details:-
Name : Max Emilian Verstappen`
-
Major: CS
-
Minor: [EMPTY]
-
The figure below displays the UI updates that you should expect to observed after the successful execution of the edit command.
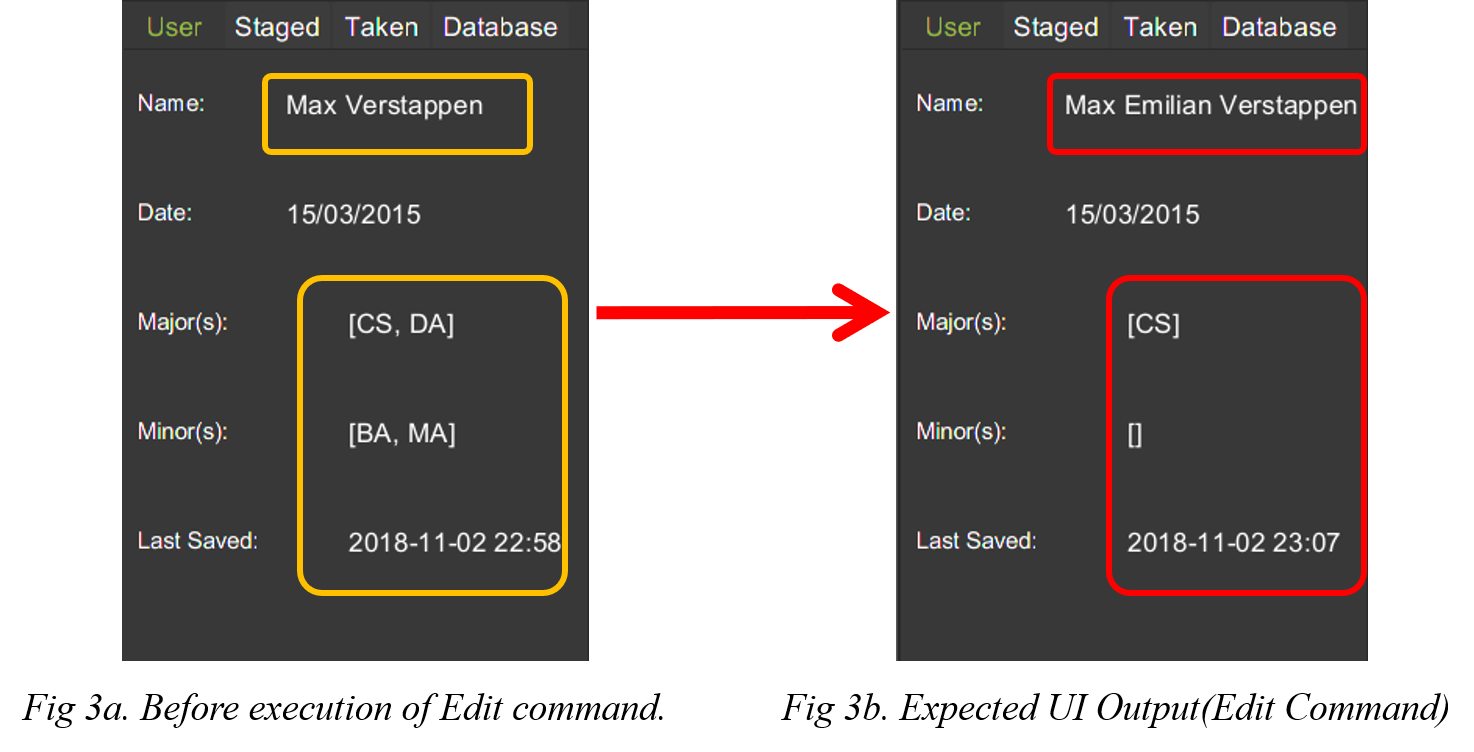
| Notice that the Name, Major and Minor fields in the User Tab has changed |
3.15. Logout from User Account : logout
Logouts from the current user account. Running this command also resets the application
to its original state.
Format: logout
Example:
-
logout(assuming that current user is logged in)
The figure below displays the expected UI updates after the successful execution of the logout command.
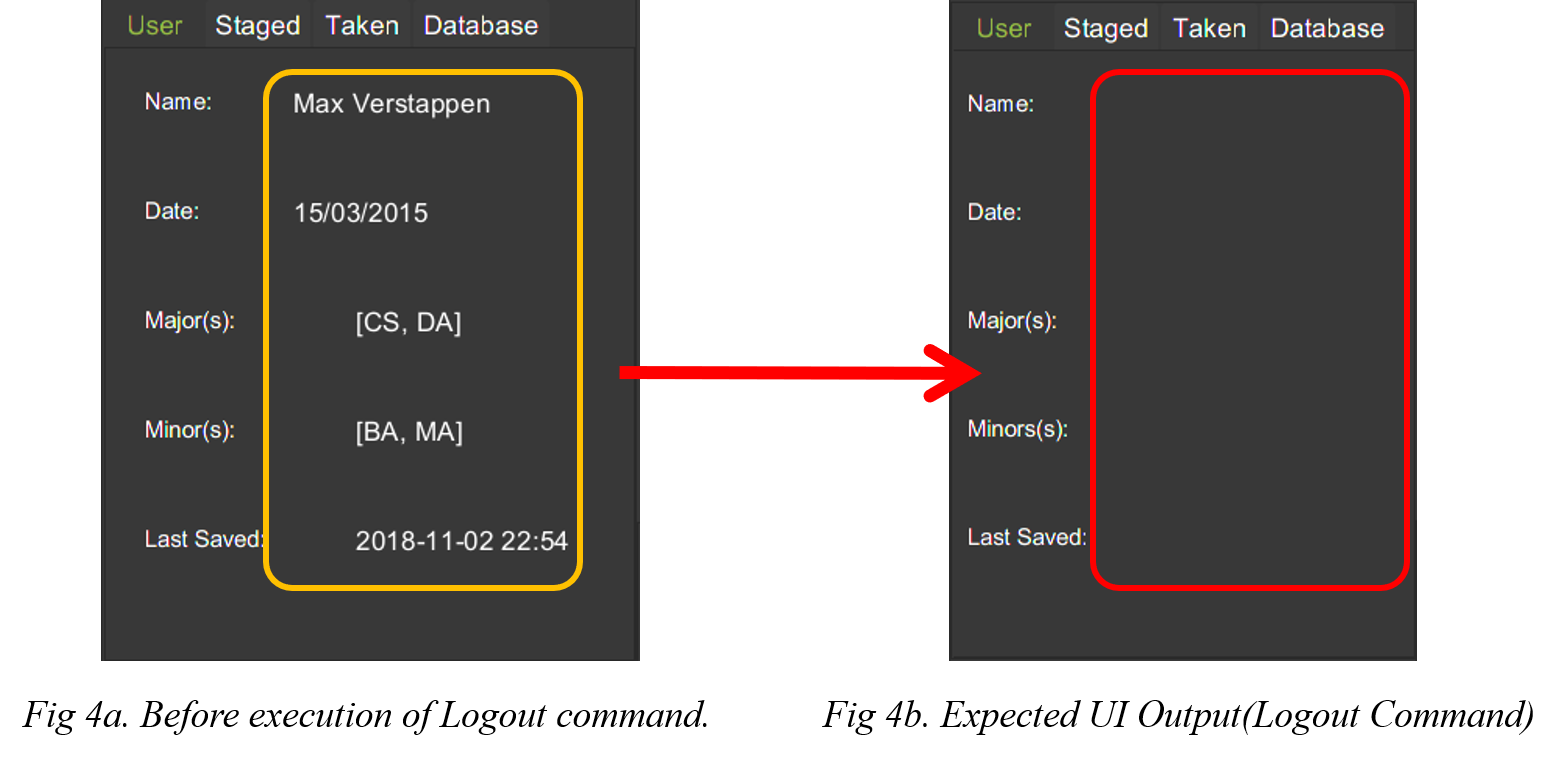
| Notice that the Data Fields in the User Tab has been reset to its original state as seen at start up. |
3.16. Data Encryption
Data stored using the save command is encrypted by default.
4. Administrator Features
The commands in this section can only be executed when logged into an administrator account. Otherwise, the message
Only an admin user can execute this command will be displayed in the output window.
|
4.1. Add a new administrator account: addAdmin
Create and add a new adminstrator account.
Format: addAdmin OPTION/INPUT…
Input fields:
-
Username :
user/<USERNAME>— It should contain only alphanumeric characters and should not be blank. -
Password :
pass/<PASSWORD>— It should contain alphanumeric and special characters -
Name :
n/<NAME>— It should contain only alphanumeric characters and spaces and should not be blank. -
Save path :
sp/<SAVE_PATH>— It should be a relative save path. -
Salary :
salary/<SALARY>— It should contain only integers. -
Employment date :
date/<EMPLOYMENTDATE>— it should be in the format DD/MM/YYYY
Example:
-
addAdmin user/myUsername pass/Password#1 n/John Doe sp/exampleconfig.xml salary/3000 employ/30/09/2018
Creates a new administrator account with the following stated details.
4.2. Edit the currently logged in administrator account: editAdmin
Edit the details of the currently logged in administrator.
Format: editAdmin OPTION/INPUT…
Input fields:
-
Name :
n/[NAME]— It should contain only alphanumeric characters and spaces and should not be blank. -
Salary :
salary/[SALARY]— It should contain only integers. -
Employment date :
employ/[EMPLOYMENT_DATE]— it should be in the format DD/MM/YYYY
Examples:
-
editAdmin n/johnChange the name of the logged in administrator to "john". -
editAdmin salary/3000 employ/01/01/2018Change both the salary and employement date of the logged in administrator to "3000" and "01/01/2018" respectively.
4.3. Remove a existing user account: removeUser
Remove a currently existing user account.
Format: removeUser <USERNAME>
Example:
-
removeUser Username
Removes a user account with username "Username" if it exists
4.4. Show the list of usernames: showUser
Display the list of usernames on the main display.
Format: showUser
4.5. Add a new module to database: addModuleDB
Creates a new module and add it to the module database.
Format: addModuleDB OPTION/INPUT…
Input fields:
-
Module code :
code/<MODULE_CODE>— It should contain only alphanumeric characters. -
Department :
department/<DEPARTMENT> -
Title :
title/<TITLE> -
Description :
description/<DESCRIPTION> -
Credit :
credit/<CREDIT> -
Available semesters :
available/[SEM1][SEM2][SPECIAL_TERM1][SPECIAL_TERM2]For each entry enter '1' if the module will be available. Otherwise, enter '0'.
Only the first four digits will be taken into account and if there are less than four digits the remaining input will be '0' by default. -
Prerequisites :
prereq/<PREREQ_STRING>Format for PREREQ_STRING: <&OR|>[<MODULE_CODE,>[MORE_MODULE_CODE,]][BRANCH][MORE_BRANCH]
Format for BRANCH:(<&OR|>[<MODULE_CODE,>[MORE_MODULE_CODE,]][BRANCH][MORE_BRANCH])
To represent no prerequisite, use an empty string or a string that consist of only '&' or '|'.
To represent only 1 prerequisite, use '&' or '|' followed by the module code.
Example:
-
addModuleDB code/CS2103T department/Computing title/The New Module credit/4 available/1100
description/This course is newly offered by the school of computing. Visit the module website for more details
prereq/|(|CS1020,CS1020E,CS2020,)(&CS2030,(|CS2040,CS2040C,))
Create and add a new module with module code "CS2103T" and the stated details to the module database.
4.6. Edit details of a module in database: editModule
Edit the details of a module specified by its index in database panel in database.
Format: editModule <INDEX> OPTION/INPUT…
Input fields:
-
Module code :
code/[MODULE_CODE]— It should contain only alphanumeric characters. -
Department :
department/[DEPARTMENT] -
Title :
title/[TITLE] -
Description :
description/[DESCRIPTION] -
Credit :
credit/[CREDIT] -
Available semesters :
available/[SEM1][SEM2][SPECIAL_TERM1][SPECIAL_TERM2]For each entry enter '1' if the module will be available. Otherwise, enter '0'.
Only the first four digits will be taken into account and if there are less than four digits the remaining input will be '0' by default. -
Prerequisites :
prereq/[PREREQ_STRING]Format for PREREQ_STRING: <&OR|>[<MODULE_CODE,>[MORE_MODULE_CODE,]][BRANCH][MORE_BRANCH]
Format for BRANCH:(<&OR|>[<MODULE_CODE,>[MORE_MODULE_CODE,]][BRANCH][MORE_BRANCH])
To represent no prerequisite, use an empty string or a string that consist of only '&' or '|'.
To represent only 1 prerequisite, use '&' or '|' followed by the module code.
Example:
-
editModule 8 code/CS2103 credit/4
Change the module code and credit of module with index "8" to "CS2103" and "4" respectively.After editing, the database panel will display the updated list as shown below. 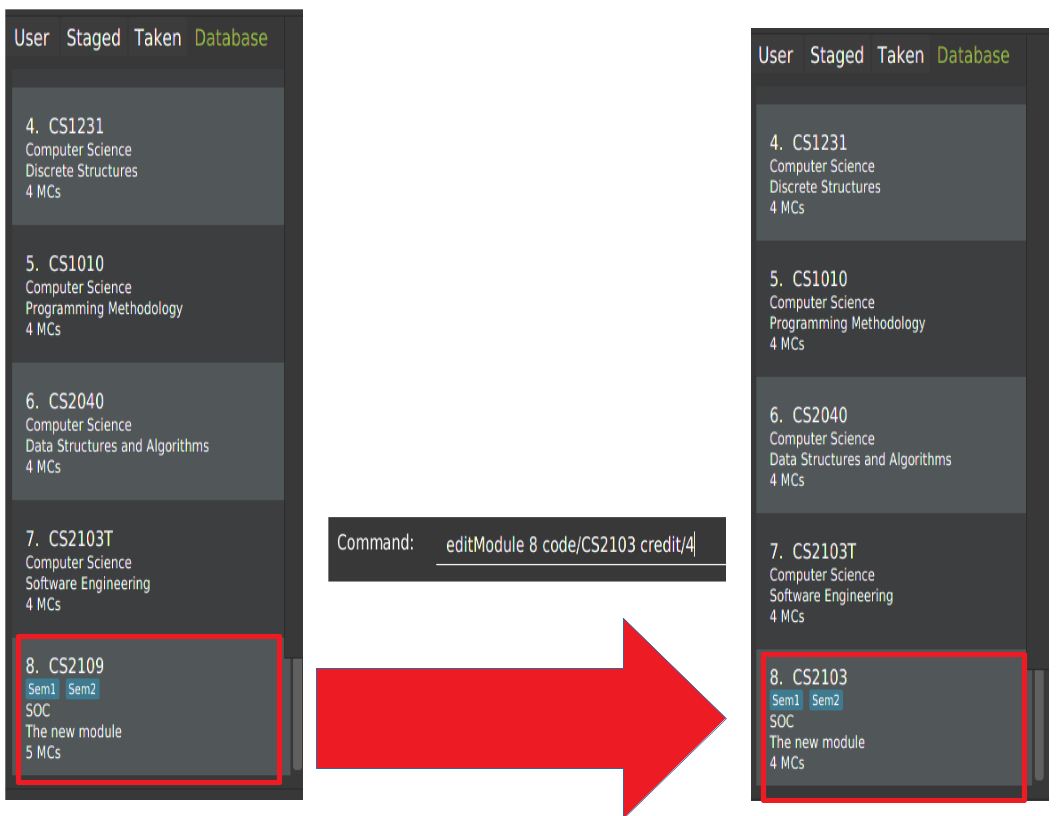
4.7. Remove a existing module from database: removeModuleDB
Removes a existing module from the module database.
Format: removeModuleDB <MODULE_CODE>
Example:
-
removeModuleDB CS2109
Removes a module with module code "CS2109" if it exists.After removing, the database panel will display the updated list as shown below. 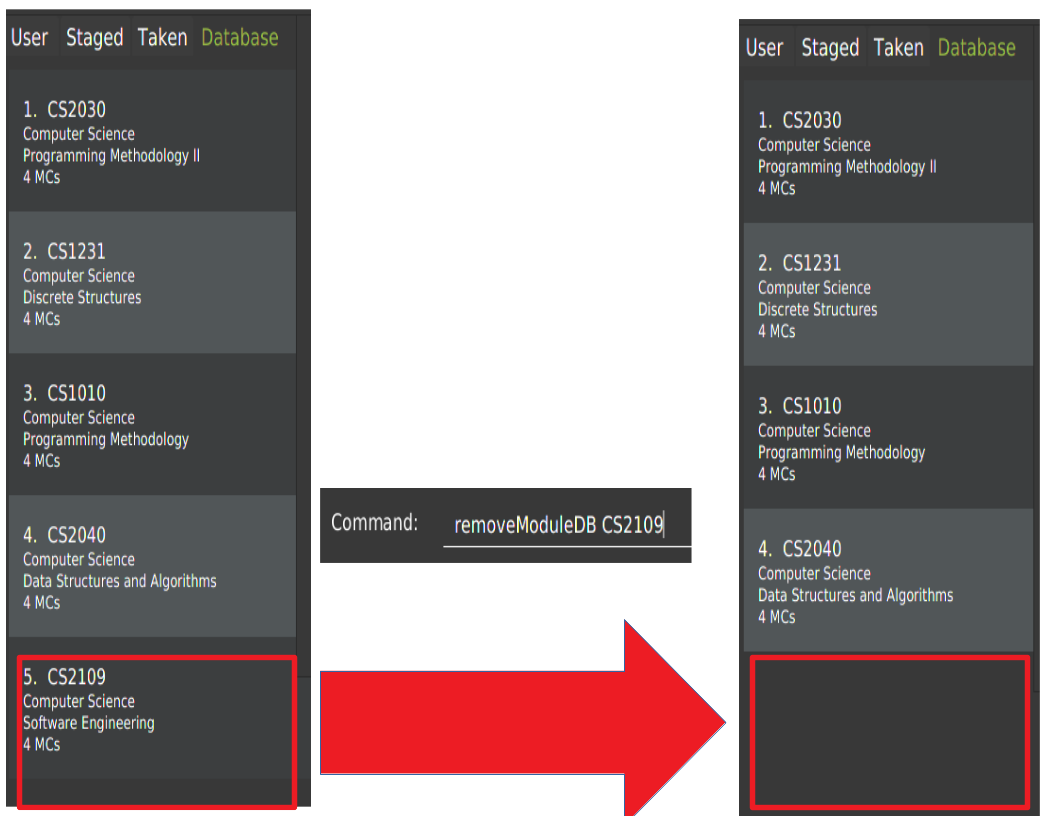
5. FAQ
Q: How do I transfer my data to another Computer?
A: Install the app in the other computer and load your previously saved user data file.
6. Command Summary
-
Help :
help -
Add to Staged:
addModuleS <MOD_CODE> [MORE_MOD_CODES] -
Add to Taken:
addModuleT <MOD_CODE> [MORE_MOD_CODES] -
Delete from Staged:
removeModuleS <MOD_CODE> [MORE_MOD_CODES] -
Delete from Taken:
removeModuleT <MOD_CODE> [MORE_MOD_CODES] -
Search :
search <MOD_CODE_PREFIX> [MORE MOD_CODE_PREFIX] -
List :
list -
Show Module :
showModule <MOD_CODE> -
Save :
save sp/[FILE_NAME] -
Generate Schedule :
generate -
Login :
login user/[USERNAME] pass/[PASSWORD] userData/[PATH_TO_DATA_FILE] -
Register :
register user/[USERNAME] pass/[PASSWORD] n/[NAME] enroll/[ENROLLMENT_DATE] maj/[MAJOR_CODE] min/[MINOR_CODE] -
Edit Student :
edit [OPTION]/[INPUT]… -
Add Admin :
addAdmin user/<USERNAME> pass/<PASSWORD> n/<NAME> sp/<SAVE_PATH> salary/<SALARY> date/<EMPLOYMENT_DATE> -
Edit Admin :
editAdmin n/[NAME] salary/[SALARY] date/[EMPLOYMENT_DATE] -
Remove User :
removeUser <USERNAME> -
Show Usernames :
showUser -
Add Module to Database :
addModuleDB code/<MODULE_CODE> department/<DEPARTMENT> title/<TITLE> credit/<CREDIT> available/<SEM1><SEM2><SPECIAL_TERM1><SPECIAL_TERM2> description/<DESCRIPTION> prereq/<PREREQ_STRING> -
Edit Module in Database :
addModuleDB code/[MODULE_CODE] department/[DEPARTMENT] title/[TITLE] credit/[CREDIT] available/[SEM1][SEM2][SPECIAL_TERM1][SPECIAL_TERM2] description/[DESCRIPTION] prereq/[PREREQ_STRING] -
Remove Module from Database :
removeModuleDB <MODULE_CODE>