1. Overview
modsUni is a desktop timetable management application targeted at
student at National University of Singapore(NUS). It aims to make the module planning process easier and
more visual. It provides all users with the ability to make class schedules within a private secure account.
modsUni incorporates a simple display, technically called Graphical User Interface(GUI),
with majority of its user interactions occurring in its in-built Command Line Interface(CLI), which is suitable for
users who prefer typing instead of clicking mouse.
2. Summary of contributions
-
Major enhancement: added User Module Management feature
-
What it does: Allows users to add and remove modules in their module lists, and search modules in the database.
-
Justification: This feature provides users basic actions to plan for their candidature and it is also one of the foundational features of modsUni.
-
-
Minor enhancement: added Module and Module List Display feature
-
Code contributed: Functional Code
-
Other contributions:
-
Project management:
-
Added Labels and assign assignees for issues.
-
-
Documentation:
-
Community:
-
3. Contributions to the User Guide
Given below are sections I contributed to the User Guide. They showcase my ability to write documentation targeting end-users. |
3.1. Adding a module to student’s staged module list: addModuleS
Adds a module to the student’s staged module list.
A staged module list is a list of modules a student is intending to take.
This command is case insensitive.
Format: addModuleS <MOD_CODE> [MORE MOD_CODE]
Examples:
-
addModuleS CS2103T -
addModuleS cS2103t
Both the above commands will have the same effect. -
addModuleS CS2103T CS2101 CS1010
Figure 1 shows an example of the usage of addModuleS command in the application
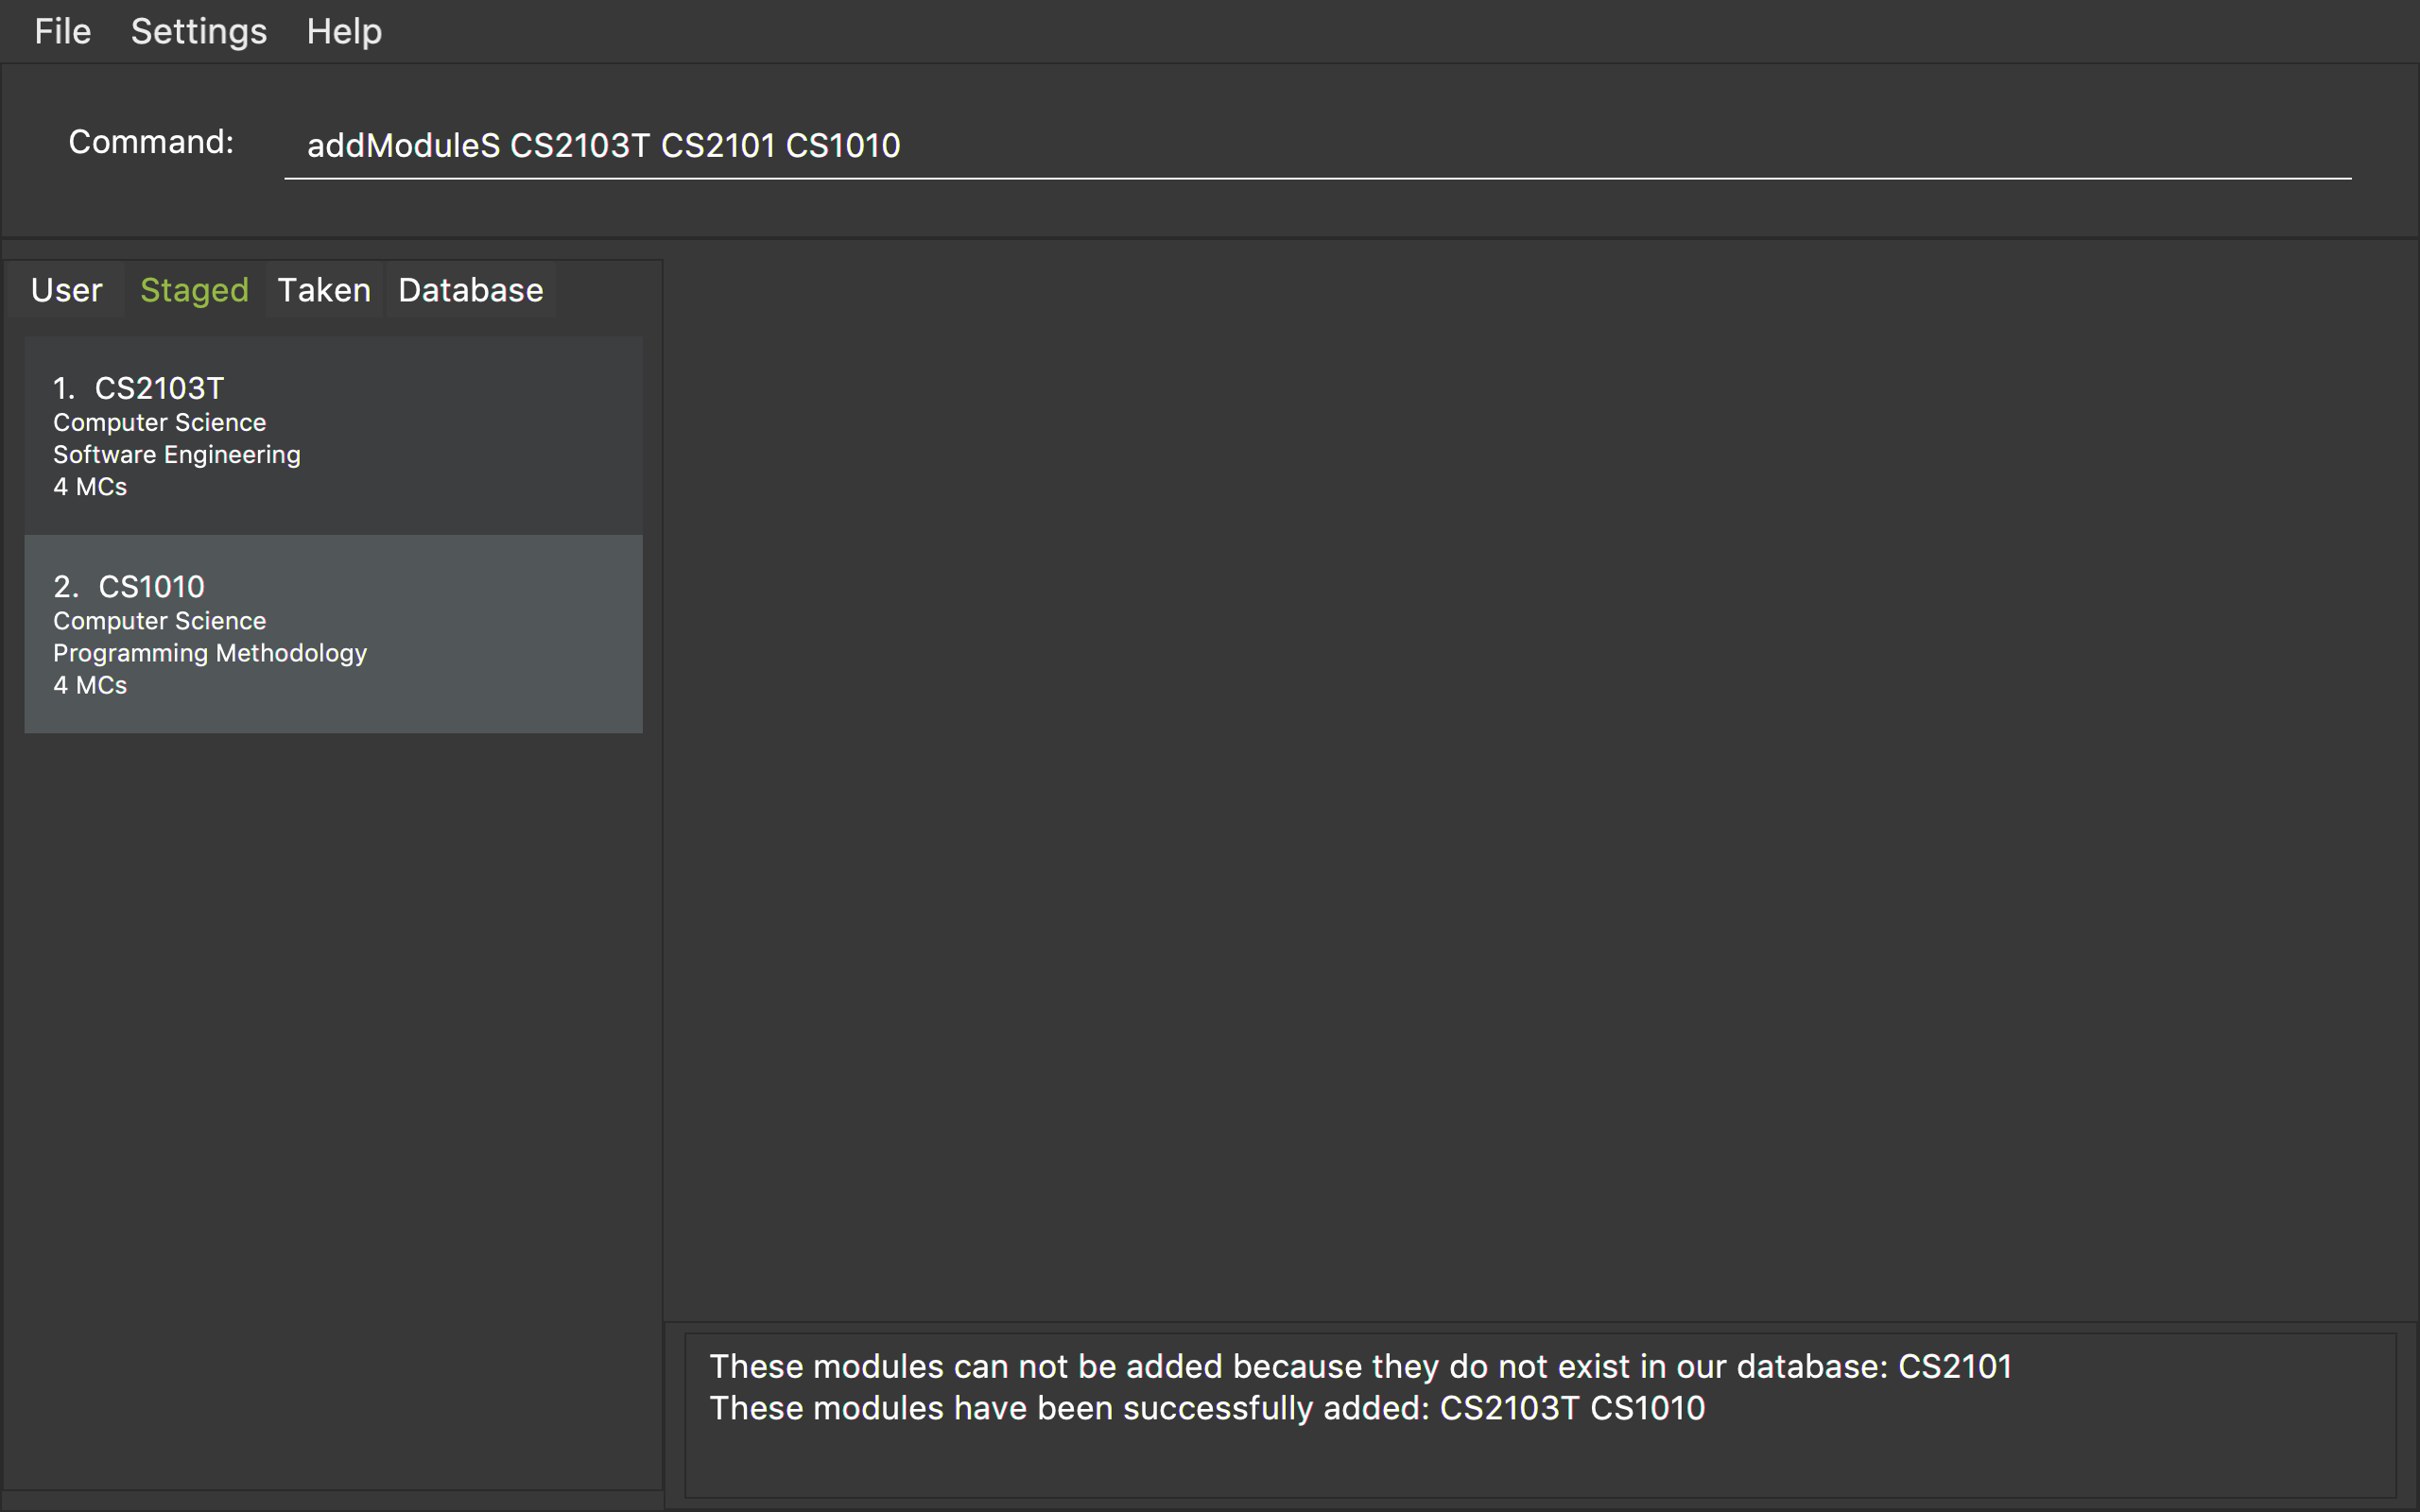
Figure 1. An example of an addModuleS command
Only a student can execute this command. Please register or login as a student
before executing.Same for addModuleT, removeModuleS and removeModuleT.
|
The module you added has not been saved. If you wish to save the module,
use command save before logout or exit.Same for addModuleT, removeModuleS and removeModuleT.
|
To add the module successfully, you must ensure the module do not exist in
neither your staged nor taken module list, and it should exist in our database module list.
You can use switch or showModule to check.Same for addModuleT.
|
|
By executing add/remove command, the application will automatically display
respective module list. Apply to addModuleS, addModuleT, removeModuleS, removeModuleT.
|
3.2. Searching for a module in the database: search
Searches for all modules in the database that match the given prefix. Searching is case insensitive.
Format: search <MOD_CODE_PREFIX> [MORE MOD_CODE_PREFIX]
Examples:
-
search CS101 ACC
Returns a list of modules that begin with "CS101" or "ACC". -
search cs101 aCc
Returns the same result as above.
Figure 1 shows an example of the usage of search command in the application
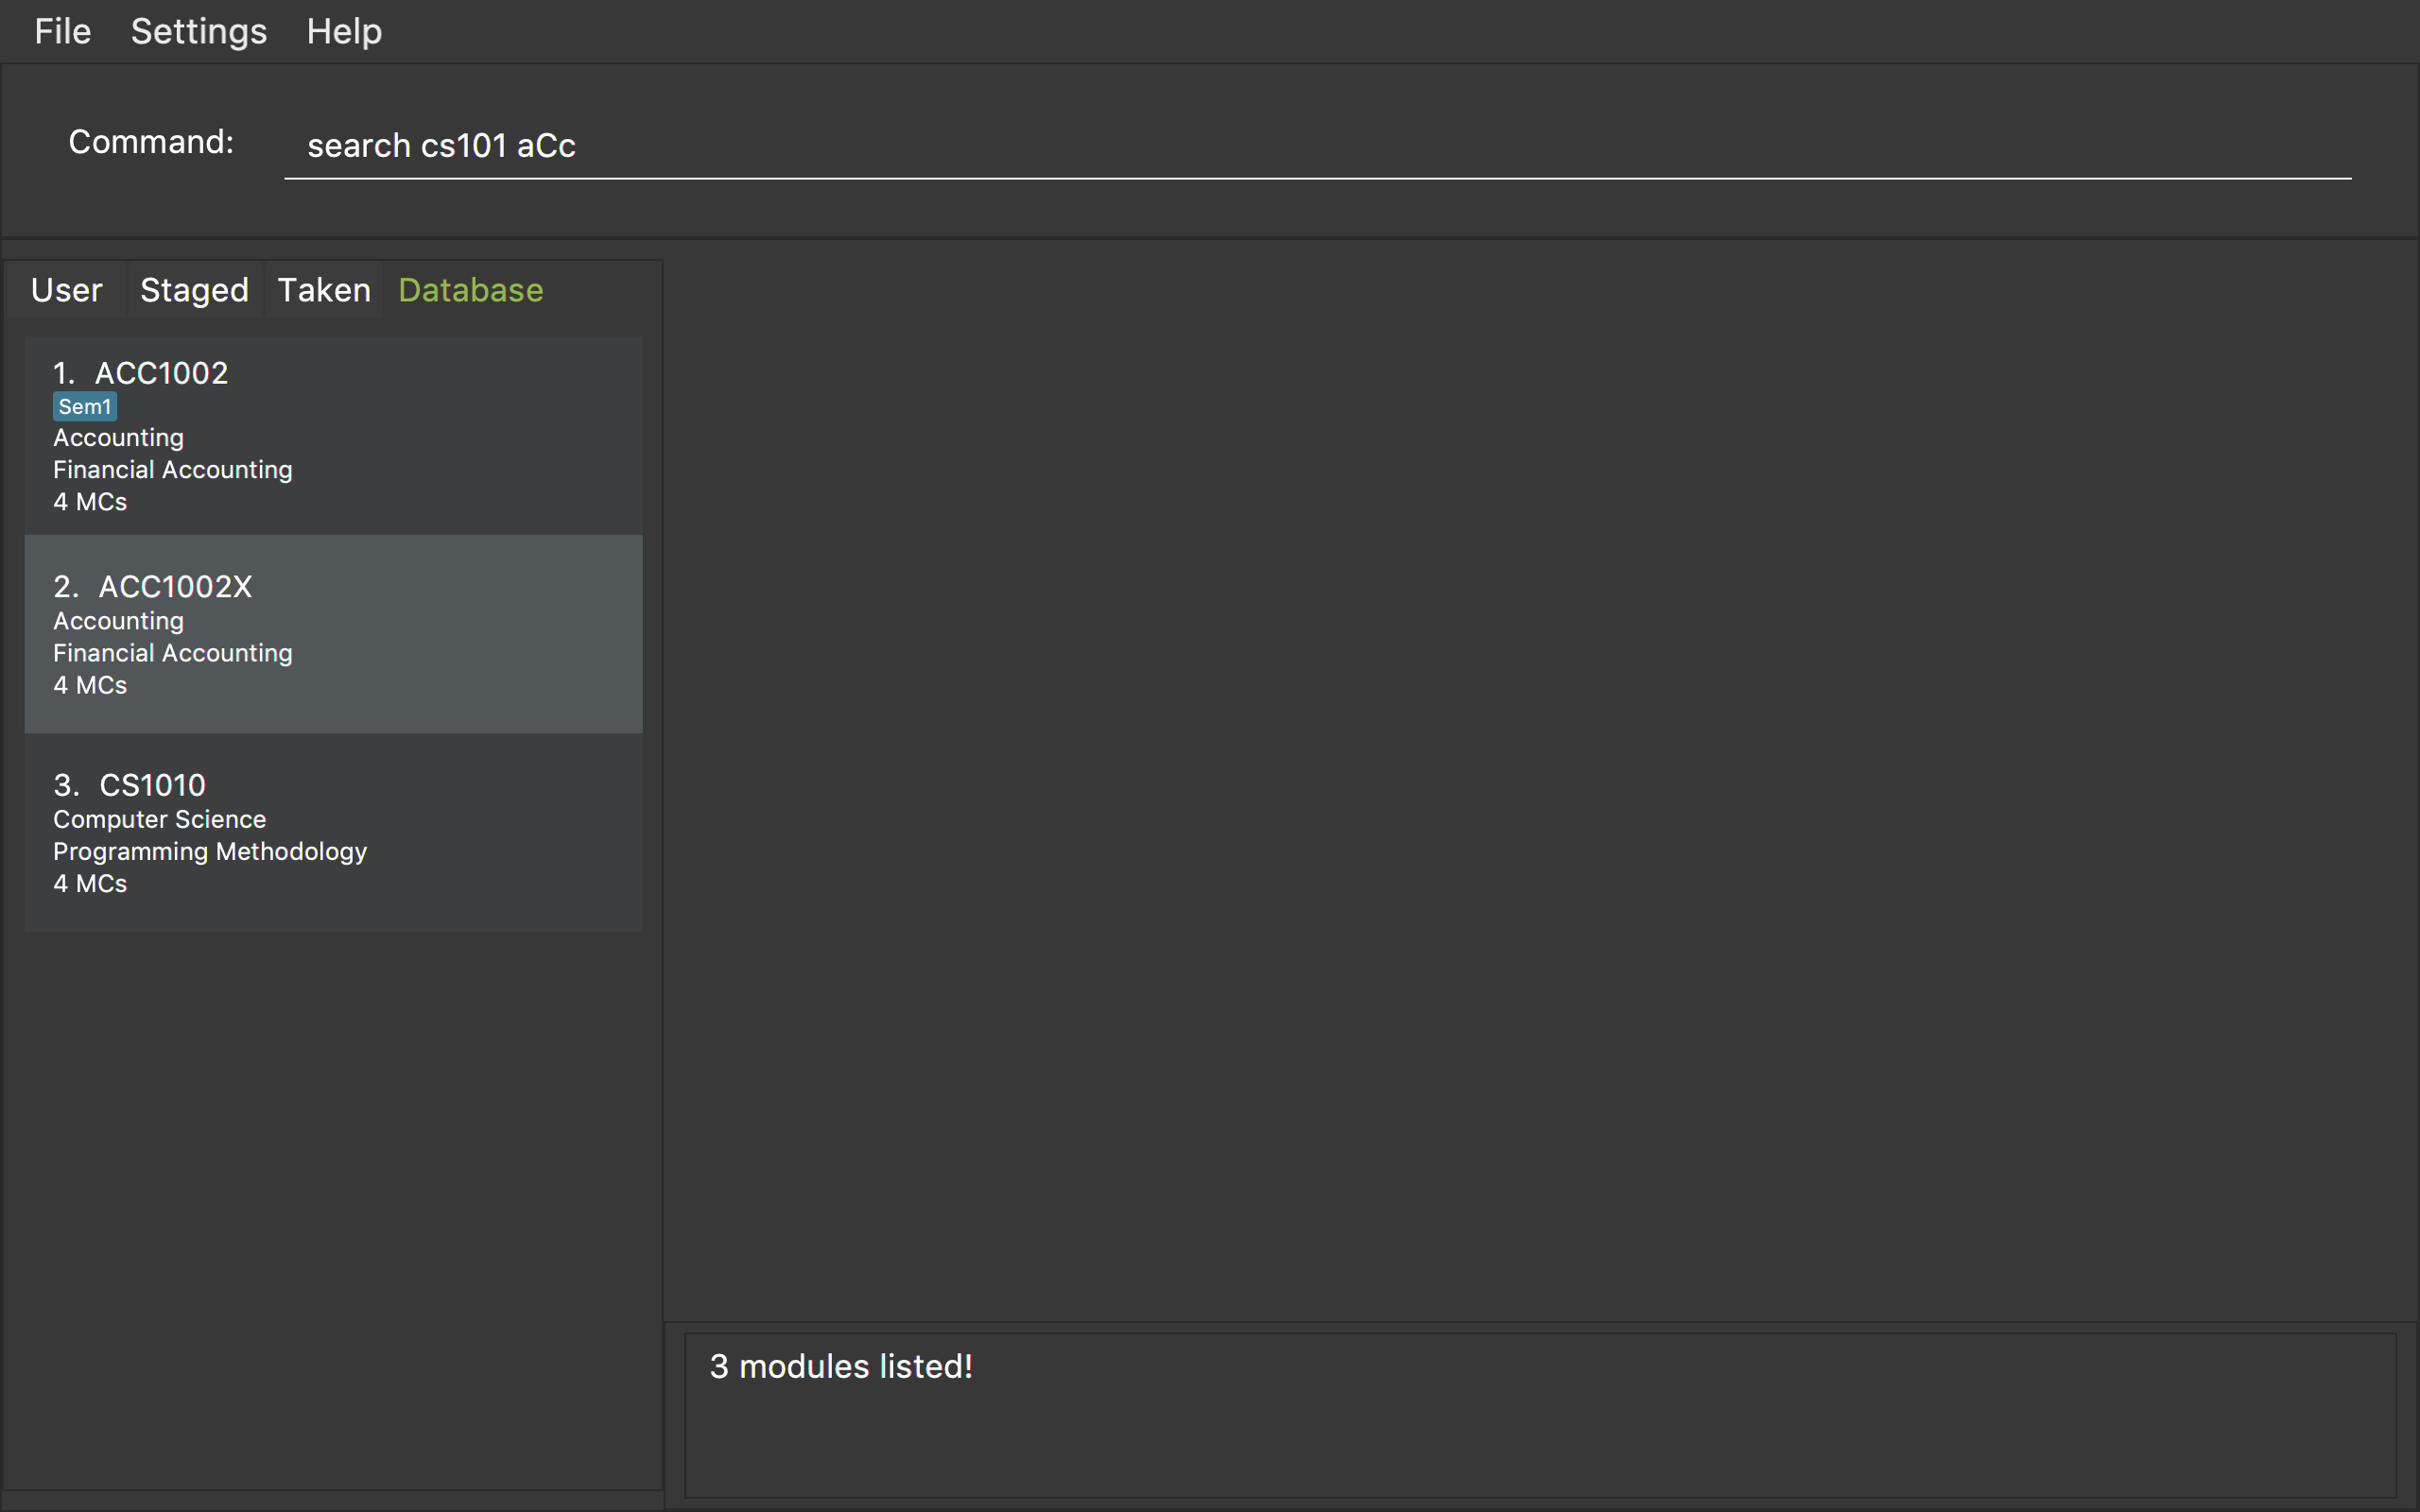
Figure 1. An example of a search command
This command does not require user to login or register before executing.Same for list and showModule.
|
|
This command does not support using a substring to search. Eg. search 1010 cannot search for "CS1010".
|
By executing database related command, the application will automatically
display the database module list. Apply to search, list and showModule.
|
3.3. Showing the detail of a module in the database: showModule
Shows the detailed information of a certain module in the database module list.
This command is case insensitive.
Format: showModule <MOD_CODE>
Example:
-
showModule CS2103T
Displays the detailed information of module CS2103T. -
showModule cs2103T
Displays the same result as the above command.
Figure 1 shows an example of the usage of showModule command in the application
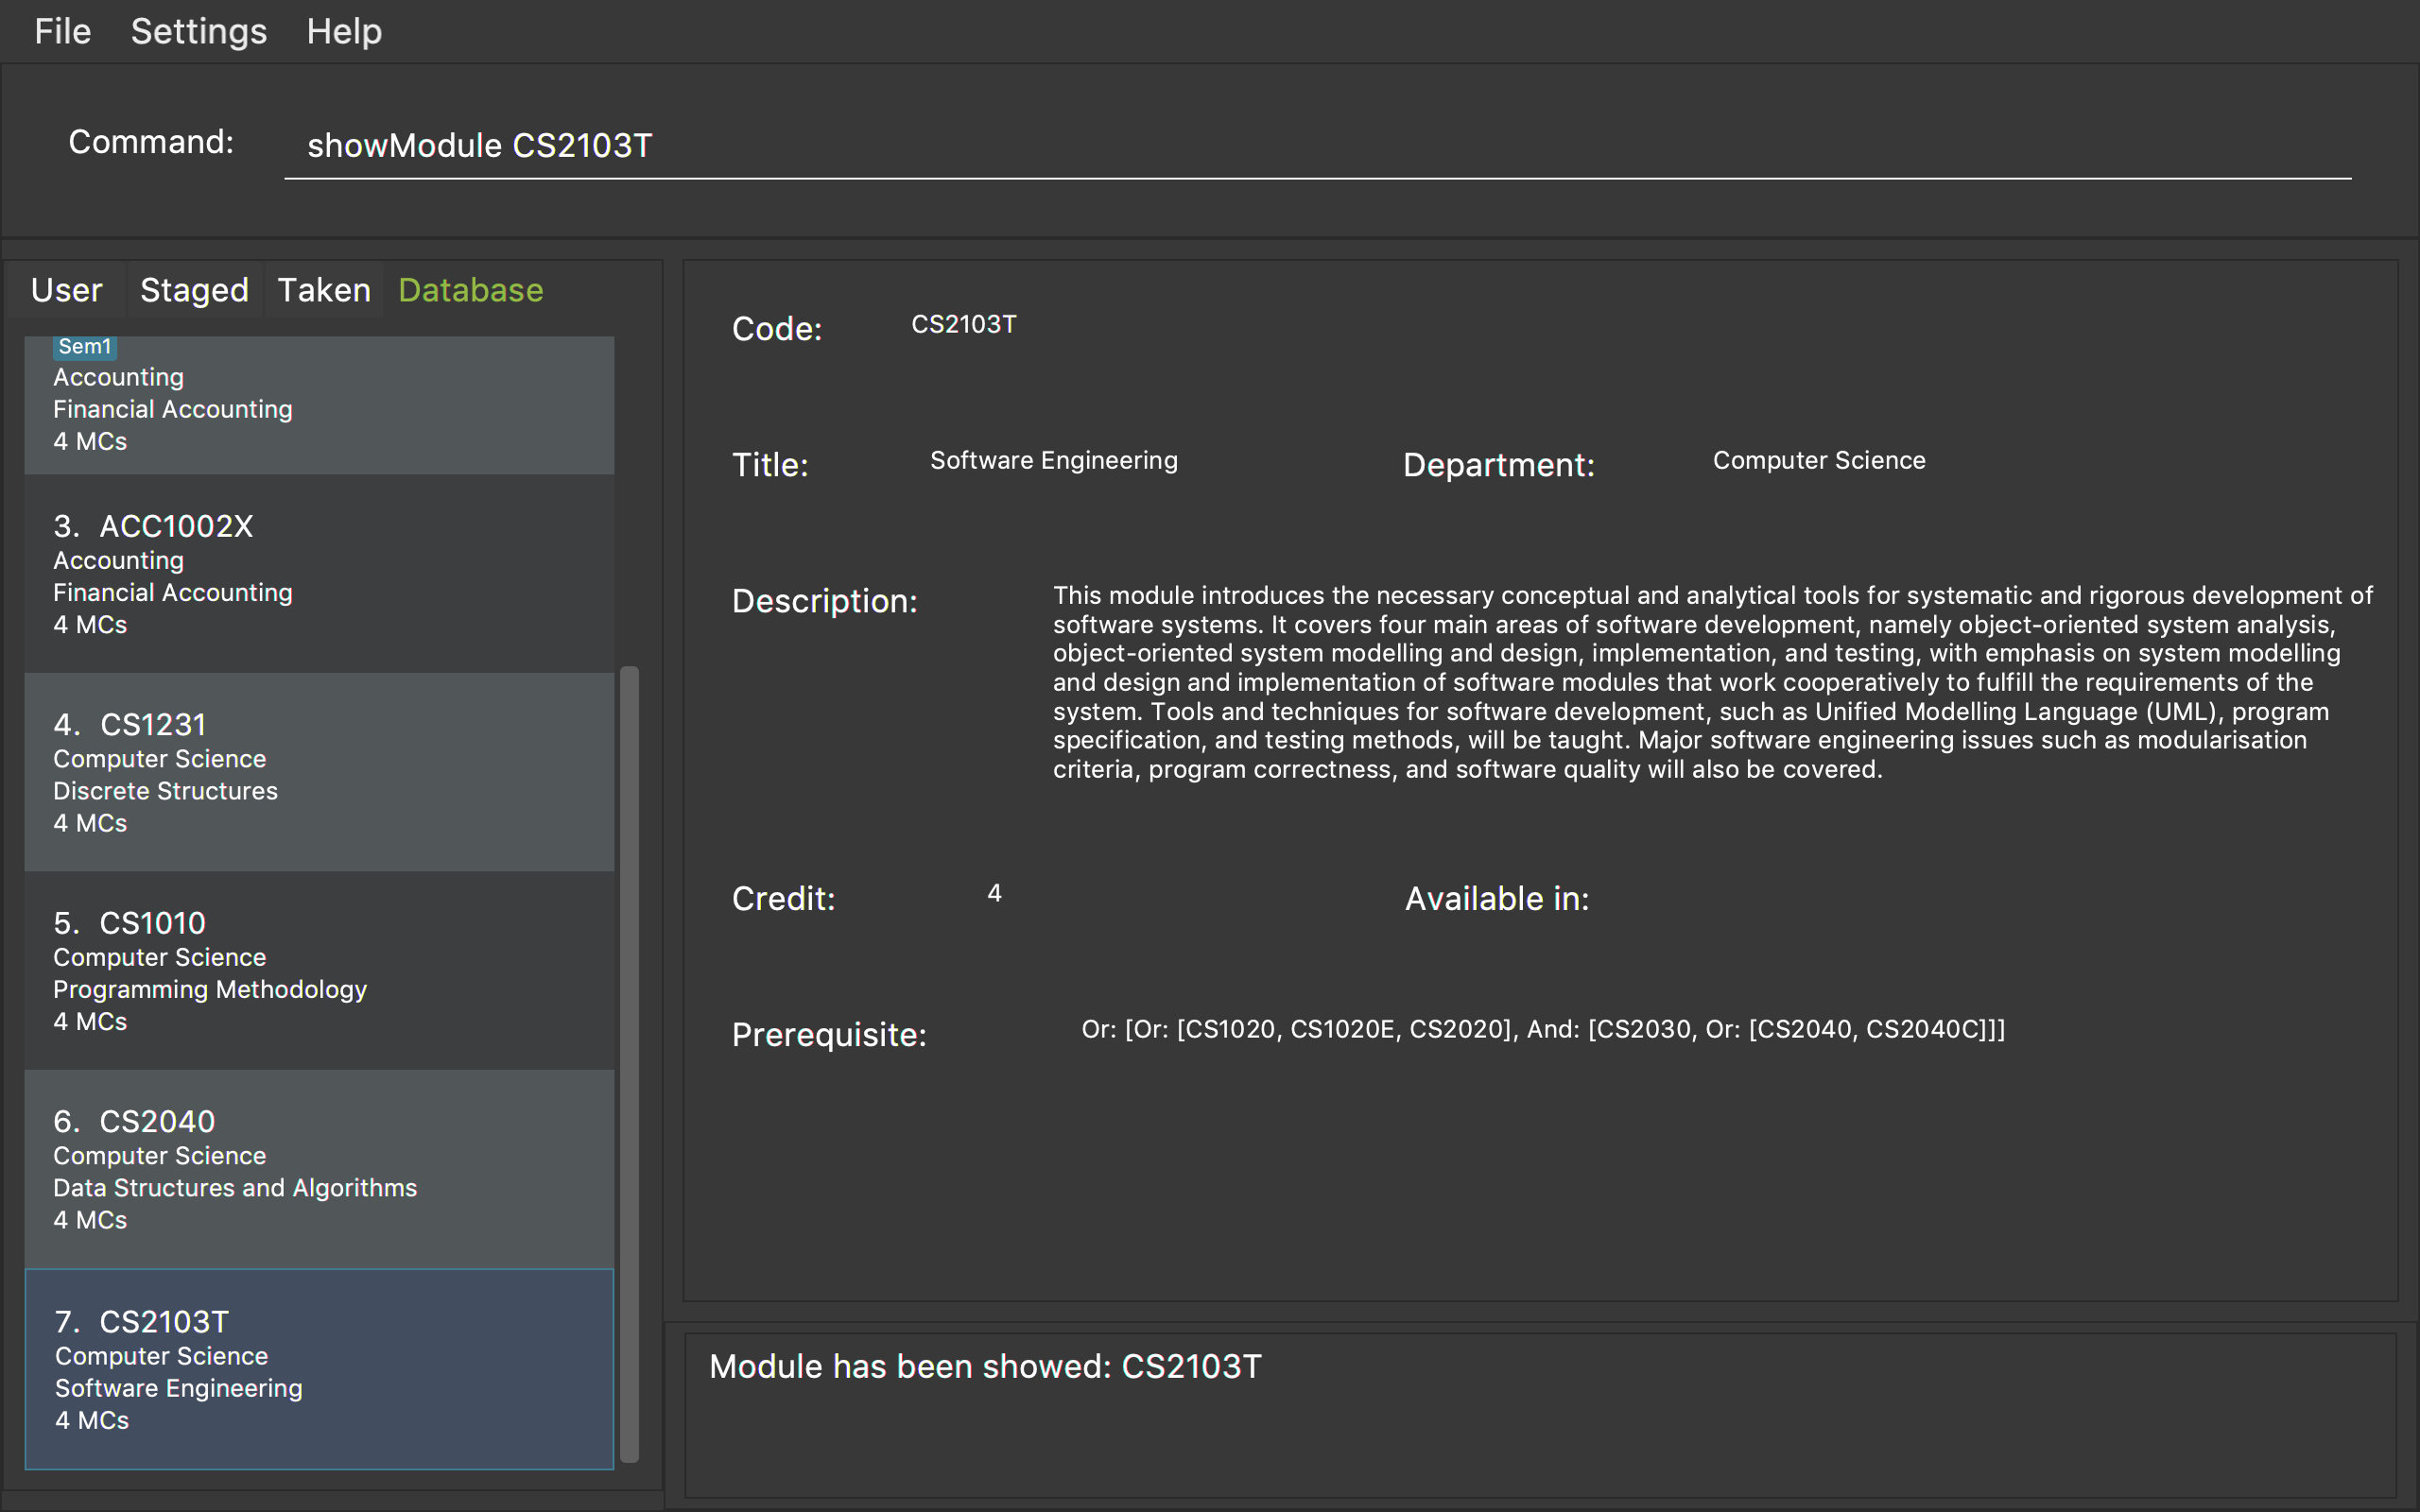
Figure 1. An example of a showModule command
Please use the full code name of the module to execute this command. If you are not sure
the module code, use search command to get the full code name first.
|
4. Contributions to the Developer Guide
Given below are sections I contributed to the Developer Guide. They showcase my ability to write technical documentation and the technical depth of my contributions to the project. |
4.1. User Module Management
User Module Management involves mainly the interaction between users and their module lists. A user is able to add and remove the module only if he is a student and the module exists in the database. A user is allowed to search a module in the database.
The section below will describe in detail the Current Implementation and the Design Considerations of the User Module Management.
4.1.1. Current Implementation
The User Module Management is facilitated by the following classes:
-
Module
It stores all the necessary data contained within a single module. Thecodeof a module is considered as a key for searching and comparing purpose. Two modules with the samecodeis considered as the same module. -
ModuleList
It stores aUniqueModuleListwhich stores modules with unique code.-
UniqueModuleListstores an internalObservableListfor UI purpose.
-
-
User
It is the actor of the command. Add and remove commands are limited to a user whoseRolesisStudent.-
Studentstores twoModuleListnamelymodulesTakenandmodulesStaged, to store the modules chosen by the student.-
modulesTakenrepresents the module student has taken before. -
modulesStagedrepresents the module student is intending to take.
-
-
Implementation of the add feature
The add feature is facilitated by the AddModuleToStudentStagedCommand and AddModuleToStudentTakenCommand class.
It allows a user to add modules to his staged/taken module list by giving their code.
|
A user is allowed to add only if: the user has logged in the user is a student the module exists in the database at this moment both staged and taken module list do not contain the module already |
AddModuleToStudentStaged/TakenCommand extends the Command class. Figure 1(shown below) depicts the UML representation of AddModuleToStudentStaged/TakenCommand.
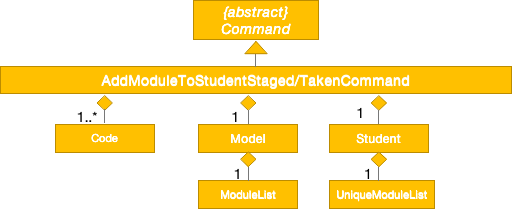
Figure 1. UML Diagram of AddModuleToStudentStaged/TakenCommand.
Parsing of command is performed by AddModuleToStudentStaged/TakenCommandParser,
which returns a AddModuleToStudentStaged/TakenCommand object after parsing input.
The Sequence Diagram shown below in Figure 2 illustrates the interactions between the Logic & Model components when AddModuleToStudentStaged/TakenCommand is being executed.
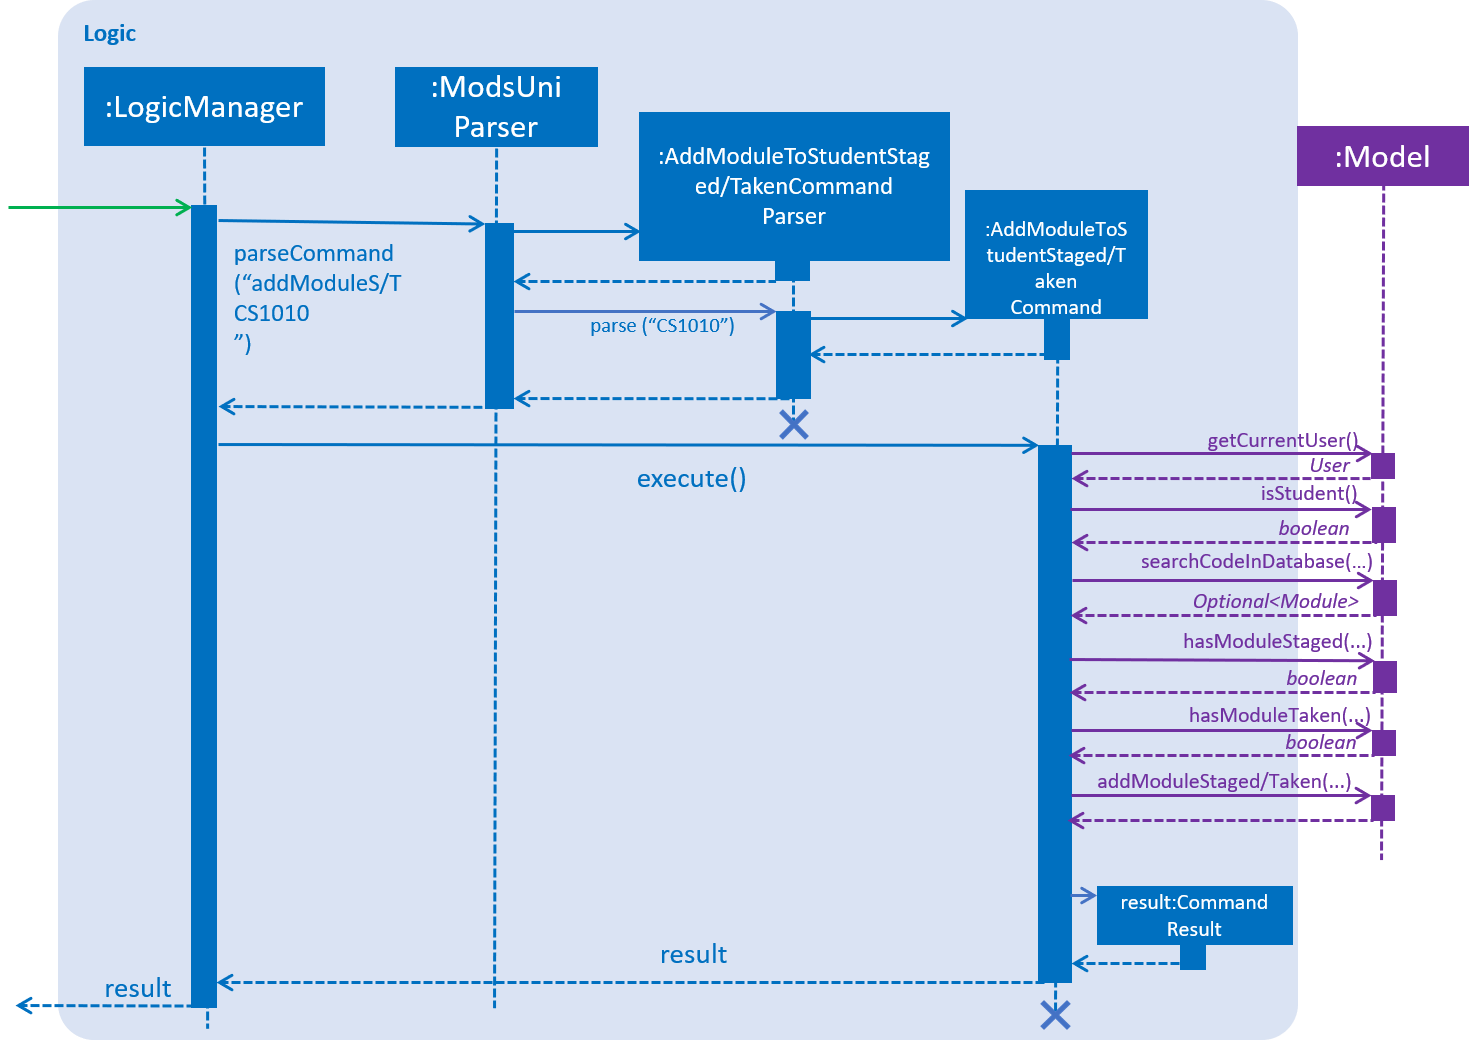
Figure 2. Sequence Diagram for the interaction between Logic and Model Components when executing AddModuleToStudentStaged/TakenCommand.
Figure 3 below shows the high-level sequence diagram of the command execution.
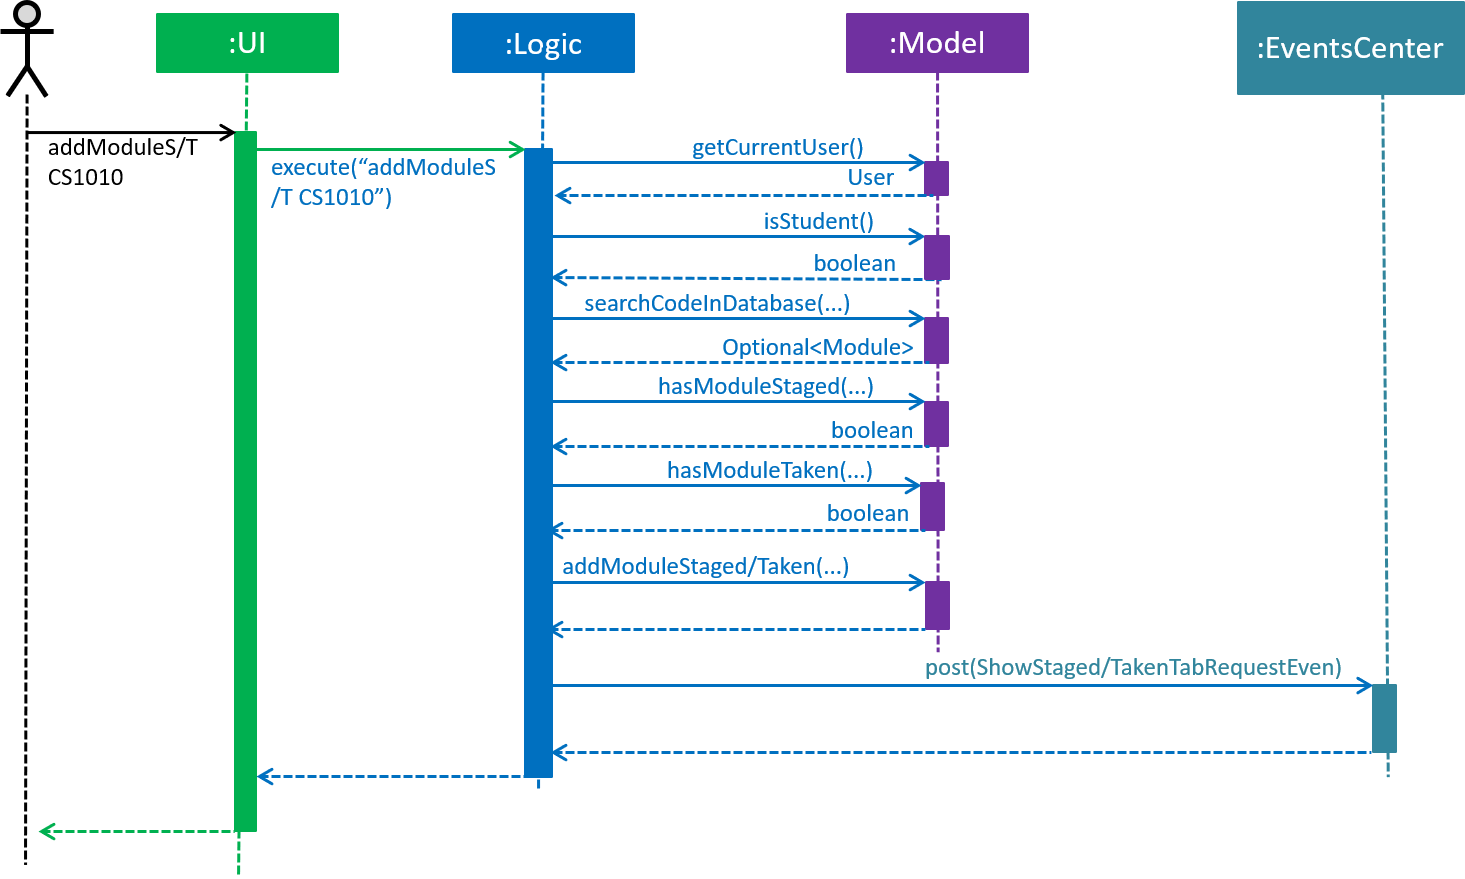
Figure 3. High-Level Sequence Diagram of adding a new module to the student’s staged/taken module list.
Given below is an example usage scenario and how the adding mechanism behaves at each step:
Step 1. The user launches the application.
If it is the first time the user uses the application, after login as a student,
a Student model will be created, then modulesTaken and modulesStaged will be initialized as an empty ModuleList.
If the user has logged in before, after login as a student, modulesTaken and modulesStaged will be recovered to the last saved version.
Step 2. After the user enters the command, AddModuleToStudentStaged/TakenCommandParser will create a AddModuleToStudentStaged/TakenCommand,
which contains two parameters.
The first parameter is an ArrayList of Code to be searched.
The second is a String contains the duplicate code entered by user.
Step 3. When the command is executed, AddModuleToStudentStaged/TakenCommand will call Model#getCurrentUser() and Model#isStudent() to check whether the user is a Student.
Model#searchCodeInDatabase(…) to check whether the module exists in the database and update toAdd to the searched module,
Model#hasModuleStaged(…) and Model#hasModuleTaken(…) to check whether the module has already existed in the student’s staged or taken module list,
Model#addModuleStaged/Taken(…) to finally add the module to the student’s staged/taken module list.
Step 4. After the module is added, the command will post a ShowStaged/TakenTabRequestEvent to show the user updated staged/taken module list.
A CommandResult containing the log of execution result will be returned.
Implementation of the remove feature
The remove feature is facilitated by the RemoveModuleFromStudentStagedCommand and RemoveModuleFromStudentTakenCommand class.
It allows a user to remove modules from his staged/taken module list by giving their code.
|
A user is allowed to remove only if: the user has logged in the user is a student the module exists in the database at this moment his staged/taken module list contains the module need to be removed |
The implementation of remove feature is similar to add feature. They have generally the same mechanism, except remove
command only use Model#hasModuleStaged/Taken(…) to ensure the respective module list contains the module, while add
command use both methods to ensure the ensure does not exist in neither module list. See Step 3 of the adding mechanism for reference.
4.1.2. Design Considerations
Aspect: How to search database using Code
-
Alternative 1 (current choice): Use
Codeas a key to searchmoduleListone by one.-
Pros: Easy to implement. Do not need to refactor
moduleListto support this feature. -
Cons: Efficiency of searching is low. The time complexity is
O(N).
-
-
Alternative 2: Refactor
moduleListto be aHashMapfor searching.-
Pros: Efficiency of searching will increase. The time complexity is
O(1). -
Cons: May not be cost-efficient to refactor
moduleListonly to support this feature.
-